 |
1/16th Tamiya WWII German Luftwaffe Ace Pilot
Photos
by Steve Bamford
--------------------
|
This is Tamiya's second 1/16th scale figure and after doing the first one, the German tanker, I was anxious to see what they would choose for their next outing into the large scale figure market. I didn't have to wait long!
Box art
The information on the box is fairly accurate and if that's all the research that you did you would have a fair representation. However, I will let you in on some small differences that will give your figure that little extra that is missing from the artist's rendition on the front and the modeller's on the back, information I only know because I had the real pieces to look at while I was painting and I didn't find in any of the books I have on the subject! I will cover these in the painting segment of this article.
 |
The Model
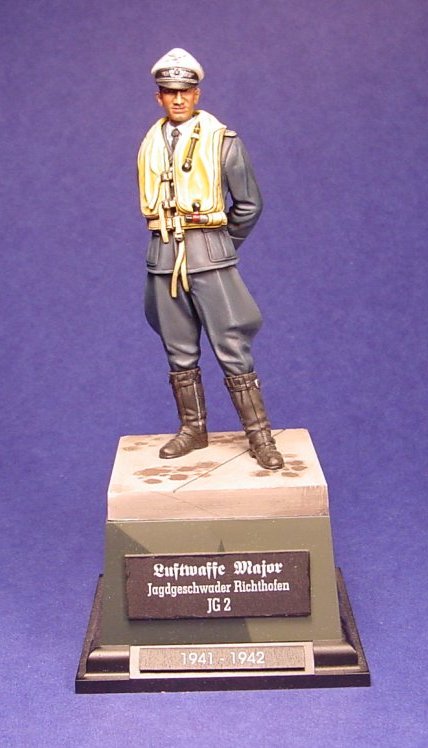
The figure depicts a German pilot from early to mid war range in time, perfect for Battle of Britain. You have the choice of either doing a generic pilot with an officers peaked cap on looking to the left, or Adolf Galland without hat, looking to the right. He is wearing a shirt and tie under his four pocket jacket with breaches tucked into his flight boots. Over his uniform he is wearing an inflatable life jacket, these came into use in the latter half of 1940 and were mandatory when flying over the English Channel. He also has leather gloves on his hands which are folded behind his back and there is an optional Knights Cross with Oak Leaves and Swords to be hung at his neck, or not.
Construction
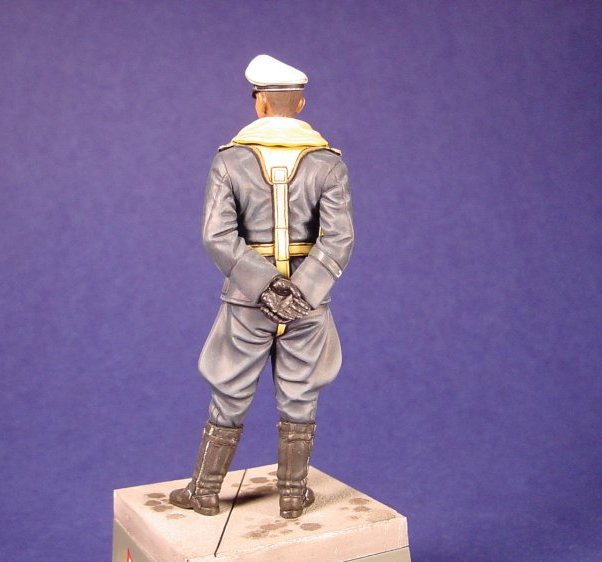
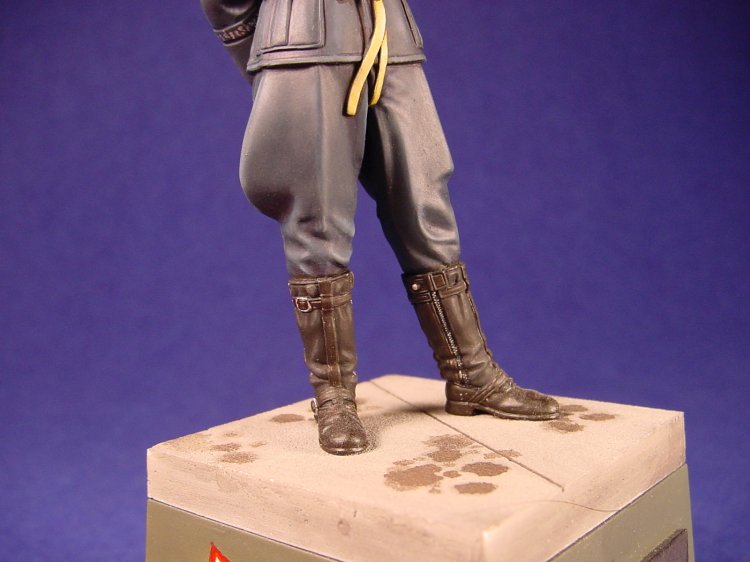
As has become usual with these injection molded large figures, the styrene is medium Gray and the main body is molded in two halves, front and back, and once again the fit on this one is almost perfect, with only a little filler being needed. The boots were the next thing to go on and they are molded in two pieces with the inside of the boot legs being separated at the strap lines, the result of this split being at the straps is that once glued in place there was no need for filler, and it gives the boots very nice detail. The fit of the boots wasn't as straight forward as their last figure and a little fiddling was required to get both feet firmly on the ground which required a swipe of filler being used on both sides at the boot/leg joint, still, not as bad as Dragon figure. At this point I decided that the epaulettes needed to be cut off and new ones made, but from what? This was an officer with shoulder boards and braiding, I had never tried this before. Time for some brainstorming with a fellow modeller and we came up with the idea of embossing the braid design into tin-foil and adding that to a lead foil shoulder board. First you need tin-foil, a pencil that's not too sharp, an old mouse pad, white glue and a new #11 blade. To start turn the mouse pad over to the soft spongy side and place the tin foil onto it, I found the dull side up was much easier to see. Next decide what size limitations you have and gently use your pencil to draw the pattern into the foil, in this case small forward and backward C's that interlock. When I had two that looked perfect (out of about six) I filled them with white glue to give them some rigidity so they wouldn't collapse when I cut them out, and put them aside to dry (about 12 hrs.) I then made the base for the two braids to sit on out of lead foil and glued them in place on the shoulders. Once the braids were dry, cut out and glued in place they looked far better than the ones that we started out with.
The life jacket was next and I glued the two parts, front and part that goes around the neck, together and filled the seam and mounted it onto an old paintbrush handle for painting separately. The breather tube and the C02 bottle were cleaned up while still on the sprue and left there until painted.
The arms and hands were cleaned up and also glued to paintbrush handles. I figured this would be easier to paint the cuff title and the inside of the arms than trying to do it after.
I love this idea of having the officers cap in two pieces as it makes it so much easier to paint it first and then put it together, so I cleaned these pieces up and attached them to paintbrush handles.
I then turned my attention to the heads and these are very nice heads indeed. Maybe not as nice as some of the after market ones that are out there but for the price I'm not about to complain! I chose to do the generic pilot with the cap on so I cleaned this one up, being very careful around the ears and at the jaw line and mounted this onto a paintbrush handle. All these handles are stuck into a piece of florists green foam.
 |
Painting
To start with I sprayed Tamiya Medium Blue XF-18 onto the body and arms, Desert Yellow XF-59 onto the life jacket and head, Flat Black XF-1 onto the lower half of the cap and, thanks to Gord Enquist, Ral Partha White Primer onto the upper half of the cap. Then, with a brush, I did the moulded on straps of the life jacket in Desert Yellow, the upper parts of the boots were done in Flat Black with the lower parts and straps done in Flat Brown XF-10. These colours are just an under coat. I have been having problems with the over coat of oils taking this off. To combat this I now spray Model Master Clear Flat Finish FS 30000 over the Tamiya paints and the oils don't seem to have any effect on this (I just hope they don't decide to change their formula!) The oils I use are Winsor & Newton unless otherwise stated.
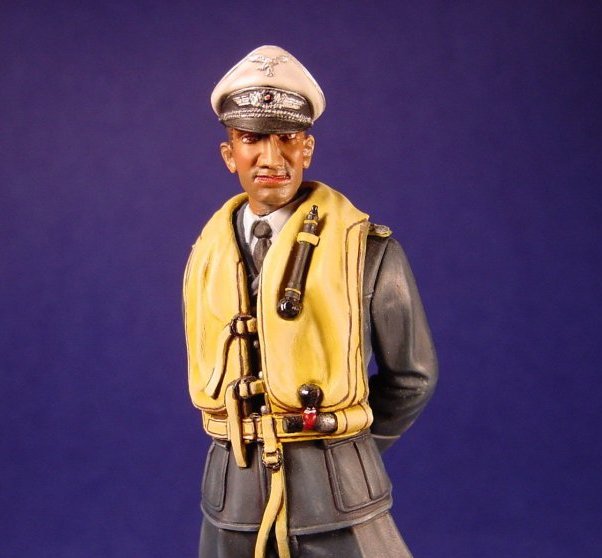 |
Face
As this was to portray someone in the middle of summer I wanted a tanned face so I used a little Burnt Umber into my usual flesh mix of, (Holbein) Burnt Sienna, (Stevenson) Naples Yellow Deep, (Golden Palette) Flesh and a little bit of Alizarin Crimson. This was highlighted with more Naples Yellow and shaded with more Burnt Sienna. While still wet I added a little of the Crimson to his cheeks and lips and blended this in and then some Paynes Gray was added in the 5 o'clock shadow area and blended with the same brush that was used for the rest of the face. The hair was painted with a thick mix of Burnt Umber to give it more texture and highlighted with Yellow Ochre.
 |
Uniform
To paint the shirt I mixed Titanium White with some Paynes Gray and highlighted this with more of the White. the tie was painted Ivory Black and highlighted with White. For the jacket and breeches I used a mix of Paynes Gray, Ivory Black, Phthalo Blue, a small amount of Burnt Umber and Titanium White. This was highlighted with more of the White and shaded with Black. The band around his right arm was painted Field Blue XF-50 with a representation of the writing for Jagdgeschwader Richthofen picked out with Chrome Silver XF-11 The buttons, the wings on his chest and very tips of the collar patches were painted with Chrome Silver again but it turns out the only thing visible when you glue the life jacket on is the buttons. The gloves were painted Ivory Black and highlighted with white.
 |
Boots
I was lucky enough to have a pair of these in my hands when I was doing this figure and the ones Tamiya has reproduced here are right on the money! To start the painting of these I painted the shaft with Ivory Black with all of the sheen taken out of it (by placing on a piece of cardboard to absorb the oil out of it) this was then highlighted with Flesh. The foot of the boot and the straps were painted with a mix of Ivory Black and Burnt Umber that was placed on plastic so it kept it's sheen and then most of it taken off with a clean brush to show the Brown under coat showing through. The buckles, zipper and snaps were picked out with Chrome Silver again.
Officers Cap
This is another piece that I was fortunate enough to have in my possession while painting this piece and again Tamiya has done a wonderful job of reproducing it and I would like to say again that having this in two pieces is a real help when painting especially the piping around the top of the cap band. The top of the hat was painted with a mix of Titanium White, Yellow Ochre and a little Burnt Umber and then most of this was wiped off to show the white under coat, it was then highlighted with more of the White a couple of times as these hats were very white. When this was dry the eagle was painted Flat Black and the piping and eagle were painted with Chrome Silver. The bottom was painted as follows, the cap band was painted with Ivory Black that had the sheen taken out of it and the peak was painted with the same colour with the sheen still in. When this was dry Chrome Silver was used to pick out the cap cords, buttons and oak leaves. The cockade was painted with a dot of White inside the Black and, lastly a dot of Red in the middle. To finish the cap off the underside of the peak was painted Dark Green XF-61 as it was on the real piece. This is hard to see on the cap once it is on his head but I know it's there!
Life Jacket
Again this is another of the items that were on loan to me while painting this figure and a great help it was. I painted this with a mix of Yellow Ochre and Cadmium Lemon to a dark yellow and then wiped most of it off and highlighted it with Naples Yellow Deep and shaded it with Burnt Umber. From the real item I was able to see a darker yellowish brown colour running down both sides, across the bottom and up the inside to just above the top buckle and also on the U shaped part of the back straps edges were the same colour. This is something that I had not seen in any pictures or artist renderings or read in any descriptions but there it was. For this I used Khaki XF-49. Also in artist renderings, the D ring buckles are always silver, not so on the example in front of me, they were quite rusty from sitting in a boat house for many years but there was still a lot of gloss black paint on them. For this I used Semi Gloss Black X-18. This same colour was used to paint both ends of the breathing tube as these are a hard plastic, the tube itself was rubber so I painted it Flat Black and at the ends of the tube were pieces of ochre string wrapped around as a clamp, these I painted Desert Yellow and the strap that holds it in place was painted the same as the rest of the jacket. The CO2 cylinder was painted with Flat Black and dry brushed with Metallic Gray XF-56 ( don't forget the end of the cylinder which is molded onto the jacket.) The valve for the bottle was painted Semi Gloss Black and the center of the end had a dot of Chrome Silver as the real one has an aluminum disc which I think had instructions on it. The end that is attached to the jacket was the same as the breathing tube end so I painted it Semi Gloss Black. The part of the cylinder that is between the cylinder and the valve, on the example I had in front of me was a semi gloss red, this again is something I had never seen or read about, so I painted it Flat Red XF-7 and then put a coat of Alizarin Crimson over it. At the top of this piece was a connecting nut, this was painted Metallic Gray. When all this was dry I cut these pieces off the sprue and touched up the connection points with the proper colours and attached them in their place and when this was done the whole jacket was glued in place, then the arms, the head and the cap followed, a few paint touch ups and the figure was finished
 |
Base
This, as usual, came from the Dragon 1/16th scale figure line and this time I asked our Wil Hendriks to paint it for me in Battle of Britain German camo colours for me, as he already has these colours and I don't he agreed and a wonderful job he did of it! Gord Enquist then came to my rescue (once again) and printed out the JG2 emblem on his computer in the size to fit the side of my base and I cut it out and sprayed the white shield on both sides. I then mixed some (Stevenson) Azo Red Deep with some Alizarin Crimson and hand painted the R's and the border and when this was dry some more Flat Finish was sprayed over this. Semi Gloss Black was then sprayed on the bottom of the base and I started to work on the top. Gord had given me some plaster slabs that he had poured on a piece of wet and dry sand paper for texture and it looked perfect for concrete in 1/16th scale. I cut a square the same size as the top of the base, etched an expansion line through it and stained it with a product called Weather All which is actually to give wood an aged appearance but it also gives a concrete look to plaster. I then mixed Ivory Black and Burnt Umber with lots of turpentine and started adding oil spots, after this application was dry the top of the base was glued to the bottom of the base, the figure was pinned and glued to the top and name signs were glued to the front (thanks to Gord ) and he will be on his way to Calgary with us on the 8th of this month and we will know the outcome of that at the April meeting!
Conclusion
I liked this figure a lot and really enjoyed doing it. I thought the subject matter is something that hasn't been covered very much by others and as with the first one, I loved the pose. It doesn't have the conversion potential that their first one has with the only thing I could see being you could model it with out the life jacket on. This would be a lot of work as you would have to remove all the molded on straps and rework the back of the jacket to lay flat but all the detail is already there for the front of the uniform and seems a shame to cover it with the life jacket. The price went up on this one , from just over $11 for the first one to just over $14 for this one which isn't big and I was expecting it to go up higher. This is once again a very fine figure from Tamiya and I'll say it once more " I can hardly wait to see what they do next!"
Grant
Editors note: Grant McIntosh does figure painting on commission and can be reached by e-mail by clicking his name at the top of this page.
Photos and text © 2000 by Grant McIntosh