 |
1/48 Eduard Pfalz DIII
--------------------
|
Eduard’s Pfalz DIII in 1/48 Scale
The Pfalz DIII, production of which began in mid 1917, was a beautifully proportioned, elegant aeroplane. The Pfalz DIII had a surprisingly robust construction for such a fine looking machine, due mostly to the method of construction of the fuselage, which consisted of a light sub-structure with a minimum number of ribs and stringers. Fuselage halves were built up using two layers of thin veneer strips over a master pattern. The fuselage halves were brought together over the sub-structure and then covered with fabric and doped. This resulted in an exceptionally strong semi-monocoque structure that was able to withstand a lot of combat damage. The weight penalty from this form of construction resulted in a degradation of performance, especially in climb rate and turning ability. It was very fast in a dive, however. Although overshadowed by the more numerous Albatros fighters, the Pfalz DIII and later the DIIIa were produced in numerous quantities and saw service with many frontline Luftsreitkrafte units, including the infamous Jagdgeschwader 1 "Richthofen"; the Flying Circus. The aircraft was powered by an inline six cylinder water cooled Mercedes 160 horsepower DIII engine. A unique feature of the Pfalz DIII was that the twin Spandaus were housed within the fuselage behind the engine under a fairing, similar to that of the Sopwith Camel. With service experience this was found to be somewhat awkward and the later DIIIa had the Spandaus mounted out in the open behind the engine. Another unique feature of the aircraft was the factory finish. Virtually all Pfalz DIIIs left the factory doped overall in "silbergrau", a flat silver grey. The chemical company Bayer Gmbh. added finely ground aluminium powder to a pale grey paint that was available in quantity in early 1917. When applied, the mixture provided an exceptionally durable, waterproof finish. A side benefit was a resulting "sky camouflage" effect.
Eduard released the Pfalz DIII kit back in 1997. The kit comprises 41 injection moulded parts in light grey plastic with no flash and very small sprue gates, 35 photoetched on one brass fret, and a film of instrument dials. The moulding of the plastic parts is beautifully done, capturing the compound curves of the fuselage nicely and even reproducing the gull wing effect of the lower wing to fuselage area. Wing rib detail is good. The panel lines denoting the control surfaces are lightly done and will require scoring or better yet removal of the control surfaces and later remounting with some deflection for a more candid appearance. Unlike their Albatros, Eduard have chosen this time to mould the upper wing radiator detail as part of the wing instead of using photoetch. The resulting detail is quite good. Eduard once again (as in their Albatros) neglected to provide the radiator to engine plumbing, even though the locating holes are present on the wing! These can easily be added using sprue, however, so this is not a major concern. The instruction sheet is in a fold out format with exploded diagrams in five stages, similar to what the Japanese kit manufacturers do. While the plastic parts are numbered on a diagram of the sprues in the instructions, the parts are not numbered on the sprues themselves, so some care must be taken to identify the parts during assembly. Paint colours are called up during assembly and refer to Tamiya, Humbrol, Revell, Testors MM, and Aeromaster paints. An adequate rigging diagram is provided. Decals by Propagteam are provided for markings for three aircraft, all in silbergrau finish with variously coloured nose and tail areas. One of the schemes is for the aircraft flown by ace Werner Voss while he was commander of Jasta 10 in 1917.
The model scales out perfectly when compared to S. J. Simken's drawings in Windsock Datafile No.7: Pfalz DIII.
Construction began with the cockpit. It turns out that most of the small plastic and brass detail parts go into the cockpit, making for a busy looking little “front office”. The instructions are clear as to positioning and alignment of parts. The interior was painted Tamiya Desert Yellow acrylic to simulate wood. The raised formers and stringers were dry-brushed with a lighter shade to pick out the detail.
The brass fret was sprayed with a light coat of Floquil Grey Primer. This serves two purposes; it gives the smooth brass pieces a “tooth” to hold paint and glue. The light grey color is also very close to the grey called for in the instructions, so that many parts can be simply cut from the fret and mounted in place as is. I find that using clear varnish works very well for cementing flat brass pieces, as it allows some time to position parts and line things up, which cyanoacrylate glues do not. White glue also works well for cementing small brass parts, as long as they are primed.
Once all the little bits and pieces were added to the cockpit interior, the seat was assembled. The seat was painted flat black and the brass seat belts were painted dark brown with silver buckles. The interior of the engine compartment was painted flat aluminum. The engine is the same Mercedes DIII that is included in the Eduard Albatros kits. This builds up into a realistic looking powerplant. It was painted with the Humbrol metallizer colours Steel and Gunmetal. This was installed in the engine compartment and the fuselage halves were cemented together. When dry, the seams were cleaned up with a sanding stick.
 |
I decided early on that I would remove the control surfaces (ailerons, elevator, and rudder) and reattach them later with some slight deflection to give a more realistic appearance. When studying photos of the old biplanes one notices that very seldom were the control surfaces perfectly lined up, as most were not balanced to return to a neutral position. The control surfaces came away easily after some scoring and cutting with a brand new no. 11 X-acto blade.
The only real problem in the construction of this model came when I mounted the vertical tail to the fuselage. The kit as is does not reproduce the smooth faired in appearance of the vertical tail. Referring to the excellent plans in the Windsock Datafile No. 7 on the Pfalz DIII, I shaped the fuselage to stabilizer joint with Squadron white putty until I was satisfied. The lower wing and horizontal stabilizer were then glued on and the joints cleaned up with a very small amount of filler and sanding.
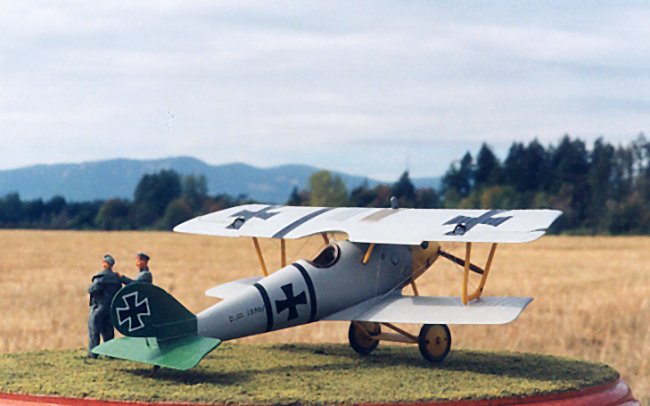
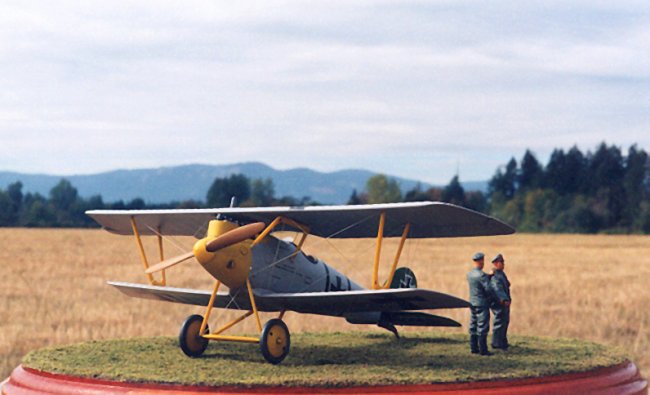
The model was now ready for painting. I chose to paint the model in the colours of a much-photographed airplane, s/n 1370/17. This aircraft has a fairly colourful history. It was flown on occasion by the German ace Werner Voss, leader of Jasta 10 at the time. Jasta 10 (along with Jastas 4, 6, and 11) was part of the legendary Jagdgeschwader 1, Richthofen, better known to the allies as the Flying Circus. During a mission on 27 December 1917, Vizefeldwebel Hecht was forced down in allied territory by an Armstrong Whitworth F.K.8 of no. 35 Squadron, R.F.C. Hecht landed the aircraft near St. Quentin and both he and the aircraft were captured. The aircraft was subsequently sent to England for evaluation by the Royal Aircraft Establishment at Farnborough.
Each of the Jastas had their own colours to distinguish them from one another. Jasta 10’s was yellow. 1370/17 was painted with a mix of Floquil Grey Primer, White and Silver in equal proportions. This was to represent the peculiar silbergrau dope used on the Pfalz fighters. I painted the upper wing, ailerons, and the fuselage and lower wing assembly in this colour. The nose panels, wing struts, landing gear struts, spinner, and wheel covers were painted Floquil RLM 04 Yellow. The tyres were picked out with dark grey. The tail, elevator and rudder was painted Floquil Medium Green. Once all these colours were dry, the entire airplane was sprayed with Floquil Crystal Cote thinned with Canadian Tire brand paint thinner. After this had cured for a couple of days, the decals were applied. At first I wanted to use decals from an old Glencoe kit that I had. These were Invisiclear decals and I thought I would have better luck with them than with the very fragile Propagteam decals that come with the Eduard kit. As it turned out, the Invisiclear decals would not react at all to setting solutions to snuggle them down. This must be an isolated case because I never had trouble with these kinds of decals before. I finally gave up on them and went to the kit decals. Much to my surprise, these went on perfectly and with little bother. Very little setting solution was required and no carrier film was visible anywhere once they had dried. Everything was then sealed up with a couple of light sprayed-on coats of Floquil Flat varnish.
 |
Next the weathering was applied with ground-up pastel chalks. The wing struts were glued on to the lower wing, and the landing gear struts and the tailskid were glued on with slow drying Krazy Glue Gel. This stuff is great - it has the consistency of petroleum jelly and sets in about five to ten minutes. This gives you enough time to align struts and braces but still has the strength of cyanoacrylate glue when dry. The top wing was then carefully glued to the struts and left to dry a couple of hours. Plumbing between the over-wing radiator and the engine was then added using stretched sprue and painted black. Fuel lines were added between the fuselage and the fuel tank in the upper wing with brass wire, painted aluminum.
Next was the rigging. I prefer to use stretched sprue secured in place with white glue. The glue dries clear and shrinks considerably when it dries, and is very forgiving of errors, and allows for easy repairs. Excess glue can be cleaned up with water. The bond is quite tough and as long as the model is handled gently, there is little chance of the rigging letting go. I try to use silver coloured sprue when it is available (such as in Monogram jet kits), because when stretched it is the right colour. Stretch the sprue as thin as you can - the thinner the better. To add the rigging, I used a pair of dividers to get an approximate length of each piece. Then, with a very small amount of white glue, cement it in place. In awkward areas, I would glue only one end then wait until it was partially set. Then I would position and glue the other end. Every now and then I would tighten up the rigging sections I had just added by passing a glowing toothpick near the section. The heat from the glowing ember would shrink and tighten the rigging (of course every once in a while I would howl in frustration as a piece would melt because I got too close with the heat). After a couple of hour’s work, all the rigging was in place. I painted the exhaust stack Humbrol Dark Earth and cemented it in place. I then cemented the control surfaces onto the model with some deflection, as discussed above. The model was finished by securing the windscreen with white glue.
The finished result was well worth the time invested. The model goes together fairly easily. The only shortcoming was the problem with the vertical tail, but this is easily fixed. This is the second Eduard WWI aircraft kit I have completed (two others are well under way - a Fokker EIII Eindecker and a Sopwith Pup), and the finished result has whetted my appetite for more. Well done, Eduard!
Will
References:
Windsock Datafile No. 7: Pfalz DIII, Rimell and Grosz, Albatros Publications, 1988
Photos and text © 2001 by Will Hendriks