|
This is my effort for 2000-2001. It’s Tamiya’s
1/32 F4C/D kit. I decided that I wanted a scheme that was “out of the
ordinary” so I chose an RoKAF F4D, operated by the 151st TFS/17th
TFW at Taegu AB in South Korea.
I was quite excited when starting this kit. I
had heard so many great reports about it. I thought it was going to be one of
those magical “throw an open tube of glue in the box, shake it around, and out
would come the completed product” type of models. On opening the box I was
duly impressed with both the level of detail of the moldings and also with the
breakdown of the parts (ie the one piece upper fuselage shell). There I was
thinking, “this is going to be a breeze. Maybe I’ll be able to do two models
this year!!!”
But then reality struck. I found some very strange
anomalies about this kit, not the least of which was identical parts, left and
right side, one of which would fit perfectly while the other was not even close,
the intakes being one such example. The aft profile of the starboard part was a
perfect fit to the mating fuselage section while the profile on the port side
was out by at least .050” at the roll of the fuselage. Ahhh, and then there
were the intake ducts. I can assure you that the fit is as poor as everyone has
previously reported. If you haven’t started this project yet and can find the
Seamless Suckers or Cutting Edge intakes (I couldn’t), I recommend that you
buy them. The other option, which I am in the process of, is to make yourself
some intake covers. If you can’t fix the problems, hide them, I always say!!
|
Click on image below to
see larger image
|
 |
The cockpit went together very well. I did some
scratch building to add some plumbing and hardware to the sidewalls and fwd.
side of the RIO’s instrument panel. I also replaced the kits decal instrument
faces with some from the Waldron range. The decal and lens arrangement for the
major instrument faces is a very innovative approach by Tamiya, the execution
was poor however, with the decals being both out of register and not sharply
printed.
|
Click on image below to
see larger image
|
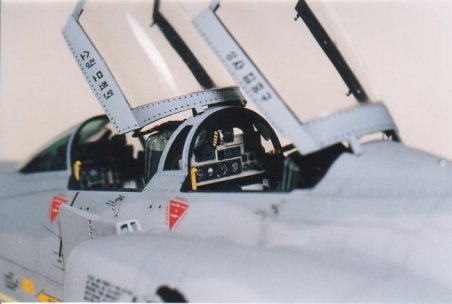 |
I also used some components of Eduard’s photoetched
set and a pair of True Detail MB Mk 7 resin seats to spruce up the office a bit.
|
Click on image below to
see larger image
|
 |
The aircraft was finished using lightened versions of
Gunze’s FS 36375 and FS 36320. Decals were applied from Cutting Edge’s sheet
CED 32005. And then came my Future disaster. I like to try a couple of new
techniques with each model I do, and I’d heard such great reports of Future as
a clear coat, that I thought I’d try it. About a week after my last
application of Gunze I applied the Future. It went on quite well and looked good
after a full coat. The next day I noticed a bit of crazing on one wing and
thought ”no problem, I can touch that up later”. Then the day after that I
looked at the model again. AGHHHH!!! The crazing had spread over the entire
surface. It looked like the shattered windshield of a car. After resisting the
initial impulse to send my Phantom on its first (and last) flight, I undertook
the laborious job of stripping the paint back down to plastic.
|
Click on image below to
see larger image
|
 |
I repainted the basic colours, this time using Gunze
clearcoat. I used an oil wash (payne gray with a bit of black and a bit of raw
umber) to accentuate the panel lines and “dirty” the scheme a little. I also
did some hydraulic fluid “streaking” using a back/raw umber oil mix. I then
used Humbrol clear matt as a dull coat.
|
Click on image below to
see larger image
|
 |
The burner cans and bare metal areas of the tail were
painted last using Testors Metallizers with some exhaust “sooting” done
using repeated application of a very thinned down (5:1 water to paint) Gunze
flat black. Fastener heads and panel lines were accentuated using paint from one
of those inexpensive, kids paint kits (the little paints “pucks” that you
add water to). This stuff worked great!
|
Click on image below to
see larger image
|
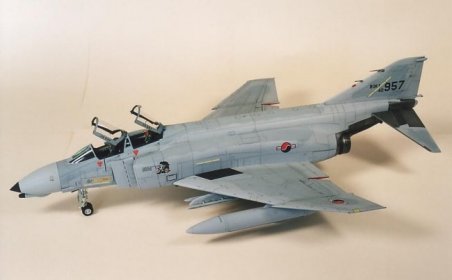 |
The final touches were added in the way of a SUU23 Gun
Pod from TAC Scale (very nice piece of resin), the missile pylons sans missiles
(most reference shots of RoKAF F4Ds showed the pylons mounted but not one
picture I saw had missiles on the pylons), and the wing tanks.
When all was said and done, the result of this
project, for all of its idiosyncrasies, wasn’t too bad. Even with the fit
problems, the kit overall is still of a high standard. The only other problem I
had with this project was the scarcity of RoKAF F4D pictures. I can only
speculate that this is due to South Korea’s security conscious nature (can’t
imagine why, they’ve such friendly neighbors).
Wayne
(click on
the images below to load the full size photo)
|


