|
HISTORY:
|
Although
the Lockheed P-38J was not the most widely produced version of this famous
fighter, it was the “J” model that first showed the true potential for
this single seat fighter. The
P-38 was designed in 1937 by Clarence L. “Kelly” Johnson. It went into
production in 1940 and shortly after its introduction into combat in
Europe it received the nick name of the “forked tail Devil” by Germany
because of it’s twin boom format and Fire power. |
|
This
unusual twin boom layout was chosen by Johnson to provide two Engines, so that
the requirements of speed and climb rate met the requirements of the AAF. The
P-38J-LO series began coming off the productions lines in June of 1944 but only
the last 210 “J” models produced contained all the modifications that made
it the better long range Fighter. Most of the earlier “J” versions were
retrofitted with modifications in the field, such as, Mach limiting dive brakes,
aileron boost, improved cockpit heating, cooling ,etc. It proved it’s true
worth during the Mediterranean and South Pacific operations where it’s
superior firepower, extra long range, and reliability gave “ACE” status to
many allied fighter pilots. The P-38J was a single seat, twin Allison, super
charged, V-1710-89 Engines, rated at 1,600 Horse Power each. The Prototype,
YP-38 was first flown on 27 January 1939.
THE
MODEL:
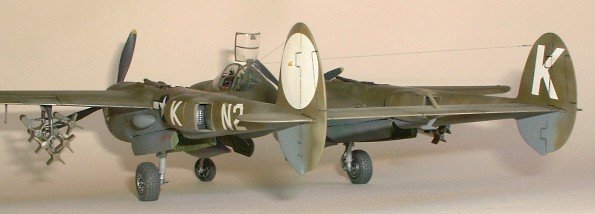
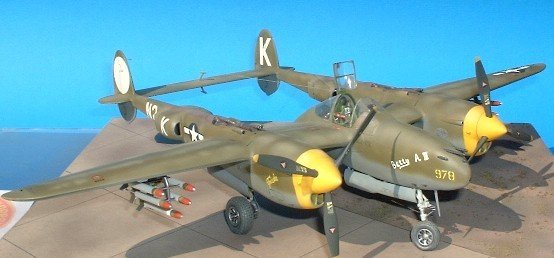
This
Hasegawa Kit # Jt1, 1/48 scale Model and version, was chosen by me mainly
because I have built most of the early versions by different manufacturers
(Monogram, Revell etc.) so I knew I didn’t want to got through that again
anytime soon. Newer is always better, right? (well, sometimes if it is a Red
‘Vette Convertible).. I also had an ACADEMY version too but just felt like the
“Hase” version (“Hase Snob”), would suit my constant AMS sickness that I
have had for several years now and there is NO CURE. And besides, all the
experts say that, “the fit is always better if it is Hasegawa or Tamiya”,
right? (Snobbery again)! The kit is ok but (gripes!), it will not fall together,
(no shake and bake here) and in some ways is just as time consuming as the old
Monogram kit(s) but, oh dear lord! It is recessed. (for the “Scale freaks”,
the Scale Panel lines would be about 2 or 3 inches deep on the “real Air
Plane”) but we will use selective “scale” stuff here like all my fellow
modelers that worry about such things and alibi the rest.
| This kit could
be built OOB and make a nice rendition because the cockpit is ok and most
of the detail will pass a lot of people’s desires. Don’t know if it is
in “scale”, don’t care, as an Engineering technician, I tend to just
go with whatever the design Engineer says, I learned long ago, Engineers
don’t make mistakes, they only make “technical errors”, in the case
of Plastic model Airplane kits.., well, I don’t lose any sleep over it
one way or the other. Looks
like a P-38 to me!! |
|
ROTATE!!:
After
deciding which version “bird” I was going to build, I just started like
everyone else, they all say, “it was straight forward” (whatever that means)
I like to say, start with step one (1) on the instruction sheet, right?? But I
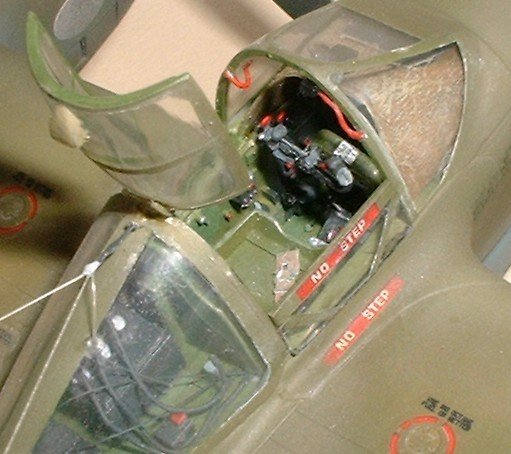
have a bad case of AMS so I started with a new TRUE DETAILS cockpit resin detail
set which was Painted MM interior Green according to the book references I have,
and detailed and dry brushed all the details and Seat and belts, Panel, and
yoke/ gun sight etc.
| I detailed
the radio equipment with wireing made from .015 solder, and dry
brushing it for highlights. I also used the TRUE DETAILS etched metal set
for the engine oil cooler intake screens, and the metal retro-fitted ,
dive brakes. As usual, there is a certain amount of putty use and
re-scribing to get the engine nacelles to fit. (just like the Monogram kit
& Academy kits) (so what’s the big deal, right?) same ole , same ole
to me.. to put a little “character” in the finished model, I cut the
front gear strut, put a pin it it and turned it a little. You know, when
you build a Twin boom type model, it is like doing 3 Fuselages so I
approached it that way, one
side, or piece at a time.
(just like a Johnny Cash Cadillac.) |
|
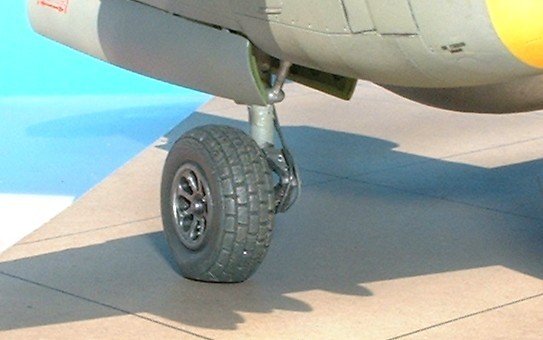
I
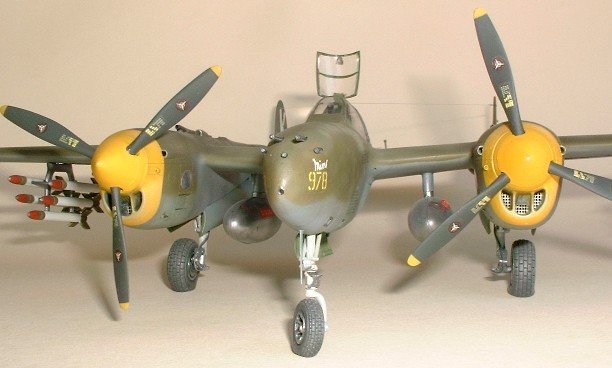
did drill out all the little scoops and intakes and super charger parts and
detailed the inside of the wheel wheels and use the solder trick for brake lines
and other lines etc. as the parts
are glued up, don’t forget to put plenty of nose weight in to keep it on the
tricycle gear. The covering over the instrument panel was improved to look like
canvas by using tissue paper soaked in white glue mix and painted tan and dry
brushed with light kaki. ( Most operational aircraft had the canvas covering
removed, but, I didn’t feel like cutting it out but you could see the
instrument panel better if it were removed). I cut to fit, screen material to
fit radiator faces front and back. After checking and re-checking all seams and
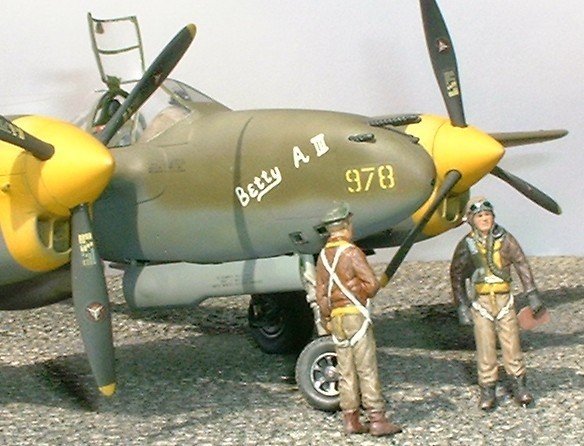
all other craftsmanship requirements, I started the paint scheme which was to be
a faded “in-use” standard Olive drab and neutral gray, to be depicted as one
of the Aircraft flown by the 8th Air Force,
383rd Fighter Squadron, 364th
Fighter Group in Europe at Honington, England , 1944.
I
used mainly Model Master and Aeromaster Paints and kit Decals, the kit decals
were just as good as anything I wanted to use in this instance.. most of the
time I will not use kit decals but I alibi-ed them this time to get the
“look” I wanted. I painted the inside of the wheel wells Interior, dry
brushed, green.. the kit instruction said so and so did some of my reference
material, some reference material says that most of them (P-38s) were painted
aluminum and / or gray and the gear was shades of gray/ alum… ( youse guys
pays your money and youse flips your own coin!!)
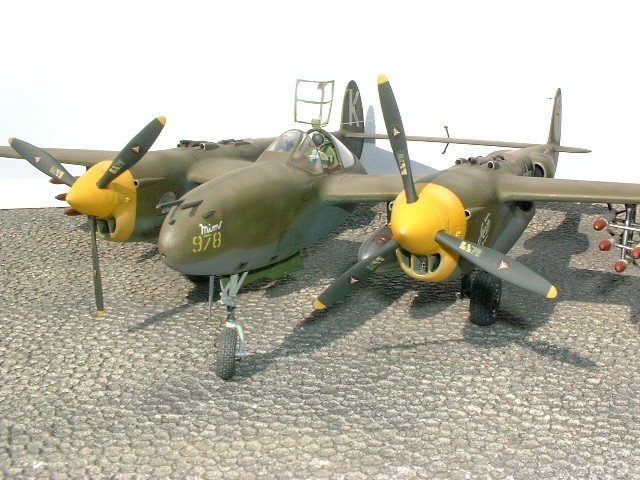
I used the kit guns and Props. But you must remember the get the Props
“correct” the Engines turned in opposite directions (One turned CW the other
CCW), to balance the flying performance of the P-38, the instructions will give
you the right direction and part’s location.
|
Again,
my AMS, was strong and on going, so I used the nice pregnant True Details
Wheels ( I like them but, I never seen so many airplanes with “flat
tires”), and Dry brushed them to bring out the nice tread design. All
the canopy parts were dipped in Future, installed, and “faired-in” as
one of the last steps, and the antenna (aerial) wire was installed using a
product called “invisible thread” been using it for years. (works
great). |
|
ON
FINAL:
The
364th Fighter Group was activated on 1 June 1943 at Glendale,
California. After training, they went to England and was assigned the same
airfield for the entire war. This group continued to fly the P-38s until the
latter part of 1944. They also started to receive and use the P-51s’ until the
end of the war. They flew 342 missions. They destroyed 449 ˝ aircraft of which
256 ˝ were for Aerial combat. Group losses were 134 Aircraft.
This
kit was ok, but was typical twin boom fit problems but can be handled by most
modelers to look like a nice P-38 but I think the Academy kit will build up just
as nice with the use of the detail parts that improve the appeal and I have even
seen some very nicely done Monogram versions for less than half the price.
( “Real men like putty!)etc.
So, off we go
into the sunset and the Wild Blue!!
THANKS! and, God Bless
America and our Military Forces that are now going into harms way.
Cws
|
|