|
Model by Martin Gastel
Photos by Steve Bamford
--------------------
|
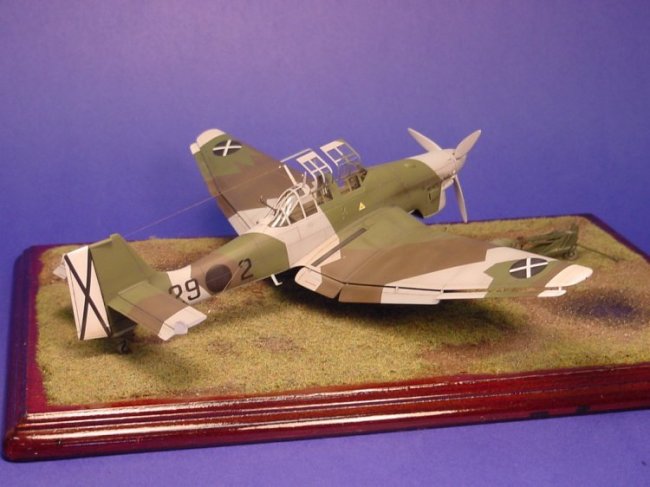
This model represents a Ju 87A-1 of 5.J/88 of the Condor Legion, during wet weather operations from Calamocha, Spain in March of 1938. It is about to be prepared for another sortie against Republican forces retreating across Aragon. 5.J/88 was known as the Jolanthe Kette due to the pig markings on the aircraft’s landing gear pants. The Ju 87 had been nicknamed by Oberleutnant Gűnther Schwarzkopf after the heroin of a popular comedy which revolved around a pig. This comedy was called ‘Krach um Jolanthe’, or ‘Trouble with Jolanthe’. Aircraft 29l2, the subject of this model, was originally flown by Unteroffizier Ernst Bartels and is one of what is believed to be only three Ju 87A’s operated by the Condor Legion (and hence, ‘Kette’, a flight of three aircraft) numbered 29l2, 29l3 and 29l4, although photos exist of an aircraft numbered 29l5. This aircraft remains unexplained according to my references, but could have been a replacement aircraft or one re-numbered for propaganda purposes.
Construction:
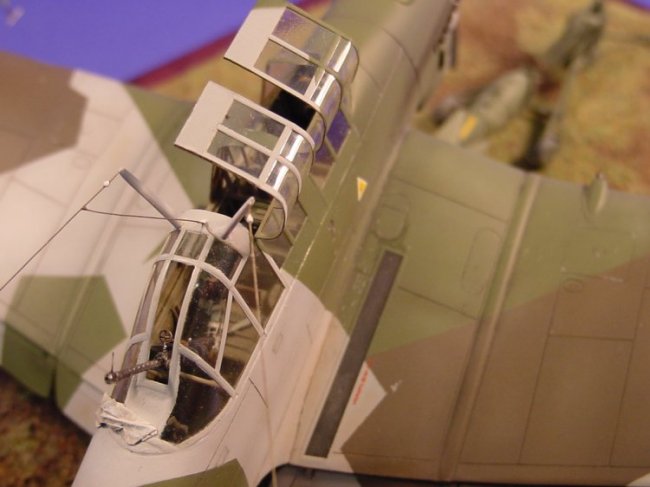
Construction began in the usual manner, with the cockpit. The kit provides a resin cockpit which is quite nicely detailed, but requires that you scratch build the roll bar and machine gun mount. There is no fuselage detail provided aft of the resin cockpit, so I had to scratch build the rear bulkhead from plastic card. Ribs from plastic strip were also added aft of this bulkhead as they would be marginally visible when the model was completed. The roll bar suggested in the kit instructions is very over-simplified so a more accurate one was made using lead wire and plastic rod and strip, with reference to photos of the actual item. The machine gun mount was also scratch built with reference to photos
as
the kit instructions for doing so were not at all clear. The canopy provided is
vacu-formed and the doors had to be carefully cut and then bent into an open
position. I could tell after dry fitting that there was going to be some fit
problems with this item so I had to build up the plastic on the vertical
surfaces of the fuselage just aft of the windscreen. The kit instructions
suggest painting the cockpit 66 Schwartz Grau, but it is far more likely that it
was painted RLM 02 Grau. I painted it with Poly Scale acrylics washed with
artists oils and dry brushed to bring out the details. |
|
The trailing edges of
the wings required a great deal of thinning. This is a little unusual
considering the elevators are commendably thin. The fit of the wings to fuselage
was extremely poor requiring the leading edge of the fillet to be built up with
Squadron Green Putty (the wing chord is longer on the wings than on the fuselage
join by about one millimeter). The landing gear pants were also significantly
narrower than their attachments on the wings so the wing portions had to be
carefully sanded flush with the pants. There was no trouble getting the gull
dihedral correct for the wings as each upper
wing half comes as one piece. The lower halves of the wings comes in three
pieces (for a grand total of five pieces). After the wings were assembled there
were hefty gaps between the separate pieces so I used Squadron Green Putty and
Mr Surfacer 500 to fill these areas. Super glue would have been a better choice
as the resultant assembly was delicate and the putty prone to separate and
crack.
I
wanted to build this aircraft as operated during muddy field conditions so the
lower portion of the landing gear pants had to be removed and the walls thinned
considerably with a file, number 11 X-Acto blade, and 400 grit wet or dry sand
paper.
| The landing gear was then scratch built with plastic card and brass tube, and using the resin wheels thoughtfully supplied with the kit (wheels also come moulded onto the pants themselves). After the completed landing gear/pants assemblies were added to the wings I added the flaps and ailerons. The flaps were placed in a lowered position as this seems to have been the norm for Ju 87A’s on the ground. Once again, control rods for the flaps and ailerons were added from copper wire. |
|
Painting
and Finishing:
The model was painted with Poly Scale acrylics sprayed through my Aztek A470. I used the grey general purpose tip as I seem to get better results with it than the black acrylic tip. Due to the large amount of filler required for this model, a primer coat was essential. I prefer to let the paint to dry for 48 hours between coats even though Poly Scale painted surfaces can be handled shortly after spraying. It also sands beautifully showing no discolouration so minor imperfections can be lightly sanded out. All panel
| lines were post-shaded immediately after applying the basic colour. This was accomplished by emptying the excess paint from the colour cup and filling it with thinner (I use distilled water), followed by dipping my stir stick in black paint and stirring it into the colour cup. This gives a very dilute, darker shade of the original colour. After blowing out some of this mixture to ensure all excess paint in the nozzle is gone, I spray the panel lines at 7 PSI. The mix is less than 10 % paint so is very transparent and will require a few passes to get the desired effect. I find the control of this method easier than pre-shading, especially for multi-colour schemes. |
|
| Jolanthe Kette with the pig marking flying without the lower pants, although I can’t make out the aircraft number. I’m sure that someone out there who knows a lot more about the Spanish Civil War can point out the error of my ways. At any rate, I like the look of this unit marking better. After the decals had dried, I applied another coat of Future over them and then used a wash of grey artist oils to colour the panel lines. As a side note, these panel lines were very fine and in some places had to be re-scribed. The final flat coat of Poly Scale flat was applied after allowing the Future to cure for a few days. |
|
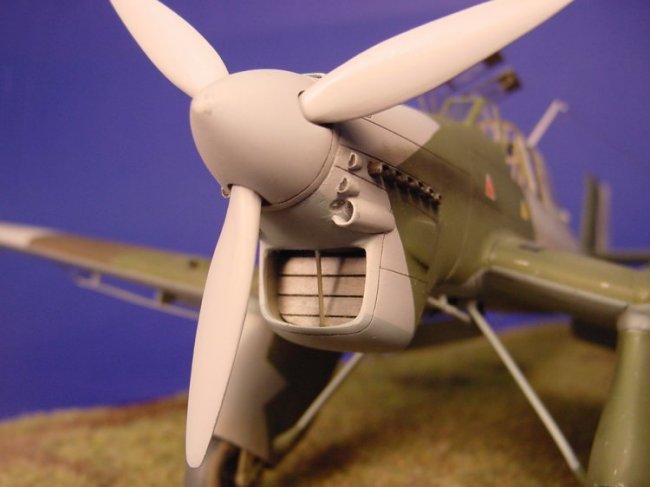
Finally, all of the
fiddly bits were added such as the foot steps and pitot tube (or is it a venturi
tube?). The pitot requires a little
bit of scratch building which should be done with reference to photos of the
actual aircraft as the kit instructions are incorrect. The
wing tip navigation lights were made from clear stretched sprue painted with
Tamiya clear red and green acrylic paint.
Weathering was
accomplished using pastels, with the exception of the paint chipping which was
done with Prismacolour silver pencil. This was actually done before the first
gloss coat so that it would be toned down by the final flat coat. Weathering was
kept fairly subtle, just some dust and exhaust stains and light chipping.
 |
As a final ‘human’
touch, a canopy cleaning cloth made from aluminum foil was draped over the rear
of the canopy as it was commonplace for ground crews to clean canopies before a
mission. This addition also enabled a non-repairable defect in the canopy to be
covered as getting a replacement part turned out to be problematic. As they say,
necessity is the mother of invention.
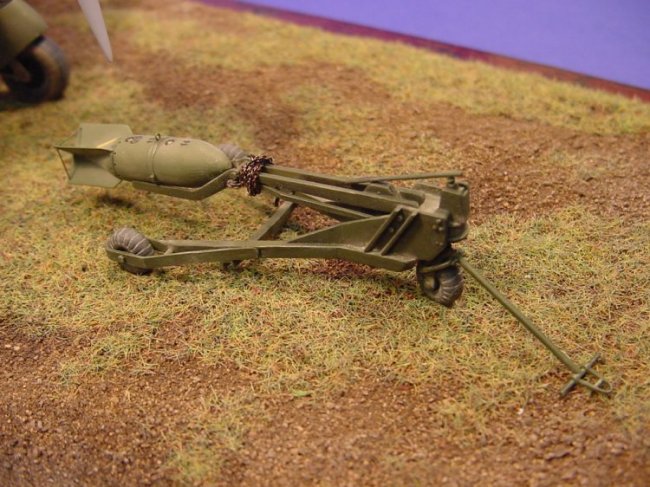
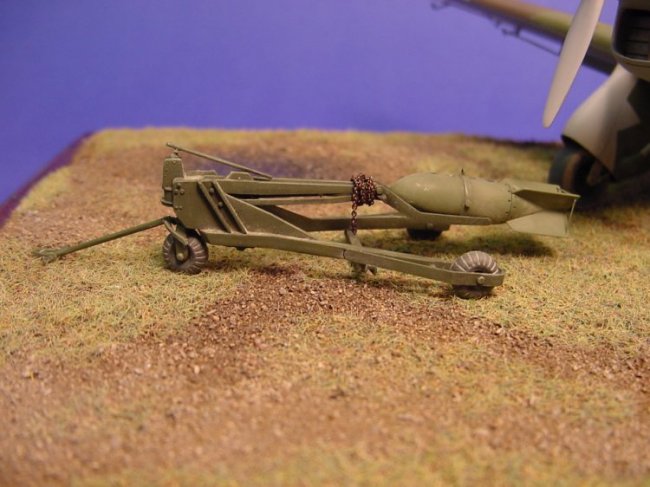
The hydraulic bomb trolley and SC250 bomb are Dragon accessories. The SC250 was modified by the addition of the harness for the Stuka’s swing arm release, made with tape, plastic rod and tiny discs punched out of aluminum foil using my Waldren punch and die set, and the locking ring from copper wire. The braces for the stabilization fins were made from stretched sprue. The only modification to the trolley was the addition of a bomb
| securing chain and some filling with putty
and Mr. Surfacer. The kit instructions suggest that the trolley should be
painted field grey and I could not find any reference material that suggested
otherwise, so I painted it with Tamiya field grey. The SC250 could be field grey,
sky blue or aluminum according to the Warbirds Resource Group site http://www.warbirdsresourcegroup.org/LRG/sc250.html
so I painted it a slightly different shade of field grey. All stencils were done
by hand, with the exception of the yellow stripe, which was cut from a yellow
decal. |
|
Conclusion:
While this is a fairly
difficult model to build and not to be attempted as a first kit, the end result
can be quite a pleasing representation of the aircraft so is well worth the
effort, at least in my mind. Where else are you going to find a 1/48 Ju 87
‘Anton’?
Martin
 |
References:
Junkers Ju 87A, Joachim Dressel & Manfred Griehl, Schiffer 1996.
Junkers Ju 87 Stukageschwader 1937-41, John Weal, Osprey 1997.
Photos and text © 2001 by Martin Gastel