|
There’s not much I can add to
what hasn’t already been said about the Tomcat. Born out of the F-111 fiasco,
the F-14 emerged to be one of the premiere fighter aircraft in the US Navy’s
inventory. Many years ago, in college, I built a 1/32 Tamiya F-14. Though the
Tamiya kit is still considered the best Cat in 1/32nd scale, you can
still build quite a nice model from the R-M kit. I donated the Tamiya F-14 I
built to my Alma Matter’s display case in the Aviation Technology building at
the SIU-C airport in Carbondale, Illinois. Fast forward to this year and here I
am at the local hobby shop and I see the R-M Tomcat set way up high on the
display shelf. I had heard vague rumblings this kit was hard to get and had been
discontinued. Knowing it would be highly unlikely I was going to spend $95 for a
Tam kit I bought this one on impulse for a mere $35. I understand you can get
this exact kit from Revell-Germany at a much higher price of $75. However, for
that much I’d go the extra few dollars and get the Tamiya kit.
The kit itself is molded in a
medium grey plastic and comes in a big sturdy box. You can tell these molds are
old and tired because there was lots of flash everywhere. To be fair though, the
detail was still crisp and the engraved panel lines are very nice. The clear
parts were a bit scratched from moving around. They’re not packed in a
separate bag. However, it’s nothing some micro-mesh couldn’t fix. The wings
are designed to swing just like the real one and the meshing gears are molded
in. You learn once it’s assembled it’s easy to get the mesh out of alignment
and it takes some finessing to get them back. More than once I had to do this.
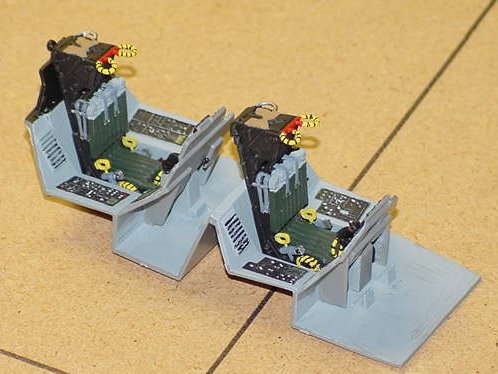
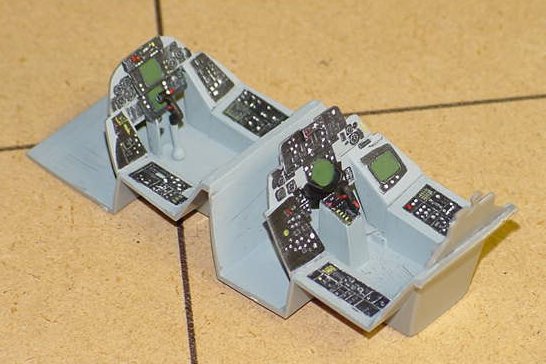
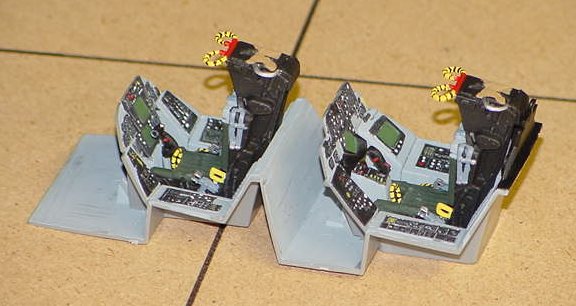
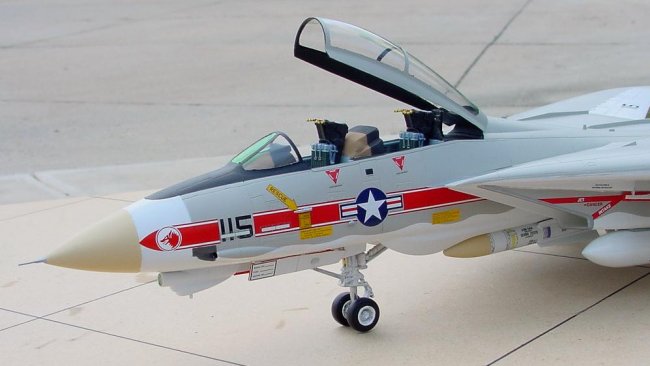
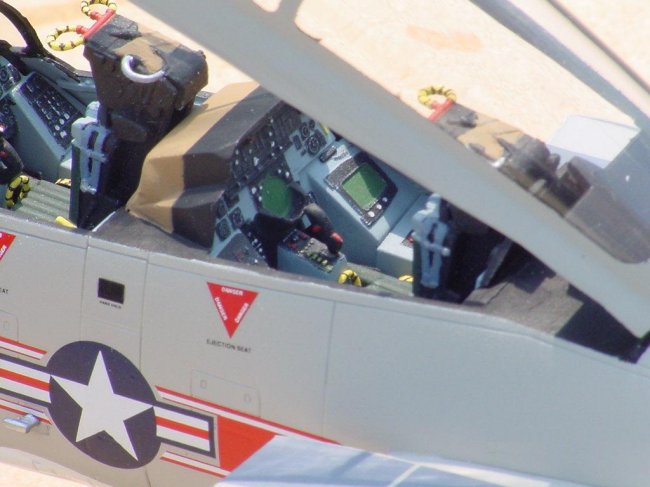
The GRU-7 seats are very nicely detailed as are the instrument panels. The
layout on the panels matched to the reference photos I had. I know there are
detail sets out there for the cockpit (seats and panels) but I was building this
one strictly OOB. I couldn’t see the justification to spending a lot of extra
money for those details. The kit also has the old seats from a previous issue of
the kit. If those were the only ones in the kit then I probably would have
gotten some aftermarket ones. It looks like R-M has done some updating on this
kit since the first issue. (They did however, change the tires from molded
rubber to plastic….bummer)
The stabilators are connected to
each other with a rod so they can pivot up and down. I started out by keeping
this feature but in the back of my mind I had a feeling it wouldn’t last. (I
was right….the stabs ended up being glued in place) The general parts fit is
OK but you’re going to need putty, files and sandpaper. The lower joint
between the forward fuse and the main body is horrible. Oh well. Nothing I’m
not used to. I’ve come to expect this from most every model I build so I
don’t get my nose out of joint when I have to putty and sand. The assembly was
very straightforward and uneventful. It was nice while the main fuse putty job
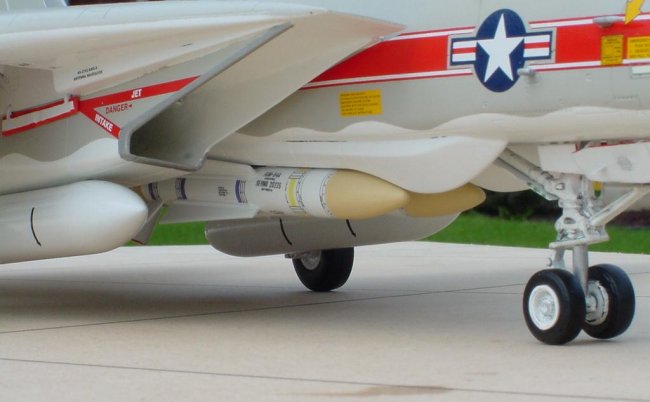
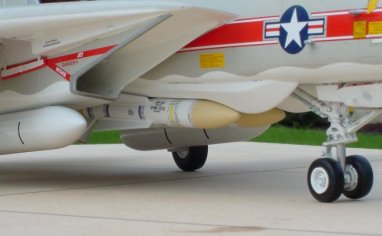
was drying I could assemble the missiles. The kit includes 4 Phoenix, 2 Sparrow
and 2 Sidewinder AIM-9L missiles. The under-fuse Phoenix fairings are included
as separate pieces, so if you want to model a bird without them you can. The
surface engraving is there so if you leave the fairings off you still will have
detail. The landing gear is OK. You could add some wire detailing for hydraulic
lines, etc. but I didn’t go that far. The fit on the main gear halves is not
the best and you’ll need to file and putty to get the seams somewhat
respectable. It’s most noticeable on the drag links. I couldn’t get mine
perfect since there are a lot of inside angles that are on the impossible side
to get a file in.
Before you glue the radome on
you’ll need to add noseweight. About 2oz is needed. I had to add mine AFTER
the radome was installed (Doh!). I went thru the nose mounted ALQ-100 ECM unit
by drilling a hole and feeding in solder until I could get it to stop
tail-sitting. I wasn’t too worried though since R-M includes the optional
upgraded TCS/ALQ-100 camera unit that fits over the fuse molded one. I did
change the pitot probe on the nose. The kit includes it but if you’ve been
building these models for a while you know they don’t last long. There’s a
small hole on the front of the radome for the pitot. I drilled this up to
.062” and inserted a brass rod until it hit something and stopped. I then left
about .300” exposed and cut the excess off. I then slipped a piece of .047”
music wire into the brass rod all the way and then cutoff the excess leaving
about .300” of it exposed from the end of the brass. Once I had things aligned
and straight I wicked thin CA in and firmed everything up. I then used putty to
fair the sections together with the proper conical transitions. I now have a
pitot tube you can stand the plane on.
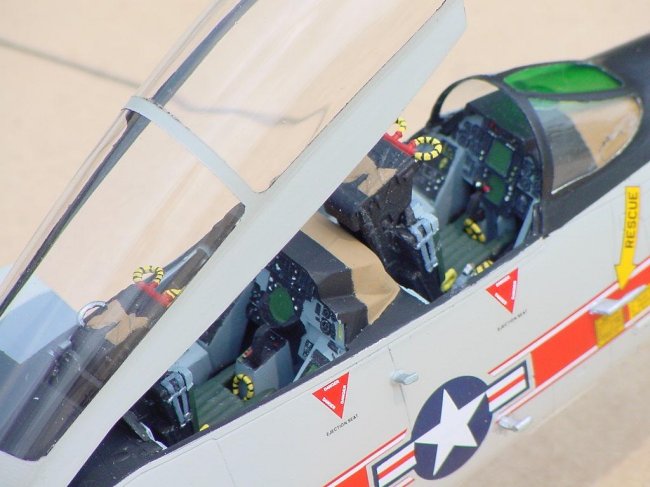
The clear parts got micro-meshed
then dipped in Future. The inside surface of the windscreen’s center panel was
lightly sprayed with Tamiya’s transparent green. The windshield was glued in
place. The clear portions were masked then it was puttied and sanded to fair
into the fuse. The cockpit area was then masked and covered for what always
seems to be like an eternity until all the painting is completed. When I finally
remove this masking it always reminds me of the scenes in those movies when they
remove the bandages from someone’s face after plastic surgery.
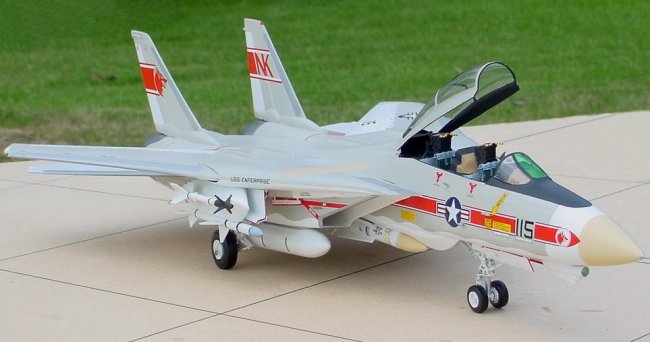
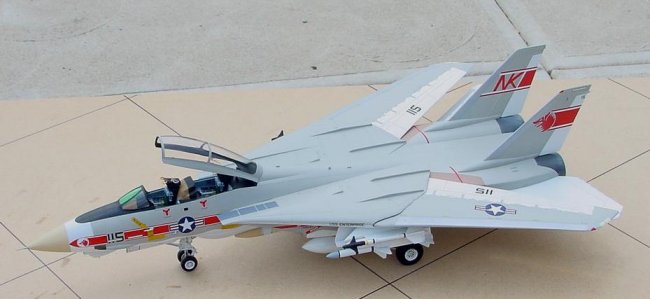
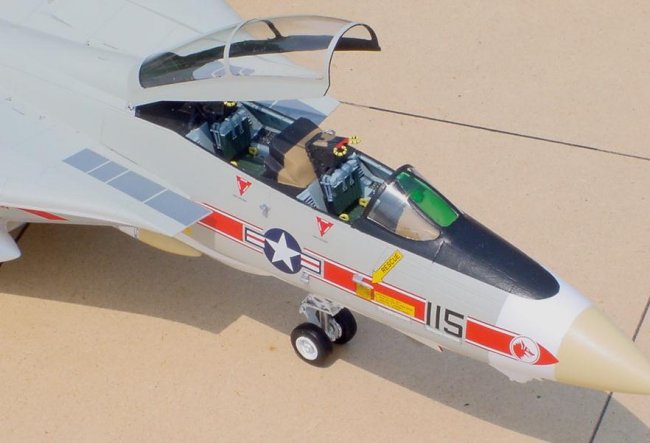
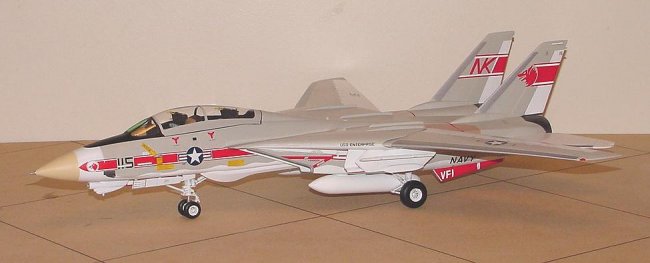
The model was
then prepped for paint. The paint scheme shown on the box is for an all grey
bird from VF-111, the Gunfighters, out of NAS Miramar. The kit decals are of the
hi-vis variety. I didn’t particularly care for this scheme, however. My
previous Cat was done up in the scheme of VF-84, The Jollyrogers. Although I
like VF-84, I’ve always had a soft spot for VF-1 Wolfpack’s markings. VF-1
is also the first squadron to take delivery of the F-14 back in 1973. Plus I
would be able to do a hi-vis color scheme rather than just plain grey.
| CAM produces an excellent set of
markings for VF-1 in 1/32 scale. I also ordered CAM’s hi-vis data sheet for
the F-14A. With these two sheets I would be able to relegate the kit decals to
the spares file. I painted all the white areas with Krylon gloss white straight
form the can. Now the fun begins. Masking.
|
| I masked all the white areas off (and
there are A LOT of those) then sprayed the model with Humbrol light gull grey.
The leading edges of the wings, stab and verticals were masked off and sprayed
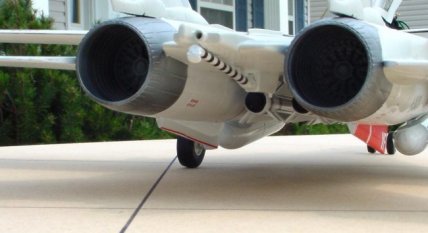
with Testor’s aluminum metalizer lacquer. And lastly the afterburners were
masked off and sprayed with Testor’s steel and then highlighted with
Testor’s titanium lacquers. The forward end of the radome was masked off and
hand painted with Humbrol radome tan and the anti glare panel and windshield
frames were hand painted with acrylic craft paint flat black after masking. |
|
|
That’s a lot of masking and painting but the end result was well worth it.
After removing all but the canopy and cockpit masks the model was then given a
coat of Testor’s semi-gloss and prepared for decal application.
|
The decal process took several
evenings. There were some areas that required micro-sol (most notably the post
side ventral fin where the ECS inlet cooling duct is located) and those took
very well. After the decals had set and the little bits of trim painting (nav-lights,
wing tip slime lights, etc.) were done another coat of semi-gloss was applied.
Now came the moment of truth as I removed the cockpit masks. The end result is
quite stunning. The seats and control stick were glued in and the canopy was
glued in place using Mighty-Tacky craft glue (just in case it needs to be
removed later for transport or other things). The missiles were installed last.
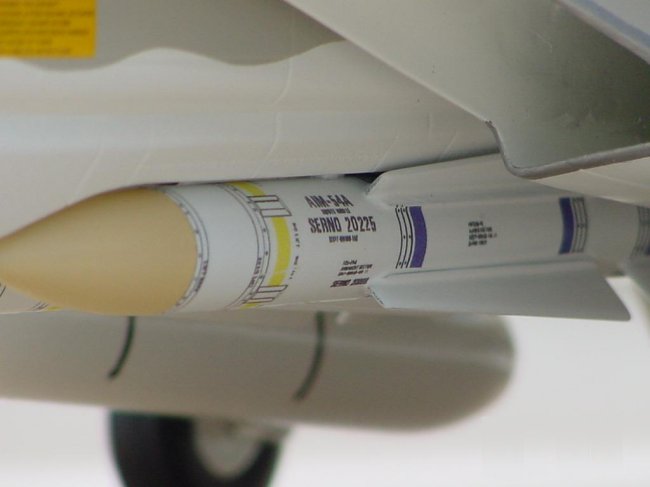
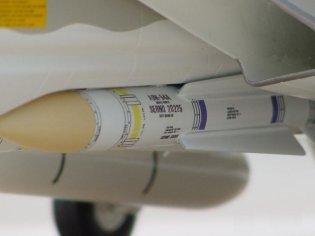
The AIM-9L’s and Sparrows were rather easy to do. It’s the Phoenix missiles
that took the longest. I had masked and hand painted their radomes with Humbrol
radome tan but as anyone knows that’s ever seen a Phoenix will tell you is
that they are covered with placards and markings. In 1/32 scale the omission of
these would be quite obvious. Since no one makes any marking for the Phoenix I
was on my own. Fortunately I have a scan of Phoenix markings from an Estes model
rocket decal sheet. Thought they are way to big a little editing in Photoshop
fixed that. I sized them correctly and printed a master out with enough marking
for six missiles (have to allow for fudges) and took them to the local Kinkos
for laser copying on some of my decal paper stock. Then began the long process
of applying all those decals. Once again the end result was worth it. The
missiles were all attached using Mighty-Tacky craft glue (just in case they need
to be removed in the future) and it was done.
|
Click on images below to
see larger images |
 |
 |
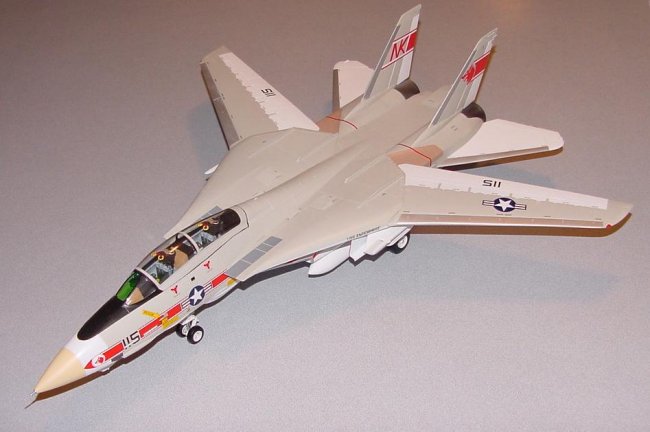
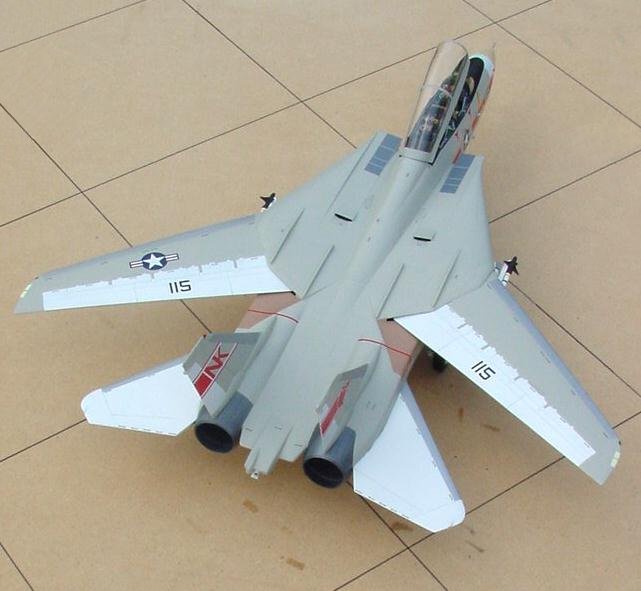
I really enjoyed building this
plane. Total construction time was about a month and the sheer size of a 1/32
F-14 is quite impressive. I always knew the F-15 was a big plane but the Tomcat
is slightly bigger and more imposing. She looks mighty fine sitting next to my
1/32 F-15E. If you’re on a budget then I highly recommend the R-M Tomcat.
It’s a great value for what you get. With a bit of work you can have a very
nice bird to add to your collection.
Jeff
|