|
The MiG-21 (NATO codename “Fishbed”)
was developed in the 1950’s as a Mach 2 interceptor to counter supersonic
aircraft entering service in the West. The
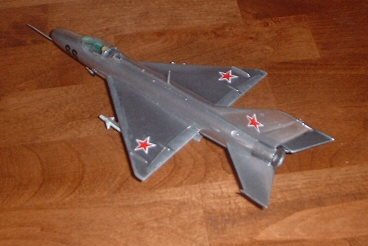
Mikoyan-Gurevich bureau tried a swept winged and a delta winged prototype, and
decided to go with the delta wing for production machines.
Production started in 1959 and over the years the MiG has been sold to
practically every Soviet ally and many Third World countries, and is even in
service now with major air forces such as India’s.
The MiG was fast and flew well but had
limited range and armament, and the Soviets tried to remedy these shortcomings
with bigger nose cones and deeper “spines” on the fuselage carrying extra
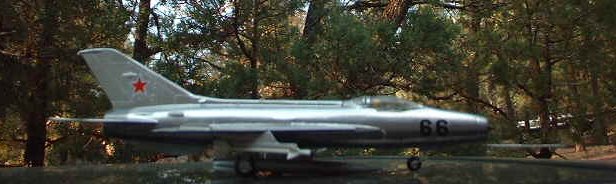
fuel and avionics. But the Airfix
MiG-21 that I built had none of those improvements; it was a MiG-21C (listed in
the instructions).
THE MODEL
The Airfix MiG-21 was originally issued
in the early sixties – thanks to Bill Clark and the others who informed me of
that. The current boxing has a neat
painting of a Soviet MiG streaking through a blue sky with the pilot wearing a
yellow helmet (or is that helmet really supposed to be white but somehow has a
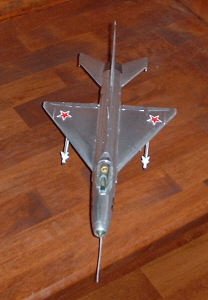
yellow tint?). The kit has decals
for three aircraft: a Soviet AF, a Finnish AF, and a Czech AF bird.
However, all 3 aircraft use the same paint scheme, in other words, you
can use any color you want to paint the plane as long as it’s silver!!!
The kit is very basic; it has raised panel lines, and all you have for
armament is 2 AA-2 Atoll missiles as well as a fuel tank.
Also there is no detail in the cockpit, all you have is a seat and a
pilot figure. In other words, a
nice simple basic kit that doesn’t take very long to make.
THE CONSTRUCTION
When the Out of the Box challenge was
laid down to ARC members, I thought about which kits I could use for this.
I had originally bought the MiG-21 kit so that I could use an old
Microscale MiG-21 decal sheet. However,
that decal sheet had no instructions. And
so the kit languished in my pile. Then
I thought “ah ha”….and I pressed the kit into service.
I had been wrestling with the Tomcat for so long that I needed a break
from it. And my trip to Phoenix for
my youngest brother’s wedding was coming up.
Perfect timing. The
MiG was just what I needed to restore my sanity and relax 
When my Grandpa and I drove down to
Pinetop to the family cabin that was the perfect time to start the project.
We didn’t have access to cable or the internet there (I went to the
library for that) and so there weren’t a lot of distractions.
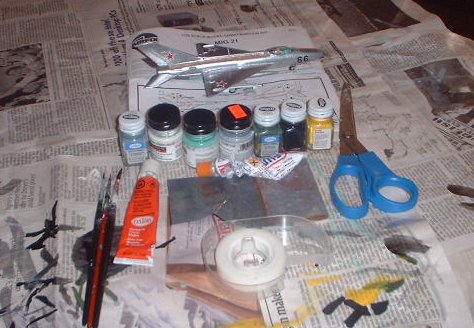
I broke out my tools; I went to the one local hobby shop and bought two
packs of Testors acrylic bottle paints (not sold under Model Master brand –
one pack was military colors and the other pack was general colors) as well as
Model Master RLM 25 Hellgrau, which sort of matched the bluish green cockpit
color of Soviet birds, Model Master Silver, and Model Master Semi Gloss White. I ended up using just seven bottles of paint: the three
aforementioned MM paints along with Flat Black, Gloss Yellow, Dark Green, and
Light Ghost Gray. I mixed some of
these colors to get, for example, flesh tones for the pilot and burnt metal for
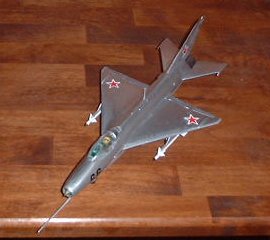
the burner can. And I used the
Gloss Yellow to paint the pilot’s helmet, simply because I like the look of
that – adds a dash of color to the whole bird and I think it looks better than
a white helmet. I guess the boxtop
inspired me.
I also used a can of gray primer and
Rustoleum’s Metallic spray paint for the overall finish of the MiG.
I used three brushes – one small, one medium, and one large – as well
as a tube of Testors cement, a tube of Tamiya putty, a pair of scissors, Scotch
tape, and two sheets of sandpaper from a Testors set.
Finally, for the pilot’s visor and the seeker heads on the Atoll
missiles I dabbed a tiny glob of tube glue on them to make them gloss black and
to add a little thickness to them (just a little!).
The model was very straightforward.
The hardest and longest part of the exercise was waiting for the gray
primer and the Rustoleum Metallic paint to dry in the cold air (45-50 degrees in
the daytime). I got crow’s feet
at first and had to use the sandpaper to clear that up.
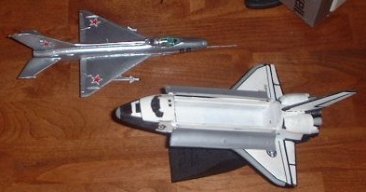
Anyway, I got it done on the day we left for Phoenix to go to my
brother’s wedding, and I got to see the MiG again when I came back to the
cabin! (I also got to finish
another simple kit that I did – the Heller 1/200th scale Caravelle,
and I started another one – the R-M P-51D, I’m including a bonus shot of the
Spamcan).
Happy Modeling!
Justin
Reference: http://www.flug-revue.rotor.com/FRHeft/FRH9811/FR9811h.htm
|