|
THE AIRCRAFT
Although the P-51 achieved its greatest fame in American hands, primarily as a
long range escort fighter, it was a British request that led to it originally
being built. The British used several variants of the aircraft throughout the
war, including the Mustang I (P-51A), Mustang III (P-51B), and Mustang IV
(P-51D). One of the more note worthy British users of the Mustang was the Polish
manned 133 Wing, called at times "Skalski's Circus."
This wing had several famous aces in its ranks, among them Stanlislaw Skalski,
Jan Zumbach, and Eugeniusz Horbaczewski. Horbaczewski's story in particular was
spectacular, as was the manner of his death. Among his exploits he racked up 16
confirmed kills, although primarily in the Spitfire, and he landed his Mustang
in enemy territory to pick up his downed fellow pilot Sgt Tamowicz following his
crash landing in the Cherbourg area.
He eventually met his death on a sweep mission when he and 11 other Mustangs
engaged 60 FW-190's on 18 August 1944. In this swirling dogfight he shot down
three Focke Wulf's before he was killed. According to Osprey's Polish Aces of
World War 2 this engagement resulted in 315 Squadron being credited with the
highest number of kills scored by an RAF squadron in a single sortie. Given his
fame, it's not surprising that Horbaczewski's aircraft have appeared in many
profiles; unfortunately, most of these are wrong. The confusion probably stems
from the fact that he flew three different Mustangs: FB-166, FB-382, and FB-387.
It is the first aircraft that is most often profiled, often in D-Day stripes.
In fact, while it probably carried D-Day stripes, to my knowledge no photographs
of this aircraft in those markings have ever appeared in print. Pictures of
FB-382 with invasion markings, though, are out there, and being a sucker for
D-Day stripes that is the aircraft I decided to build. I first became aware of
the confusion on these markings after getting in touch with Franek Grabowski,
and it was only with his thorough, patient assistance I was able to get the
markings correct, or at least as correct as they are known today, and I could
make them. Thank you Franek! As always though, to paraphrase author speak, any
inaccuracies that appear are my fault.
THE KIT
There are several 1/72 scale P-51B's available, and I used the Hasegawa P-51B
with Malcolm hood (kit# AP105) because of the canopy treatment. The rear quarter
panels are molded as part of the fuselage structure, rather than as separate
pieces to be glued in, making life much easier, at least for me. The well
documented downside of this kit are the wings. They are the same as in the D
model kit, so they have an incorrect leading edge, shallow wheel wells, and
incorrect inboard gear doors. To correct these problems, and to add the dropped
flaps pose most commonly seen on the ground, I used the Hawkeye resin wing. It
is beautifully molded and fits with a minimum of work. The only drawback to this
wing are the spent casing ejection chutes which duplicate the kits, so they are
missing the single, large chute. Once the wing was installed the gun ports
(which are correctly aligned with the ground, not the leading edges) and the gun
camera were drilled out. The tail wheel well was detailed with stringers and
cable runs; probably an exercise in futility since it is barely visible. The
other major modification was using the True Details cockpit set including the
American stick grip; the British spade grip was not used on these particular
aircraft. The Squadron vac-form Malcolm hood (canopy only), was used while the
windscreen and rear quarter panel windows came from the kit. Finally, the pylons
and bombs were from the spares box. The kit went together with no major
headaches. The only filler needed was at the wing roots, where they had been cut
back to match the new leading edge sweep, and gap filling super glue was used
for this. The nose intake is slightly undersized and required some sanding to
blend it in. Rescribing was mainly done using an old, dull razor saw and dymo
tape.
|
Click on
images below to see larger images
|
|

|

|
PAINTING
FB-382 carried the U.S. equivalents of British colors. Most likely olive drab
and dark sea gray over light gull gray were originally used at the factory; the
dark sea gray, though, was repainted at some time with ocean gray. To duplicate
this I went with Gunze Sangyo olive drab and light gull gray, while the ocean
gray was from Aeromaster. The yellow wing ID bands were also painted with an
Aeromaster color. The white stripes are Model Master enamel. Generally I'm not a
big fan of the Model Master range, but I really like their white for its
opacity. The black stripes were then outlined with decal stripes and painted in
with Tamiya gloss black. Finally
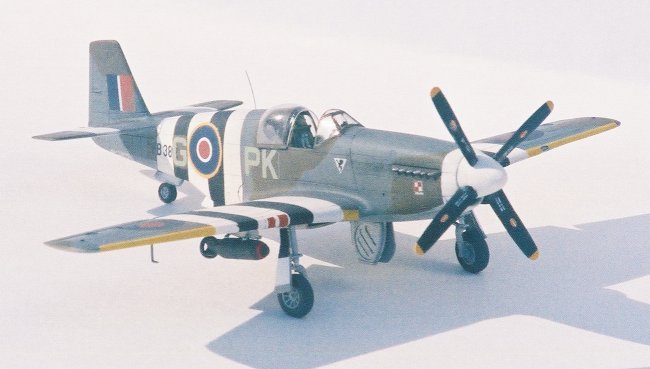
the main wheel wells, gear, and gear doors were painted Testors' flat aluminum
while the wing main spar and tail wheel well were Tamiya chromate yellow.
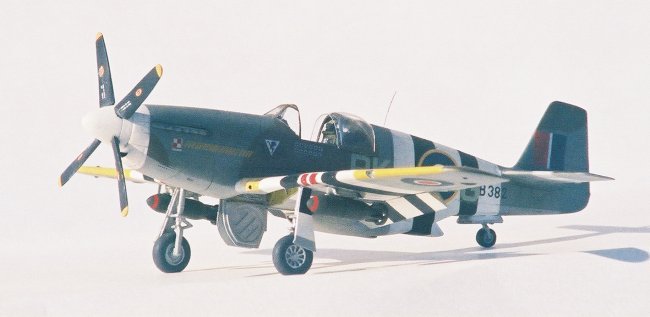
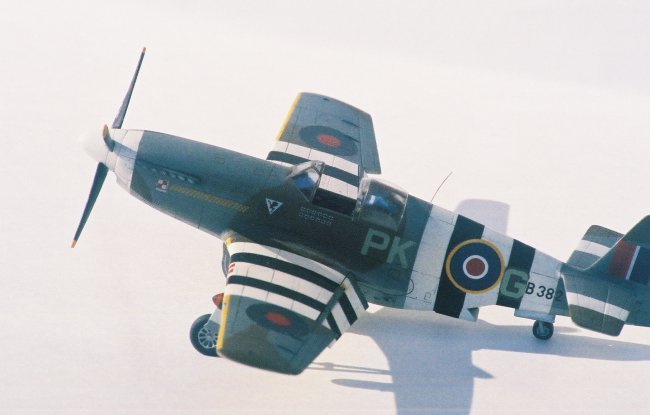
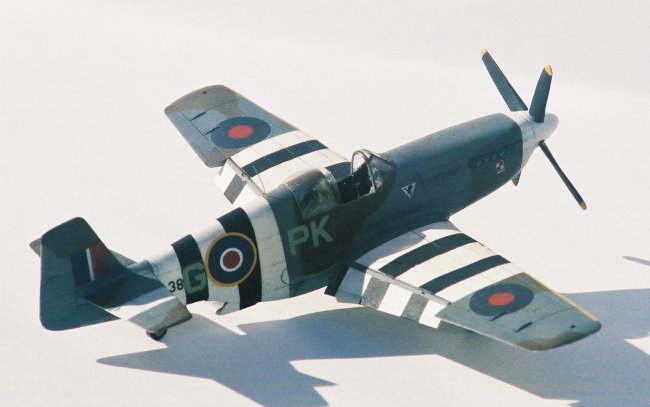
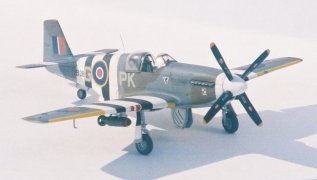
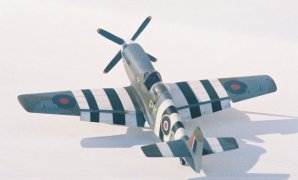
MARKINGS PECULIARITIES
The white band around the nose had a slight but definite rearward slant towards
the bottom. The invasion stripes were very roughly applied and of uneven
diameter on Horbaczewski's plane. The black wing stripes, for instance seem to
have been sized to fit around the under wing pylons, which led to them being
narrower than the white stripes. On the fuselage, the rear sky band was over
painted with white. This meant it was larger than all the other stripes, and
again the fuselage black stripes were narrower than all the white ones. The
fuselage "G" code letter was painted over the aircraft serial number,
and in addition, the rear black stripe stopped short of the "G"
leaving it on an olive drab camouflaged patch of paint. Rather than making the
stripes neat, as usually depicted, I tried to duplicate the crudeness of the
real aircraft, so the model's invasion stripes are uneven in width and ragged on
the edges. Another peculiarity was the yellow wing leading edge ID stripes which
continued the full length of the wing; this squadron evidently had several
aircraft finished that way. The flap leading edges, which are normally unpainted
natural metal, were painted on this aircraft in what appears to be ocean gray,
and then partially covered by the invasion markings. The wing roundels were not
in their usual position; they were much farther inboard than typical, and the
fuselage roundels were larger than normal. In addition, the base of the
propellers carried a significant amount of white over spray from when the nose
was painted. Finally, the canopy was of the unframed variety with the
bottom rails being painted, but the forward and trailing edges were not.
DECALS
The decals came from several sources: Xtracolor sheet# X039-72, Super Scale
sheet# 72-303 , and the Hasegawa and Academy P-51 kits. Starting at the front
the Polish insignia on the nose came from the Hasegawa kit; all the others were
much too large for FB-382. The bomb tally came from the Xtradecal sheet, but it
had to be cut down to the correct 19 mission tally. It appears that the
bomb markings should have red surrounds on them, but I was not about to try and
replicate that in this scale. The aircraft data block (minus the "+"
indicating a fuselage fuel tank) was applied first, then the squadron insignia
was applied over that. These insignia came from a pair of Academy sheets; they
are the closest to the correct size and style;
although, the correct red head and claws had to be added. The kill tally was
also from the Academy sheet, since it had the correct white outlines; although,
it too had to be pared down to show only 12 kills. The aircraft code letters are
from the Hasegawa kit; all the others were far too large. The non standard
fuselage roundel came from a Typhoon sheet, in order to match the size of the
roundels in photographs. The serial number had to be pieced together from
several different sheets out of the spares box. All other markings came from the
Xtracolor sheet. Future was used as a clear coat prior to decaling and again to
seal the decals once they were applied. Following that artist's oil paints
were used to "dirty up" the aircraft. Once that had dried Polly
Scale flat coat was used as a final coat.
FINISHING UP
Following the last matte coat drying the loose pieces, mainly gear doors and
wheels, were added. The bombs, which had been painted dark green with red and
green stripes, were glued on along with the canopy. Navigation and id lights
were painted, and finally the radio antenna, made out of stretched sprue, was
added, and I could finally call it a day. What was meant to be a quick and easy
project shows how difficult it can be to produce an accurate model of even
famous aircraft.
Murph
|
Click on
images below to see larger images
|
|
|
|
|