|
There’s
nothing new I can add about the Fairchild A-10 Thunderbolt II, nicknamed
“Warthog”, so I will talk a little about the unit I chose to depict on my
model: the 917th Wing.
The
917th Wing
Originally
formed in 1963 as a Troop Carrier Wing operating C-124 aircraft, the 917th Air
Force Reserve Wing based at Bakersdale AFB, Louisiana is a composite wing today,
which operates both the A-10 Thunderbolt II (47th Fighter Squadron) and B-52H
Stratofortress bombers (93rd Bomber Squadron).
The
917th first received its A-10 in 1983 and the new 46th Tactical Fighter Training
Squadron assumed replacement/training responsibilities. Due to Air Force
restructuring and the creation of the Air Combat Command in 1992, the
“Tactical” was dropped from the 917th name, becoming 917th Fighter Wing.
The
46th Squadron was deactivated during 1993 when the active-duty Air Force took
control of all fighter replacement training, and all A-10 aircraft were assigned
to 47th Fighter Squadron. In that same year the 917th became the first Air Force
Reserve unit to acquire a strategic mission: the 93rd Bomber Squadron was
created to receive the B-52s.
The
917th Wing Warthogs were deployed to Aviano Air Base, Italy, in 1993, 1994 and
1995 to support United Nations no-fly zone rule over Bosnia-Herzegovina, and was
awarded the Air Force Outstanding Unit Award for service during these deployments.
Italeri
OA-10A Thunderbolt II Kit
The
Warthog is one of my favorites airplanes, and stands up there with the F-4
Phantom and I was really surprised when my girlfriend presented me with the
Italeri 1/72 kit. More surprise was when I opened the box. 126 parts finely
molded in light grey plastic plus 7 clear parts, with great recessed details,
good cockpit for this scale and fine selection of armaments which includes
nicely done Mavericks with clear lens and well molded Sidewinder missiles (a
little undersized tough). A fine printed decal sheet is provided to two Ghost
Grey painting scheme aircraft.
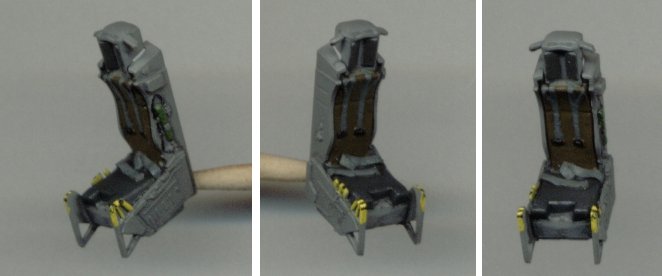
But
the surprises ended up here, as soon as I finish the painting and assembly of
the cockpit, with its great ACES II ejection seat reproduction (the best plastic
injected in 1/72 scale in my opinion), the fitting problems started. You will
need a lot of sanding and dry-fitting here before definitely attach the assembly
in the fuselage halves, the rear bulkhead is wider than the space where it’s
supposed to fit. At this point I thought, “Oh, it really IS an Italeri kit!”
I
made just a few modifications to the kit:
-
add
the lap seat belts made from Tamiya tape, the shoulder ones were molded in
the seat;
-
add
some wiring inside the wheel wells;
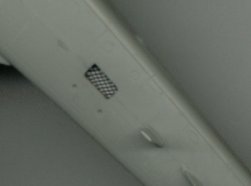
-
opened
the APU air intake on the lower after fuselage and add a fine nylon screen
on it;
-
sanded
off the stall stripes on the leading edge of the wings and replaced it with
a styrene strip, more suitable to the scale.
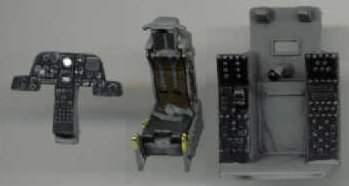
Now,
here is a list of some of the fitting problems I found during assembly:
-
Cockpit
assembly is too large to fit inside the fuselage. Need dryfitting and
sanding to correct placement.
-
Fuselage:
part# 07 which consists of the gun fairing and nose wheel well assembly is
pretty hard to align with the fuselage halves and nose cone, a lot of putty
and sanding was required here; patience needed also!
-
Wings,
a lot of work here: upper and lower halves also difficult to align, with fit
problems on the wing tips and landing gear pods. The two part ailerons are
ok to be posed in the opened position, but they are hard to fit when closed.
As these parts are opened on the ground only during maintenance or for
airshows display purposes, I choose to pose them closed and paid the price!
-
Wings
and Fuselage join: another challenge here in getting the correct dihedral to
the wings. No sanding nor putty here, but you will need to hold or build
something to assure the correct alignment between the parts.
-
Engine
nacelles: again dry-fitting, putty and sanding required. And be careful, the
complete engine assembly is too weak, any pressure and the parts may break
it up. This happened to me during the painting stage, and I have to work it
all over again!
Well,
the rest is ok! Oh, I can’t forget that! The kit instructions ask for 30g of
weight nose, but I can assure you I add much more than that to get the nose
wheel on the ground. The aircraft has a long tail and a heavy weight engine
nacelle which makes it a really tail-sitter. Be careful on this! And don’t
worry about the extra weight, the landing gear parts are strong enough to hold
it.
Painting
and Decals
The
Ghost Grey scheme indicated on the kit is too boring in my opinion, so I decided
to work on a camo aircraft with some nose art, that’s when a friend of mine
(thanks Angelo!) gave me the decal sheet from his Academy kit for the 917th
Wing, 46th Fighter Training Squadron, with the Warthog nose art. A great scheme!
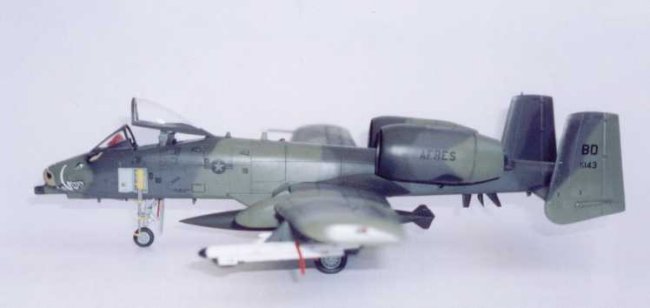
As
the Warthog nose-art was in hi-viz colors, I decided to depict and aircraft from
the earlier years of the 917th Wing Thunderbolts, circa 1984 (the nose Warthog
art was toned down to grey later). This way I selected the first version of the
European I camo scheme (FS 34092, 34102 and 36081) and white armaments and pods.
As the 46th Squadron was a training unit at the time, I cut off the AGM-45
Maverick tail fins and painted blue stripes on them to depict a training load.
|
Click on
images below to see larger images
|
 |
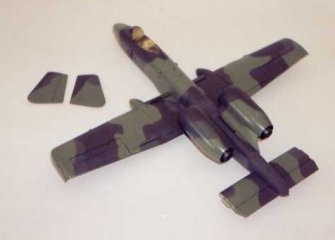 |
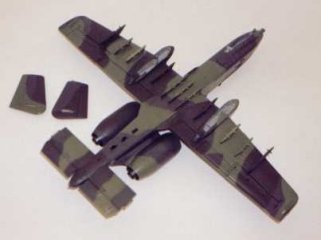
I
choose to paint the engine nacelles, vertical stabilizators and fuselage
separately to make the things easier. The A-10 airframe design do not help to
paint a camouflage in 1/72 without masks as I like to work, and painting these
assemblies first and then complete the airframe assembly made the things pretty
easier in my opinion. In the pictures above the engine nacelles were already in
place after painting.
I
used Tamiya and Gunze acrylic paints on most of the kit, including pre-shading
and camouflage, Model Master Aircraft Gray was used to paint the landing gear
struts, wheels and wheel wells, and Model Master Metralizer Non-Buffing Gunmetal
for the engine exhausts and Buffing Titanium for the fan blades. I achieved a
great effect on the fan blades using pastel chalks and a silver drybrushing. I
really liked the result!
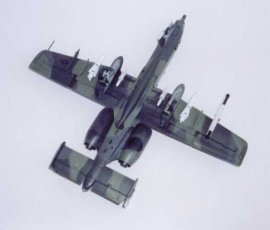
After
painting was completed it was time to decaling. I used both decals sheets (Italeri
and Academy) to get as markings and stencils as I could. I had two problems
here: the first one was some silvering on the Italeri star ‘n’ bars decals
and secondly, and the most serious, the Academy’s Warthog nose-art does not
fit to Italeri model properly. It is too wide to the aircraft nose and I had to
paint the area just behind the gun muzzle in the end.
|
Click on
images below to see larger images
|
|
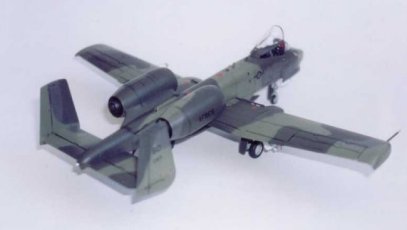 |
Weathering
and Final Assembly
I’ve
never seen an A-10 too weathered, so the effect here is very subtle, only a fine
black wash to highlight the panel lines and some pastel chalk to produce some
dirt. Small silver chips were visible on the wing leading edge and engine air
intake.
Everything
coated was time to attach the small parts like landing gears, gun muzzle, ladder
and external stores. The ladder is too large for the scale but as I don’t have
any option here I used it anyway. I armed my aircraft only with two
“training” Maverick missiles and a ECM pod (as long as I know the
Sidewinders were not used in 1984). I add a centerline fuel tank and two empty
triple ejector rack that I took from an Italeri A-7E Corsair kit. I used Model
Master Acryl Semi-Gloss clear as the final coat of the model.
Conclusions
This
is a really nice kit from the A-10 Warthog and I believe it’s the best option
to 1/72 modelers. Great detail overall and a nice cockpit, but it has a not so
easy assembly, specially nose, wings and engine nacelles. Nothing that could not
be handle by modelers with some experience. The aircraft design and the European
I camoflage pattern makes the things difficult to paint it, so you better leave
the engines and tail fins to be glued after painting. It will help you a lot,
and the fitting for these parts with the fuselage is great.
I
have another of these Italeri kit waiting for me in my shelf, but next time
I’ll depict a Desert Storm veteran, with Gulf War nose art.
I
named my Warthog “AC” after my girlfriend (and near future wife) Ana
Carolina. I took a small “AC” from an old “U. S. AIR FORCE” lettering
available in my spare box and placed it in the crew ladder door.
This
is for you Ana! Thank you for all!
Mario
|