|
The
armament tub is a rather interesting feature of this aircraft. It is designed to
hold bombs, depth charges or a torpedo and can be quickly removed from the
aircraft and replaced with a loaded tub vastly improving the sortie turn-around
time.
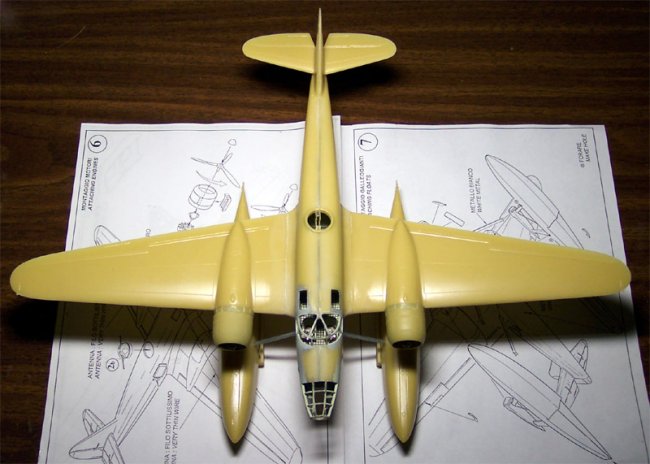
Things are moving along very quickly now, for a
kit of this caliber I had expected things to take a lot longer. The engines were
placed on the back-plates and the cowlings were glued in place. Both completed
assemblies were glued to the wing mountings and the aileron hinges were placed.
After making another surface inspection I went to the tail control surfaces and
installed all the mass balancers. I’m saving the wing and fuselage antennae
masts for the very last as I would probably break them off a half dozen times
before finishing this.
|
Click on
images below to see larger images
|
 |
 |
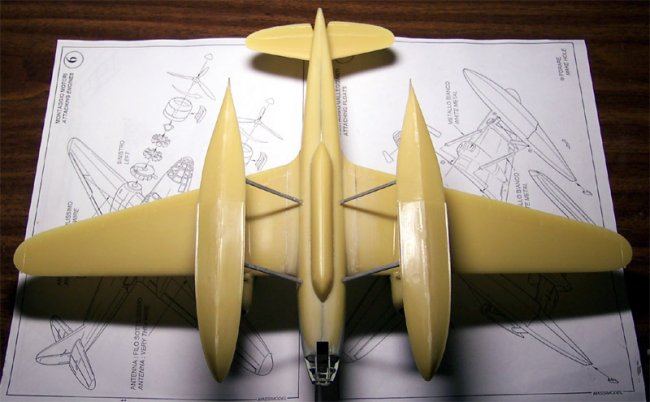
Now begins the tedious job of packing all those openings with tissue paper prior
to painting. I torn up several pieces of tissue and inserted them one piece at a
time with fine tweezers alternating with drops of water. About and hour and a
half later I was ready to glue the antennae masts on. Yeah, they would have been
trashed by this time.
|
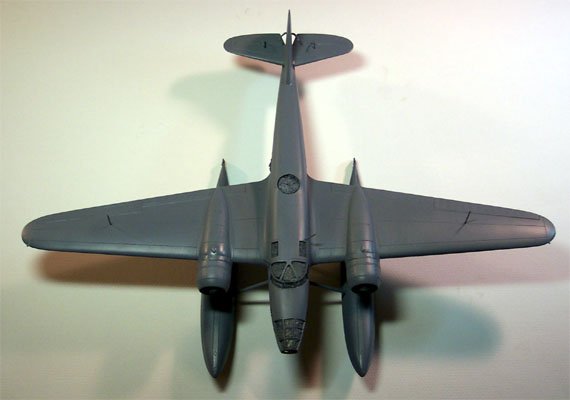
And off we go to the paint room. I’m using Model Master Primer Gray cut
50% with lacquer thinner. I’m shooting it with my Badger 360 airbrush
and have the pressure set just under 20 PSI. Using a primer before
painting your top colors is very important. It gives the top coats
something to bond to, allows you to use less paint to achieve a good color
density and will show you all the defects that need to be addressed prior
to applying your color coats. Also, the color of primer that you use will
influence the final color of your paint job. |
Click on
image below to see larger image
|
 |
|
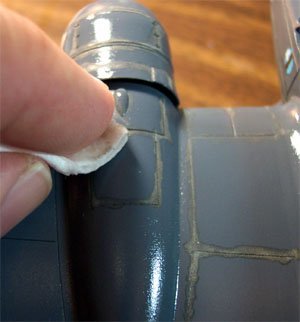
The primer has revealed several areas that need attention. First and not
surprising were some seam areas on the top and bottom of the fuselage that had
appeared to be good after sanding but still needed a very fine amount of filler.
The amount needed was so little that I simply brushed a couple of coats of
unthinned primer into the seam then sanded it smooth. Second and more unexpected
were several casting seams on the floats and engine cowlings. These were shaved
off with a razor knife then sanded smooth.
I had left off the oil coolers from the
bottoms of the engine cowlings until after the primer was done. The interior of
the coolers were done in a gray/brown mixture then strapped into place with
strips of masking tape so they could be properly aligned. Little dabs of
super-glue were used to hold them in place and then a more substantial bead of
super-glue was put in place with a dental pick. The point where the oil coolers
meet with the wing area has to be the single worst fitting point on the entire
model. A terrible gap was formed here and had to be filled with successive
layers of super-glue and filed down with a flat diamond file.
|
After all this filling and sanding had been finished she went back to the
paint room for another coat of primer. Still have a seam issue under the
fuselage and will have to layer in a little more paint before topcoat
colors can go on. Also noticed a casting seam on the tip of the Starboard
wing that needs to be sanded off. One more round of sanding and priming
and I should be ready to start mixing my final colors. |
Click on
image below to see larger image
|
 |
|
Progress has been a little slow on this project recently and that is mostly a
result of the more mundane aspects of life intruding upon the modeling schedule.
When I built the Fw-200 Condor I ran into a paint shortage situation and
cautioned the reader to be prepared and have the paint stocks you will need in
advance. I did not take my own advice well. I had intended to mix my own paint
from stock and match it to color chips. I was able to achieve a light gray for
the underside that I liked but no matter what I did I just could not get the
right tone to the upper dark gray so here I sit, waiting for paint to arrive
from Texas.
|
There are a few things I can do in the meantime though. First I’ll paint
the center section of the aft fuselage Testors flat white enamel in
preparation for masking then the rudder is done with Gunze-Sangyo Black
Green. I’ll let these dry until the new paint arrives then mask them off
with masking tape and tissue paper. I love the painting process, laying
down a color then masking it off and laying down the next color. The most
exciting part is when it’s all done and the masks come off. The
anticipation of how it will look and if everything came together as
planned, it’s like that person at the plastic surgeon as the bandages
come off, will it be a work of beauty or a horrible monstrosity? |
Click on
image below to see larger image
|
 |
|
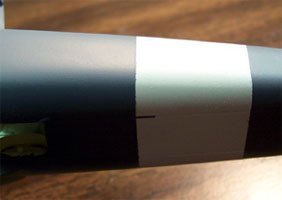
Squadron has delivered my paint right on schedule and I am ready to proceed. The
rudder and the mid fuselage area have had several days to cure and are ready to
be masked off. The rudder is easy, I just cut some long thin strips of masking
tape and ran them along the hinge line then laid larger pieces of masking tape
over the rest of the rudder. I used the thin strips so they could flex easily
around the top area of the hinge line, which bends slightly. I measured the
white fuselage strip on the three view verses the distance from the edge of the
gunner’s window and the beginning of the tail fin. On the drawing I had 11mm
from the window edge to the edge of the white area, 14mm of white area and 10mm
to the beginning of the tail fin. That’s a total of 35mm. So now I divide 14
(the white area) by 35 (the total area) for a result of .4 or 40%. I also divide
11 and 10 by 35 for .3143 and .3125. Now I go to the model and measure the total
area from the window edge to the beginning of the tail fin and get 62mm.
Multiply this number by .4 gives me 24.8mm, which I round up to 25. Now I know
how wide my strip will be. Take 62 and multiply by .3143 and I get 19.48mm,
which I will round down to 19 this being the distance from the window edge to
the beginning of the white area. Just to check everything I multiply 62 by .3125
to get 19.93mm, which I can measure from the beginning of the fin to confirm my
strip size. Boy, that was a lot of work, wasn’t it?
|
Alright, back to masking. I use the same technique as before to mask the
white area. Two long thin strips mark the outer edges and the center
section is covered with larger strips of tape. Due to the shape of the
fuselage the tape wants to buckle in a couple of areas and I use my
tweezers to pinch it so no paint will blow underneath it. |
|
All the seams have been double checked and the entire model has been dusted with
compressed air. I am ready to start painting. I begin with Model Master Enamel
Aircraft Gray thinned about twenty-five percent with lacquer thinner. Air
pressure is set at 18 PSI and I lay down two good coats of color on all the
underside surfaces. This is allowed to dry overnight then I move on with Polly
Scale acrylic Dark Sea Gray for the upper surfaces. This is thinned about the
same ratio as the enamel was but using Windex as my thinning agent. I also added
two drops of a flow aid to the thinned mixture as Polly Scale acrylics tend to
clog the airbrush tip. The top color was somewhat difficult to do as a result of
the floats and supporting structure. It was more than the typical top and bottom
colors. We have top and bottom colors on each of the floats, on all the struts
and on the main fuselage so there are a lot of demarcation lines and some
over-spray is unavoidable. After the Dark Gray had overnight to dry I came back
with the Aircraft Gray thinned out to about 50% and with air-pressure adjusted
down to 10 PSI and touched up the over-spray areas.
|
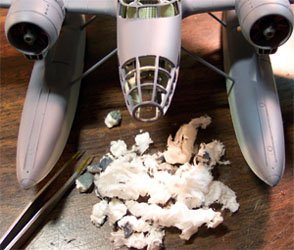
Now I can start to remove the masking tape and packing material in the
fuselage. First thing I saw was a little bleed that had occurred into the
white fuselage band along the upper panel lines on both sides. This is
easily repaired with a fine brush and ultimately there will be a wash on
that also. I did not realize just how much tissue paper I had packed into
this back when I was getting ready to prime it. This picture to the left
is just from the nose cone only.
There were a variety of
little tissue threads stuck to edges that needed to be cleaned up and the
edge lines around the window areas had to be touched up with a brush but
overall it is looking very nice. |
|
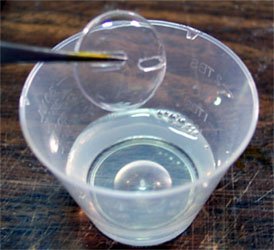
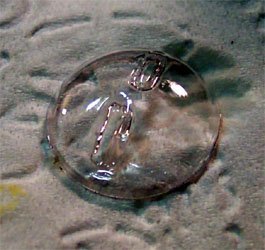
While this is curing I start looking at the clear parts and the top turret. I
also have sanded the side window hatches and have them ready for paint. They
will be one of the last pieces put in place. The turret glazing and nose glazing
are on a single sheet so that is where I’ll start. Using my Dremel with a
cut-off wheel I cut the major pieces of excess plastic off then shift to the
flat edge of the wheel to trim the turret glazing to the final size. The
interior slots are opened with the tip of my razor knife then finished with a
series of diamond files. The nose piece is too large for the framing so I will
sand it down on a large sheet of sandpaper until it conforms to the frame work
of the aircraft. The glazings are dipped in Future and placed on tissue paper
and covered with a cup to dry.
The top colors have had a day to cure now and the entire aircraft is coated with
Future floor finish. The Future is applied at 100%, no thinning at all. Air
pressure is set back to 18 PSI and the gun is about 4 to 6 inches from the model
surface. I apply a wet coat to the entire bottom area and let that dry for a few
hours then come back and coat the top surfaces. I’m putting this on very
heavy, just short of the point at which it will run or pool. This takes some
practice to be able to judge the concentration level so if you are not real
experienced with Future you may want to use slightly lighter coats and use more
of them. Once she is dry to the touch she is moved back to the model room to
finish curing.
|
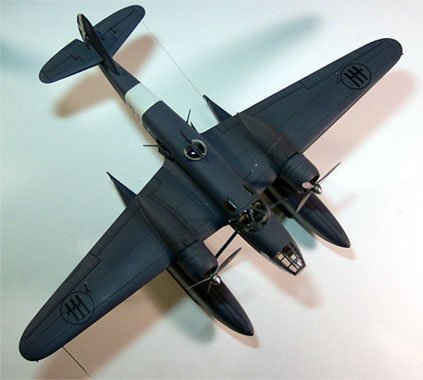
Yet another day has passed and now I will apply the decals. The decals
with this kit behave very nicely. They do not want to grab or tear but
slide nicely into place and react well to both Micro-Set and Micro-Sol.
The tail marking are a combination of four decals, two on each side that
overlap each other. The white cross overlaps the opposite one and the
national shield is placed on top of the white cross. There are some small
numbers for the side that are not visible in the pictures and the modeler
has a choice of high or low visible numbers and can choose the aircraft
number to be placed. There are no stencils but then in all reference
photos there are no stencil markings to be seen.
|
Click on
image below to see larger image
|
 |
|
|
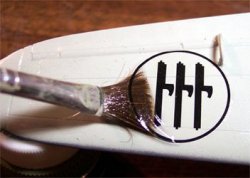
I love to get feedback from readers, it helps keep me motivated on
projects and sometimes provides ideas for new techniques. Sometimes my
mistakes are pointed out. See that decal on the left wing? Well guess
what, it’s all wrong. Seems the Italian markings are handed (left and
right hand) and the instructions showed this but I failed to pay attention
to that point. Fortunately it was pointed out to me before the sealing
coat of Future went on (thanks Randy). I have the top decal on the bottom
and vise versa. |
|
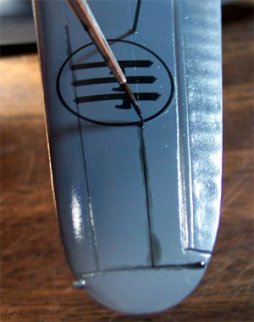
Now I have to fix this. There are no spare decals and I am not about to try to
get another set from Italy so I must lift these decals that have been put down
with both Micro-Set and Micro-Sol and have had more than 24 hours to dry. I
start by wetting the decal with some Micro-Set to help soften it then wet it
heavily with water and let it set for a few minutes. Now, using a wide soft
brush, I gently push the bristles against the edge of the decal to start it to
lift. This takes patience. Shortly the edge of the decal lifts and I continue to
wet it and work the bristles further under the decal. Progress is slow but sure
and after about fifteen minutes this decal has been lifted without taking any
damage. I transfer it to a sheet of stock plastic with lots of water to wait for
me to remove the second decal. The second one comes off in the same manner and
takes about fifteen minutes also. The wing surfaces are wiped off and the decals
are replaced on the correct surfaces. After they have had a few minutes to set I
apply some Micro-Sol with the same soft brush that I used to lift them with.
This sets the project back one day while everything dries back down but the
correction has been made and now I have total confidence in my ability to lift
decals in the future. See, there is a bright side to everything.
24 hours have past and I can start to work on some panel lines. This is a very
conventional approach (for me). I’m using a standard sludge wash made from
Grumbacher acrylic paste, tap water and liquid dish soap. For more details on
this mixture you can read about it in
The
Basics of Weathering. I’m working through the wing upper surfaces and the
upper nose areas first. The sludge wash fades quite a bit when it dries but the
final dull coat will make it stand out nicely. It only takes a few minutes for
the wash to flash dry and then I can begin to wipe the surfaces with a damp
tissue compress. The tissue leaves an assortment of fine lint threads behind but
once the surface has dried I can dust this off with a wide, soft brush – the
same brush that I used to lift those decals with.
There are several other detail items that
still need to be worked on and I will do these between weathering steps on the
main aircraft. The two items of interest to me at this time are the top turret
that I’ve already gotten the clear parts ready for masking and the propellers.
The instructions do not give any good reference for masking the turret dome so I
have to go back to my copy of Ali D’Italia and find some pictures to determine
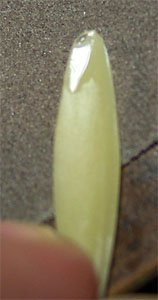
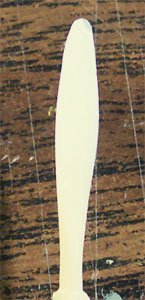
the correct framing patterns. The propellers have issues of their own, there is
a horrible seam line that runs down the length of each blade that must be sanded
off, and these blades are very thin and delicate. One blade on each propeller is
warped and needs to be straightened under hot water and if that is not enough,
one blade has a large chip missing from the tip.
The first thing that I will deal with is the chipped propeller blade. After the
propeller has been washed in warm soapy water to remove any mold release
residues and dried I can begin. First I apply a droplet of medium super-glue to
the chip and place a drop of accelerator further up the blade and allow it to
run down to the glue. Now I lay a piece of 220 grit automotive emery cloth down
on the edge of my work table and begin to sand the tip of the blade. When it
nears the original resin material I shift over to 400 grit emery cloth to finish
the job. This is emery cloth, not sand paper so it is not as aggressive and the
400 gives a nicely polished surface ready for paint. The rest of the propeller
is not ready however. There is a nasty seam that must be sanded off of each
blade and around the shaft mount. This is done with the 220 grit emery cloth
folded over and finished with the 400 grit.
|
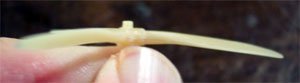
Once both propellers have been cleaned up they have to be straightened
out. I cannot count the number of times I have seen people ask on forums
how to straighten resin and the answer is always the same – hot water.
That’s a little vague fellas, just how hot is hot and when do you cause
irreversible damage? This is exactly how I dealt with it: I took a
porcelain cup and filled it with hot tap water then micro-waved it to
raise the temperature. I used a candy thermometer to check my temperature
and when I reached 180 degrees Fahrenheit I was ready to start. I worked
in the kitchen where I could have running cold water at my disposal. I
held the bent blade into the hot water and swirled it around for about 20
seconds letting it acquire some heat. |
| This is a very thin part so the time
required is short. If it had been a heavier part I would have let it soak
longer. I pulled it out of the hot water and pinched the blade with my
fingers and bent it back to the desired shape and while holding it in this
shape I submerged it in cold running water to solidify the piece. Two
blades on one assemble and one on the other needed to be straightened. |
|
|
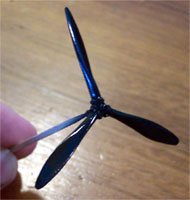
Now I am ready to start painting. The propellers will be done with Alclad
Aluminum. I mount each prop on the end of a toothpick so as to have a good solid
painting handle and head to the paint room. I like to use Krylon Gloss Black in
a rattle can for my Alclad primer but shooting from the can is not a good idea.
I use a drinking straw pressed over the tip of the spray head and shoot the
paint into a film canister (this is called decanting) where it is collected and
then transferred to my Badger 360 airbrush. Each propeller and it’s spinner
cover are primed, given an opportunity to dry then given two coats of Alclad
The backsides of the spinner covers will be done with Model Master Steel as well
as the blade mounts at the propeller shaft and then washed with a rust wash. Now
I can move on to the top turret.
You ever have one of those days when
you lose that one little piece? I thought I was having one of those days when I
could not find the counter balance for the top machine gun. I couldn’t find it
anywhere then I got to thinking that I could not recall having ever seen it. I
went back to the preview article and examined the parts lay-out and sure enough
– no counter balance. At least I had not lost it and it is a simple piece that
I will be able to scratch build so it’s no big deal. The frame for the gun is
painted with Polly Scale Light Gray acrylic and the gun itself is done with
Gunze-Sangyo Burnt Iron then dry brushed with Model Master Steel. The counter
balance will be fashioned from some stretched sprue.
A few details remain to be finished
on the main model. The waist guns and armatures are installed and the sliding
cover plates for the gun windows are ready to be placed. The reference photos
show these plates cocked out at the aft end and a bit of a shaft is visible
between the plate and the fuselage so this is made from some stretched sprue and
the plates are glued in place. All pictures that I’ve found of these planes
show it to be fairly clean and lacking in severe weathering so I will restrain
myself in the weathering process. I add a light dusting of Tamiya X-19 Smoke aft
of the cowling flaps and back from the exhaust tubes under the wings. Using some
Model Master Steel on a stubby brush I dry brush some chipping around the front
crew access hatch, the engine covers and access panels and around the waist gun
plates. I keep this very light. A quick dust-off with compressed air and it is
ready for a good coating of Polly Scale clear flat.
|
Click on
images below to see larger images
|
 |
 |
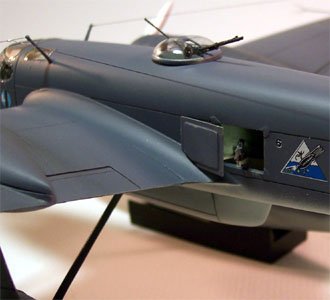
After looking at several reference photos of the top turret I masked it and shot
it with the dark Sea Gray. It is very visible into the turret and there is no
detail below the gun so I went back to the spares box to dress this area up. I
came across a resin turret seat from the Fw-200 that had been an alternate and
it fit beautifully into the Fiat turret so I painted it up and super-glued it in
place. This improved the interior look quite a bit looking in from the top,
front or waist gun windows. The counter balance was made from stretched sprue
and inserted after the dome glazing was glued in place.
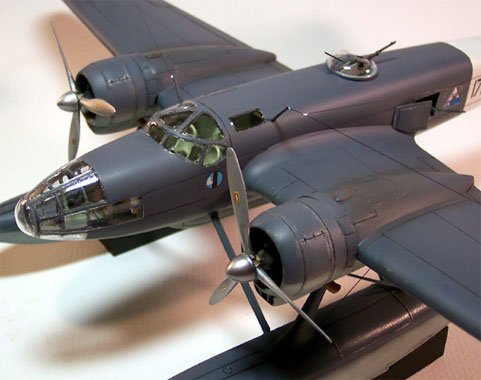
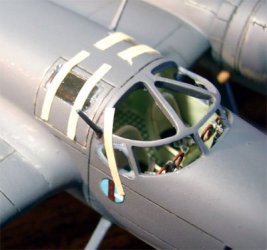
Now I am moving on to what is most
likely the hardest aspect of this kit – the front glazings. These glazings are
a series of individual pieces that each must be cut out from the main sheet then
sanded and trimmed to fit each opening on the model. I start with the two
rectangular pieces behind the cockpit to get a feel for it. Oh Yeah, this is
going to be fun.
Each piece is trimmed to just fit
into the correct opening without any pressure then it is Futured and set aside.
It is important to keep them in the correct order as the left and right pieces
are not interchangeable even though they look virtually identical. I have about
8 hours invested in getting these pieces trimmed and sanded. After each piece
has had 12 hours (overnight) to cure they get placed. I use thin strips of
masking tape to hold each pane in place and have put a bead of Testors Clear
Parts Cement around the edge of each opening. I cannot work in series here as
the tape from one piece will interfere with the next so its one piece on the
left then one on the right then one in the nose. I give each piece about an hour
for the glue to harden then remove the tape. Where the tape crossed over the
glue line there is some glue crude but the glue is still slightly pliable and
can be trimmed up with a razor easily.
Now that the cockpit panes are all in
place I can put the aerials in place. For aerial wire I’m using invisible
thread drawn through a slot cut into the tip of a black permanent marker to
color it. A little superglue and accelerator is used to attach it and the
attachment points are touched with a little flat white for the insulators.
The last of the nose panels have been
put in place and the framing has been touched up with a fine brush. I used a
piece of stretched sprue to make the pitot-tube mast and a piece of fuse wire
bent in a “U” for the dual tips.
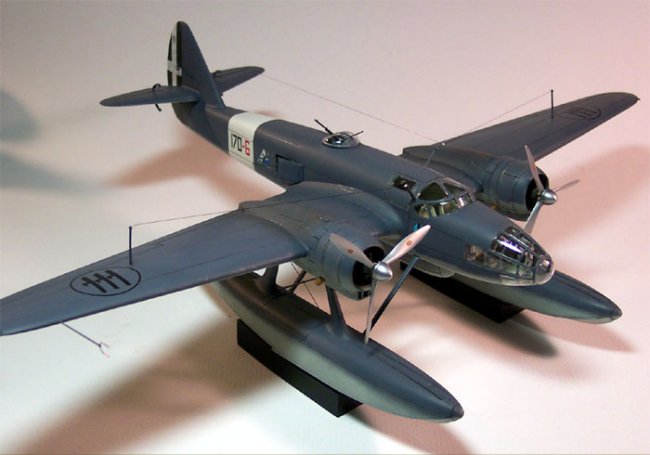
The last item to be dealt with is the propellers. They have already been painted
and have had plenty of time to cure, the spinner covers have been glued in place
and the hubs have been washed with a rust wash. The decals are placed ½ inch
from the tips. Since these were done with Alclad there is no topcoat of Future,
which would change the appearance of the Alclad finish. This aircraft uses
counter-rotating propellers so take care that you glue them on the correct
engines.
This sure has been an interesting
build. This has been the most complex resin kit I’ve completed to date (the
S-38 is the most complex I’ve started) and it has been a learning experience.
Using five-minute epoxy was definitely a good move. I’ve had to straighten
resin pieces in the past and have always used straight hot tap water but moving
up to 180-degree water made that job so much easier. Considering the price of
this kit I was somewhat disappointed to find there was a piece missing (Turret
gun counterweight) and that there was no pitot tube included especially since it
is such a prominent piece and there is not radio directional beacon housing that
would be mounted ventrally behind the weapons pod.
Those individual pieces for the
glazings certainly were a project with nearly eight hours of trim time and then
installation time, whew, some real work there. The instructions were good and
the decals were very good. It is indeed a pricey kit but overall I think it was
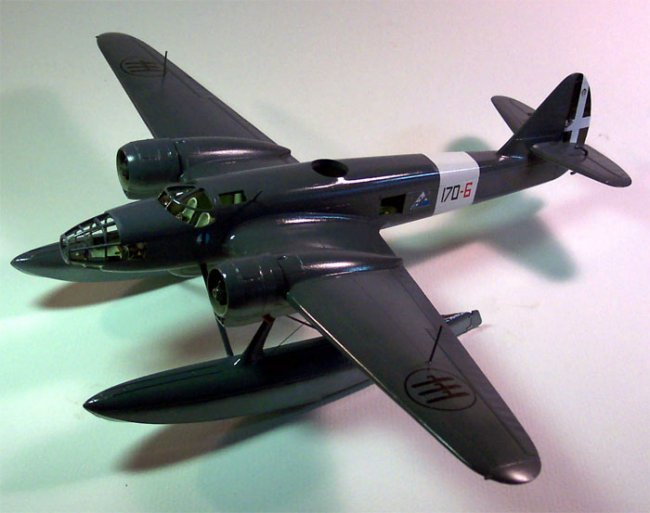
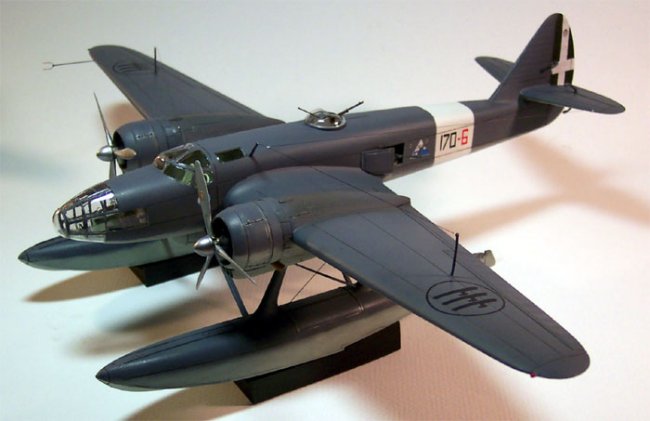
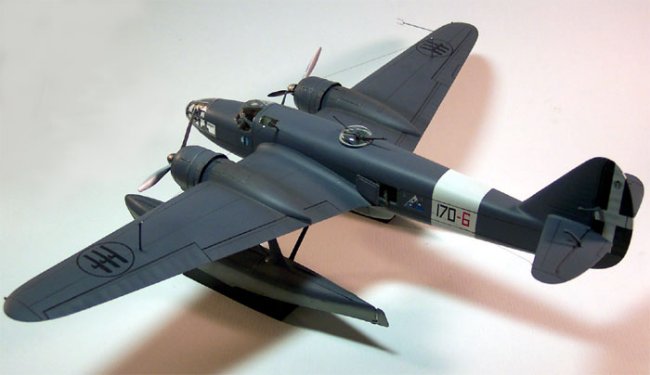
worth the investment. And there you have it, one complete Massi Models 1/48
scale resin RS.14 Fast Maritime Reconnaissance Seaplane.
Matt
|