|
The
RAF’s famous “Treble One” squadron began formation flying on Meteor F8’s
in 1955 but in 1956, after re-equipping with the Hunter F6, it entered a
competition, open to all RAF fighter squadrons for four ship display teams &
won through. The team grew to five
& then in 1957, the “magic” nine aircraft.
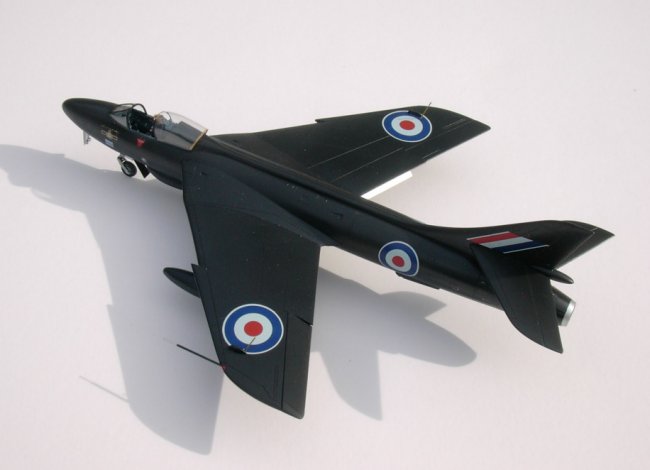
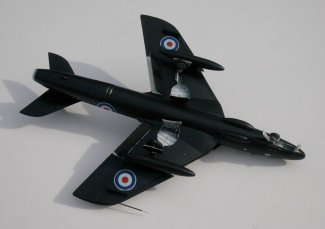
Black
was the chosen colour for this team (the first in the RAF since WW2 allowed to
paint it’s aircraft in a special colour) as the then leader (Sqdn Ldr Roger
Topp) recalled how “mean” the all black nightfighters of the RAF looked
during the war. Curiously though, it was the French who “christened the
team “Les Fleches Noir” at the Paris Aeronautical Salon of 1957.
The name stuck & the “Black Arrows” impressed crowds all over
Europe until re-equipment of the squadron with the EE Lightning in 1961
The
Academy Hunter F6 & similar FGA9, have been available now for a
number of years. Apart from the Nichimo & very old Lindberg
offering, they are the only injection Hunters available in this scale.
There
are several Hunters here in ARC in the gallery but here’s how I tackled mine
& I’ve broken it down into the various stages.
First though, a list of the “extras” used.
- Cutting
Edge
cockpit
- Aires
wheel bays
- Aeroclub
& Squadron canopy (see below!)
- Flightpath
decals
- Aeroclub
white metal undercarriage legs & wheels
|
Click on
images below to see larger images
|
|
|
|
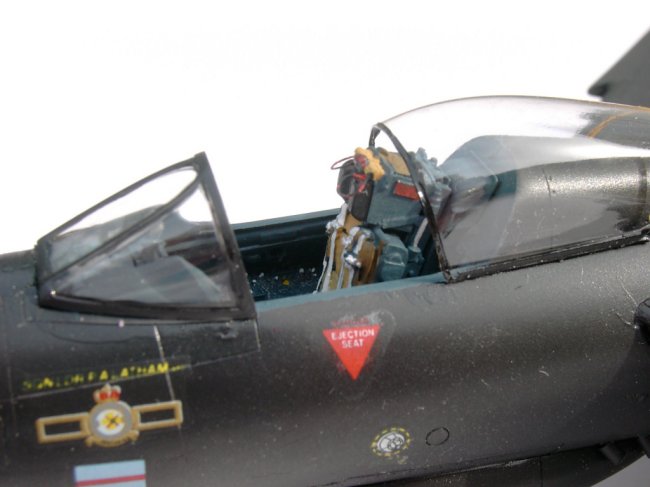
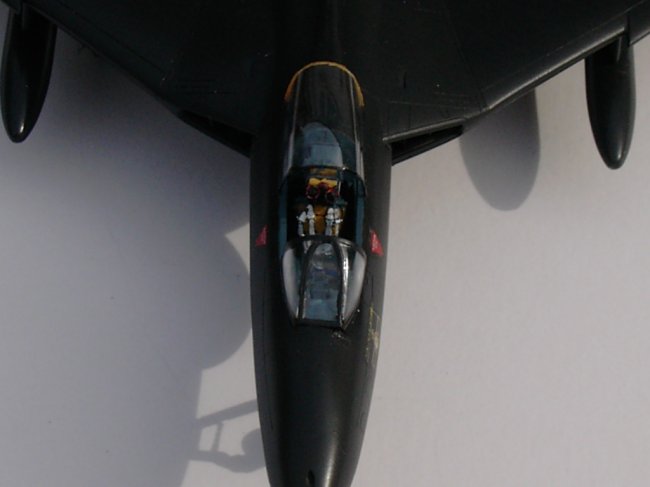
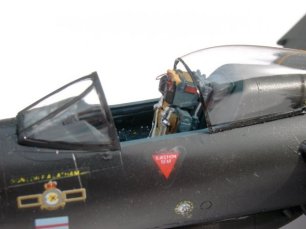
Cockpit:
If
you add nothing else to an Academy Hunter, you really must replace the
cockpit. As provided, it’s far
too shallow & the seat way under scale (see “undercarriage” below for
why I think this is so!). I used the Cutting Edge offering which of course
includes a superb seat & requires only careful painting & the addition
of the seat firing handles from fuse wire.
As my Hunter was going to be over all black, I wanted to avoid the
cockpit “disappearing” into the rest of the kit so I painted it a very dark
grey.
Fuselage/wings:
Here,
I followed the guidance of many previous builders & attached the wings
BEFORE joining the fuselage halves. The
intake trunking was assembled as per the kit instructions & installed in the
starboard side; however, no amount of test fitting & sanding of various
parts could result in a satisfactory, gap fee joint for the fuselage, & of
course with the wings attached it was impossible to use tape to hold it together
while it set. The result was a 1mm
gap along most of the fuselage spine & no option but to fill the gap with CA
glue. I won’t use this method
again!
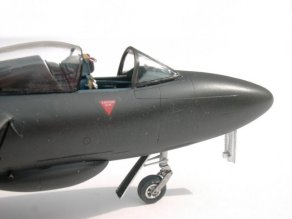
Undercarriage:
The
Aires wheel bays fit nicely into the Academy wings. The
nose bay however is a different kettle of fish.
Academy mould the nose bay with the underside of their nose, along
with the cannon ports. In order to
use the Aires bay, you have to split this kit part (no. D1), & remove
all traces of the wheel bay. You
are left with two “cheeks” which you must then attach to the Aires
resin bay. This was going great
until I came to fit it to the fuselage & found that the underside of the
resin cockpit prevented it going in. Assuming
that this was a result of the Aires bay, I cannibalised another kit part
from another kit (this one will have to be my FR10!).
This wouldn’t fit either. Looking
back at the Cutting Edge cockpit instructions, they do indeed tell
you to remove a large “slab” from beneath the front end of their cockpit.
I was able to accomplish this “after the fact” with a razor saw &
wet & dry but you are left with a wafer thin cockpit floor in this area.
I think this is why the kit cockpit is as shallow as it is; the Academy
pattern makers simply couldn’t figure out how to fit in a “full scale
depth” cockpit with a “full scale depth” wheel bay!
The
Aeroclub undercarriage legs simply replace the kit offerings, their main
wheels being larger & in my opinion all the more accurate than the kit
wheels; a bit of drilling out to accentuate the detail & they look great.
The legs include the necessary “pips” for attaching the kit doors,
however the Aires wheel bays do not have the various strut attachment
points. Although Aires
include doors with their set, I used the kit doors with a little surgery (parts
C9 & C10) being required in order to mate with the Aeroclub legs.
I
discarded the kit canopy & obtained the Aeroclub version, however, I
could not differentiate the canopy from the backing sheet on this so ended up
with a Squadron offering! (Kit windscreen used).
As far as I can make out the rear of the Hunter’s hood has no external
frame but there appears to be something running around the inside in this area. I presume that this is some sort of seal, possibly
“inflated” by pressurisation to fill the gap.
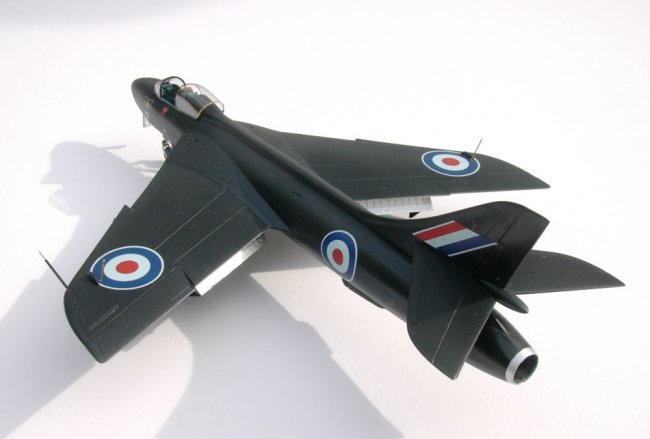
Painting
& decals
Over
all gloss black from Xtracolour. Easy.
The only exceptions being the wheel bays (aluminium) & tail pipe end
(natural metal). The decals came
from the Flightpath Hunter F6/FGA9 update set.
Main decals were fine but the red serials simply disappear when applied
to the kit. Rather disappointing.
After decaling, I sprayed Humbrol satin varnish.
Final
Details:
I
added brass rod for the wing tip aerials & tubing for the cartridge ejector
shoots (to replace the kit parts.
Conclusion:
All
in all very satisfying. Not quite a
shake & bake although I dare say it could be “out of the box” but the
addition of the resin cockpit is, as I say above, a real must.
I have the kits, decals & parts for more F6’s, FGA9’s (including
the fabulous Flightpath set), FR10 (PJ conversion) & T7 (Aeroclub
conversion).
There
are estimated to be over 100 Hunters around the world in either active service
or “flyable storage”. If I had
my way, the RAF would snap up enough low airframe hour examples to equip say a
couple of squadrons, fit them with more up to date systems & use them for
the kind of “low-tech” operations that the RAF finds itself involved in
these days. Somehow though, I
don’t see that happening! Shame.
Sources:
Brief
history of the Black Arrows taken from “Hunters:
The Hawker Hunter in British Military Service” by Martin Bowman,
published by Sutton Publishing & recommended!
Graham
|
Click on
images below to see larger images
|
|

|
|
|