|
KIT REVIEW
The Monogram
Devastator (Kit 7575) was first produced and released in 1979. This release was
touted by Scale Modeler magazine as one of Monogram's finest offering at the
time. The kit is molded in a light grey styrene and flash free. Panel lines are
the raised type with raised rivet details. The kit is exacting in details such
as the wing root detail and the corrugated wing areas. The cockpit interior is
provided with the basic details, and if no additional details are added it
basically captures the look of a Devastator cockpit. It is an outstanding model
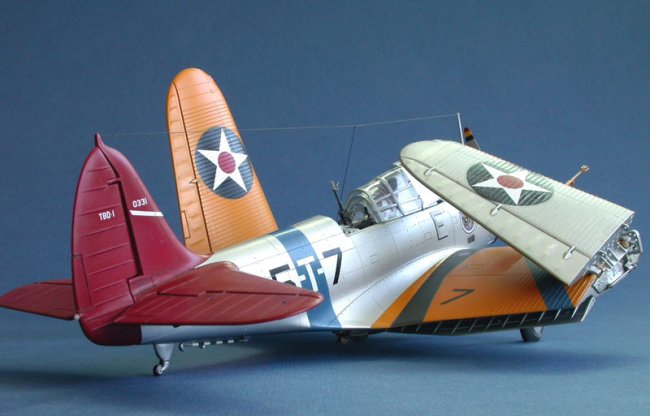
from the 70s. Details included are: foldable wings, rotatable rear gunner seat,
opened access panels to gun bay and hand crank step platform, and bombardier
sighting compartment located beneath the pilot's floor complete with sighting
window. Armament options provided are a Bliss-Leavitt Mk XIII torpedo and some
bombs.
The kit used in
building this model is an original release from 1979.
FIT UP:
Dry fitting was
performed on the parts prior to assembly to assess the challenge that was to
come. The fit is generally good. The only exceptions are the wing to fuselage
and stabilizer to fuselage joints. The wing joint is particularly bad as it
needed shimming with styrene sheets.
CONSTRUCTION
& SUPER DETAILING:
The kit is
upgraded and brought up to today's standard by rescribing the panel lines. On
this model, I tried out a tool lend to me by my fellow GOMBs modeler to simulate
rivets. I simulated the rivets on the fuselage with recessed detail by using a
tanner's pin wheel. I first draw out the center lines of each roll of rivets.
Then I roll the pin wheel along these lines. Any indentations that are not deep
enough, I enhanced them with a #80 drill bit.
|
Click on
images below to see larger images
|
|

|
 |
|
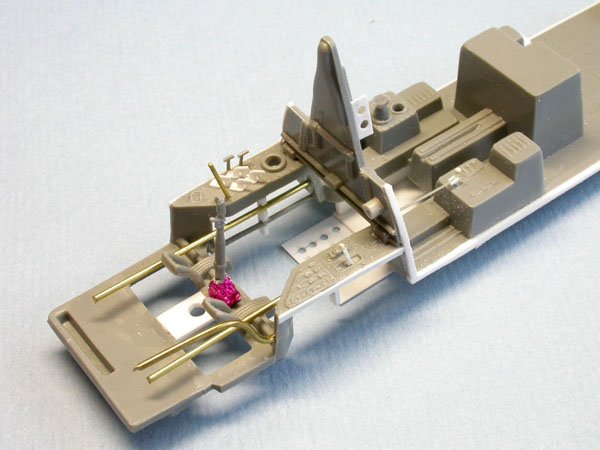
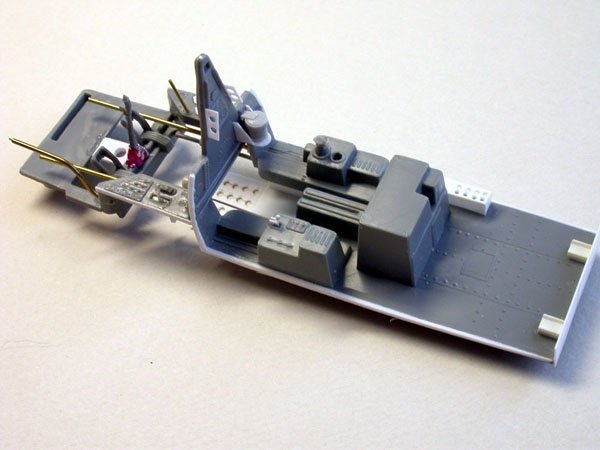
Using the fine
photos from Lynn Ritger's TBD site at http://tbd_devastator.tripod.com/,
I scratch built the most noticeable details in the cockpit. Details such as: the
throttle quadrant, pilot consol handles and levers, CO2 bottle, fire
extinguisher, pilot seat height adjustment winch, canopy open/close cranks,
torpedo sighting gears on top of the instrument panel dash, etc. were all
scratch built. See photos above of the unpainted cockpit. A set of WWII US Navy
resin seats from True Details was used to replace the kit seats.
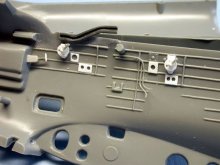
The perforated
floor plates under the pilot were added using styrene sheets. The bombardier
compartment under the cockpit floor is hard to see. Hence I only added detailed
for the arm rests and adjacent ribbings. Sad to say, after the fuselage is
assembled this area is just barely visible. Now, I understand why Monogram
chooses not to detail this area.
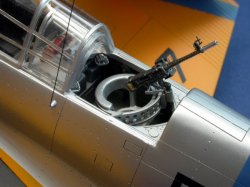
| One of the major
(and very noticeable) attractions of a navy bomber is the rear gunner
compartment. The kit molded the chair and the ring type gun mount for the
Browning 0.30 caliber machine gun as one piece. As such, the ring type gun
mount is just a blob of plastic and do not show the beautiful lightening
holes on the ring mount and no details for the sliding gun mount itself. I
supplemented this by cutting off the ring "blob" and scratch
built the ring and sliding gun mount using styrene sheet. See picture at
right. |
| Click
on image below to see larger image |
 |
|
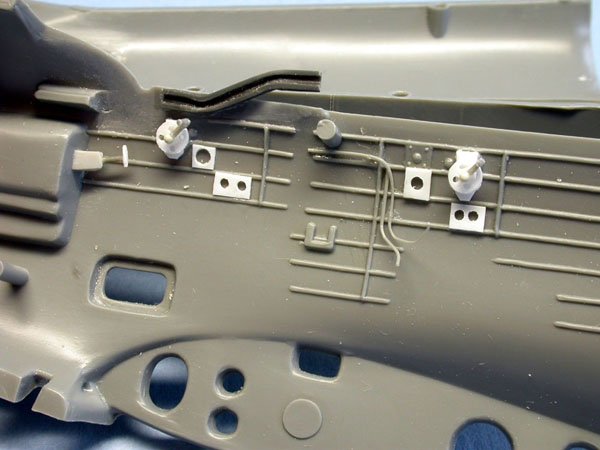
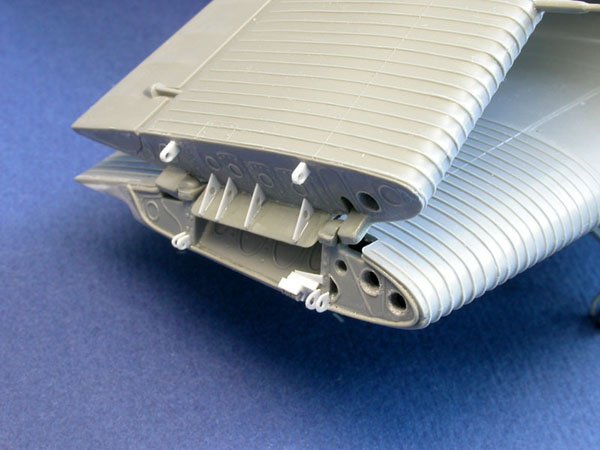
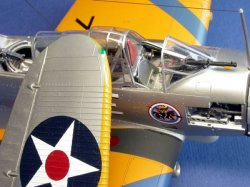
The wing folding gear and locking
mechanisms are not provided by Monogram. Again, this is another area where it is
very visible and required some attention to. Using photo references from the
Squadron book, I scratch built the locking tabs, mounts, and locking pin
assembly using styrene sheets. The locking pin mechanism was made from a styrene
rod and wrapped with stretched styrene “thread”. The other weak area of the
wing fold from the kit is the bad joint between the wing rib and the top and
bottom wing panels. You can’t sand or use putty here because you will loose
all the molded details there. The salvation is to use a strip of stretched
styrene “thread” to simulate the rubber wing seal on the real aircraft. This
worked out really well. The pitot tube that came with the kit is not an accurate
depiction. I made a corrected three prong pitot tube assembly from stretched
styrene rods (see photo at top of this article). Later, I added the air
temperature gauge commonly seen in photos of TBDs.
| The Browning .30
caliber tail gun provided by the kit is a good representation, however
more details are required. To detail the gun, I built the magazine holder
out of 0.1mm styrene sheet. Gun sight is made from stretched styrene kit
tree and carefully glued to the barrel with liquid cement. The kit's
machine gun grip handle was represented by just a blob. I cut off this
blob and replaced it with a styrene handle craved from left over styrene. |
|
Click
on image below to see larger image |
 |
|
|
Wing fold
mechanism is also scratch built from styrene sheets and shaped as per the
reference photos in the Squadron Publication reference book. The locking
pins were made from brass wire and attached with cyno glue.
|
|
Click
on image below to see larger image |

|
|
The
Bliss-Leavitt Mk XIII airborne torpedo that came with the kit has a very simple
tail assembly, and the counter rotating screws is not well represented at all.
To improve on this, I used an out of production KMC Mk 13 torpedo I happened to
picked up from Uncle Bills Hobby Shop. Good news is that Squadron has released
the same set under their True Detail brand name.
When both fish
is compared side by side, the Monogram fish is longer than the KMC version. The
overall length of a Bliss-Leavitt Mk XIII is stated as 13'-5" from two
sources on the web. Hence, in 48th scale, 13.42 ft is 3.36". The KMC
torpedo's oveall length measures 3.25" long. Measurements aside, when I
eyeball the shape and relative size of the model torpedo against the real thing
on the photo below, it appeared that the KMC one is correct.
The KMC resin
torpedo is beautifully done with recessed details. The screws are delicately
cast It is so fragile to cut them out of the pour stub and protective ring such
that they provided 2 sets just in case you break one. I am glad they did because
I did break one of them.
Wing to
Fuselage Joint
The top wing to
fuselage joint was very bad on my kit. To avoid using putty, a shimming strip
was cut from a styrene sheet and custom fitted to close any gaps at these joints
prior to gluing the wing to the fuselage. In this manner, I obtain a perfect
joint without any putty filler.
|
Landing
lights
The TBD
has a big landing light right on the port wing leading edge. I can not
find any reference photo that shows this in sufficient clarity. Hence, I
"eyeballed" it as best as I can. On the kit, the mounting for
the light is not crisp and if I do not do any improvement to it, the light
would not mount well and a very noticeable gap would show. Hence, I cut
off what's there for the mounting and created a better one using a piece
from a styrene tube to fit a new light from a rail road MV lens. This
worked out very well and is a major improvement. |
|
Click
on image below to see larger image |
|
|
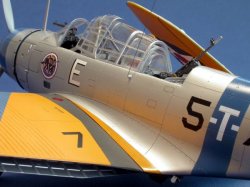
PAINTING:
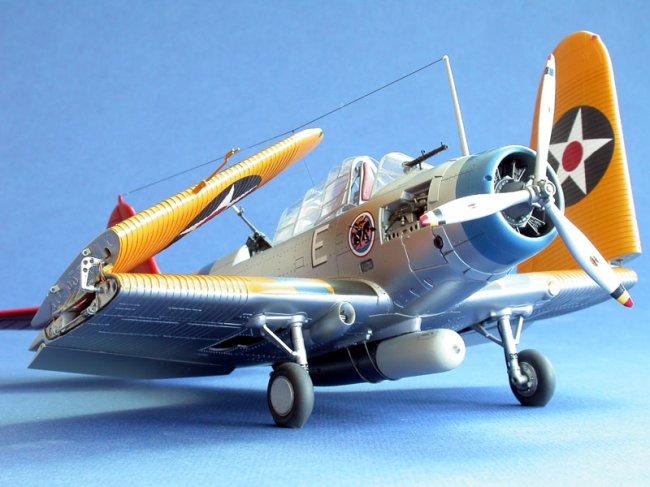
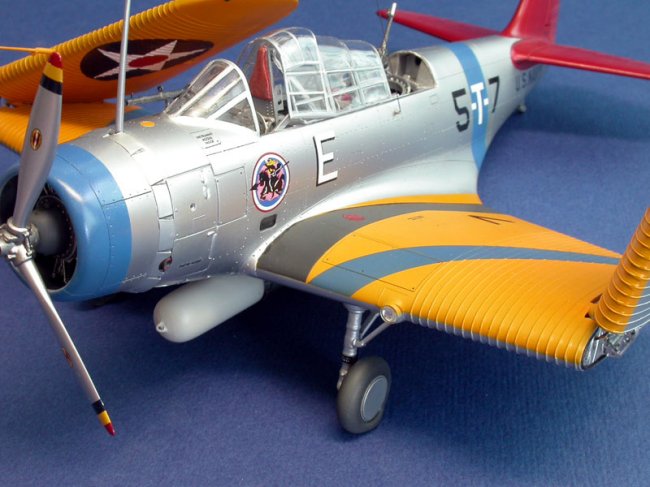
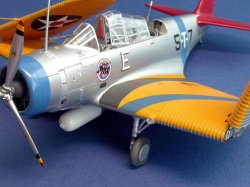
The aircraft I
am doing is a pre-war Devastator 5-T-7 (Section Leader) from VT-5 assigned to
the USS Yorktown (CV-5). Photos of this aircraft are available in the Squadron
reference book and it is also illustrated in color on the back of the book.
Navy aircraft
of this era is often referred to as the Golden Wings, and rightly so as the
wings are painted in bright yellow. The standard pre-war color for a TBD from
this time period is all interior wheel wells, flap detail, underside of wings,
fuselage, landing gear strut, etc. were painted in silver lacquer. Seat belt is
a standard off white for the fabric seat belts. Instrument panel is black with
black gauges.
The standard
pre-war color for a TBD from this time period is all interior wheel wells, flap
detail, underside of wings, fuselage, landing gear strut, etc. were painted in
silver lacquer. Seat belt is a standard off white for the fabric seat belts.
Instrument panel is black with black gauges.
Reference
photos show the Bliss-Leavitt Mk XIII airborne torpedo in the pre-war years in a
shiny steel colour with a light grey colour head. To simulate this, the resin
torpedo was painted with a Krylon gloss black primer that I picked up in a
Canadian Tire store. When dried, a coat of Alcad II Dark Aluminum was sprayed
on. The torpedo head was painted with Gunze H325 grey.
On the pre-war
Devastators, the aircraft were painted with a silver lacquer. To simulate this,
I used Alcad II Aluminum. Alclad is used because the silver finish must be able
to withstand lots of taping. The model is prep with Alcad's grey primer paint.
The primer did not require any thinning and was easy to spray. After 2 hours
drying time, I wet sanded the surfaces where the silver paint would go to ensure
the surfaces are still smooth. Two coats of Alcad Aluminum were applied at 20
psig without a hitch. Alclad is such an easy paint to apply and to get great
results.
| With the masking
still on, I sprayed all the color surfaces with one coat of Future. To
retain the beautiful metal finish I did not applied any Future clear coat
over the Alcad.
The green house canopies
were masked off with strips of Magic tape. I masked all the vertical
frames first and spray painted with Alcald. When dried, I removed the
tapes and mask all the horizontal frames and complete the painting. This
approach for green house type canopies will result in clean results each
time. |
|
Click
on image below to see larger image |
|
|
DECAL:
The new
Yellow-Wings decal sheet No. 48-006 was used instead of taking a chance by using
the kit decals. The decals are very thin and go on fantastic. The colours are
opaque and any undercolor does not show through. The decals settled in nicely
with Mr. Mark Softer decal solution.
Yellow-Wings
claimed they did a lot of research to get things right, however, I think they
have made 2 mistakes. First, the "E" for excellence has the wrong
shadow direction; the decal sheet has the shadow leaning towards the right hand
side whereas on reference photos the shadows are towards the left. Second, the
VT-5's squadron badge decal had a dark red background. Based on reference
photos, the background should be much lighter in colour so that the horse and
rider shows up clearly. To fix this, I hand painted the background using a light
pink colour. Some books show it as a yellow background but the Squadron book
shows it as pink. Now, who do you believe? But for sure, Yellow-Wings background
is too dark.
FINISHING
TOUCHES:
The aerials
were made from 10 lb fishing lines. I first glue them to the model first and
then paint them dark grey.
An MV lens was
used for the landing light on the port wing leading edge. The use of a rail road
lens made all the difference in the world when compared to just using the clear
part from the kit.
After attaching
the torpedo onto the belly of the plane, I made two tie straps out of stretched
spruce. Mounting holes were drilled onto the bomb racks to facilitate the
attachment of these straps. Straps were painted gun metal.
CONCLUSION:
This has been a
very satisfying built of a historic aircraft from the pre-war years.
The Monogram kit is an old kit, but with a little care and attention, it
came out shinning and can stand proudly next to other models from the recent
super engineered kits. This kit
also enable me to do more scratch building, tried out new tools for making
rivets on a model and used the fantastic Alcad II paint system.
This kit is highly recommended.
Wayne
www.Modelart.ca
To see more
photos of this model, go to www.Modelart.ca
References:
|