|
Hello
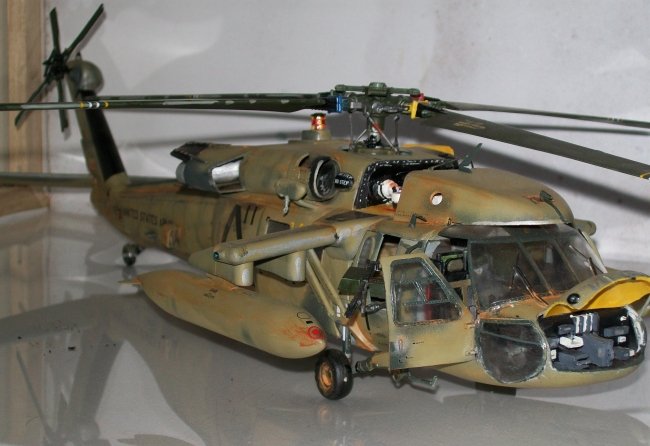
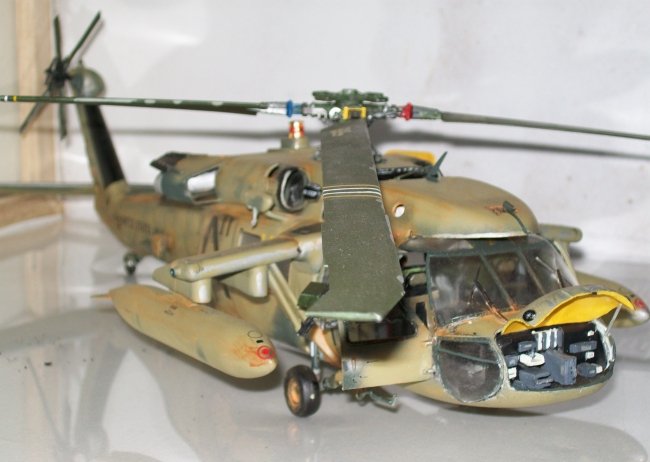
once again fellow modellers! I would like to share with you today a couple of
pictures of a model that was supposed to be on display at the South African Nats
earlier this year but which I could not attend due to unforeseen reasons. The
Model in question is the 1/35th scale Academy/MRC UH 60 L. The model is well
thought out and engineered, but I felt that it needed a little something extra,
hence the product you see in front of you.
I
used almost no aftermarket parts save for the resin backpacks and a M1 rifle
that was modified to resemble a newer type of sniper rifle and some 00 scale
rail modelling resin crates. Numerous parts were scratch built to add detail.
All
paints that were used are from Academy and were airbrushed using a GAV airbrush.
Weathering
was done by using a variety of methods including washes and watercolours amongst
others as will be discussed.
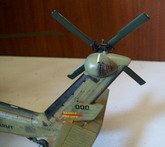
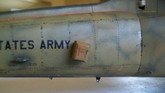
The
decals depict a prison transporter as was used during Desert Storm, but I have no
concrete proof that it ever flew in the configuration that I depicted it in.
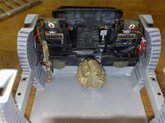
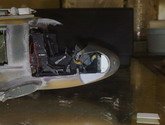
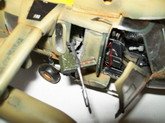
Below
is a photo of the cockpit and cargo bay with a number of scratch built items.
Click on
images below to see larger images
The
build commenced as is usual with the cargo bay and cockpit with all the main
parts airbrushed in the colours as seen in the squadron walk around. The
instrument panels were airbrushed flat black and then drybrushed white to
accentuate the instrument panels and a wiring harness made out of telephone
wire. I then built the ribs on the reinforcing arches with strips of plastic
sheet as is seen on the photos in the squadron walk around. The arches were then
glued to the floor section and work commenced on the pilot and co pilot seats.
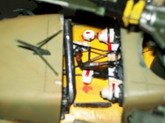
I
noticed that there is bins and some first aid bags mounted on the seats and set
out to build the bins out of plastic card, then having glued these onto the rear
of the seats I decided that the best course of action would be to cast a set of
the first aid bags I did so and then after giving the bags colour CA’d it to
the rear side of the seats and also onto the bins. Next I made seat belts out of
very thin tin strips and glued these onto the seats. Going back to my reference
photos in the walk around I then noticed two very distinct things not present on
the Academy seats the first being that the pilot and co pilot armour plates were
the wrong shape I decided to leave them as is with the exception of adding two
almost triangular pieces of plastic sheet with the missing 3 holes drilled into
them the shape was now correct. The second problem was that the cable running
from the side to the rear of the seat along with what looks to be a solenoid and
the release handles on the armour plates was also not to be found on the kit
seats I decided that these had to be built and did so.
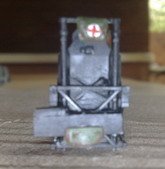
After
completing the pilot and co-pilots seats it was time to move on to the two
gunner’s seats I noticed once again that there are stowage bags of sorts
behind these and decided once again to cast a set of these and then to make the
seatbelts out of tin strips I then coloured these and set them aside. After
having a look at the passenger seats I decided that it would constitute a boring
subject if I used them and then decided that I would rather depict a bird that
was used to convey ”captured enemy equipment”. In order to accurately depict
the above mentioned I would have to have crates and did not have any handy.
Luckily I have a very good wife and seeing my dilemma she decided that she would
buy me a set of rail crates which I then put to use in my helicopter along with
some more tin straps to “secure” the cargo. Next I saw that there is a fire
extinguisher present in all of the birds shown in the squadron walk around and
decided that mine must also have at least one: I built the extinguisher out of a
piece of scrap sprue and copper wire painted it and glued it onto the right hand
side support beam.
The
end of the interior work was now in sight save for detailing of the cargo
compartment roof which I did once again from reference photos from squadron walk
around. I also decided that the helo needed a bit of character and that the two
gunners would have to be two “special forces types that hitched a ride to the
AOO and at the time of emplaning left their kit inside the helo and was busy
catching a quick smoke nearby before maintenance on the bird ended and the
journey began”. In order to depict this I modified an old Tamiya M1 carbine to
a more sniper looking rifle and stuck it into the left corner behind the pilots
seat I also added two resin backpacks for good measure. Lastly I decided to also
add a LED light to the roof with the battery box crafted into the bottom of the
bird and the switch into one of the exhausts a bit later on. Lastly I applied
the decals in the interior with some future and left those to dry along with the
now glued on roof section. This concluded the interior work and the sub assembly
were now put aside.
After
completion of the interior I now decided that it was time to move on and have a
look at the fuselage halves and then decided that it was good but not right for
what I wanted!
I
decided that the Blackhawk had to have open doors and cut out both of the front
doors. Only after cutting them out did I start to think about the fact that they
had no detail. Once again I referred to my references and then scratch built the
door detail and was very pleased with what I achieved in a relative short time.
I then looked towards the tail section and decided that I wanted real see
through type mesh this was built again by using styrene strips after blanking
the gaping hole that was cut into the bubble on the left hand side of the tail.
The 2 halves were now airbrushed sand and some of it removed after drying next
came some heli drab patches and blocks and lastly as preparation some black on
the panel lines and some silver in places that would later serve as wear and
tear on the water based desert yellow. The halves were now left to dry while I
paged through the walk around deciding what was to follow..........
After
the paint dried, I decided that the best course of action would be to build
the battery box into the bottom of the fuselage and place the micro switch into
the left hand side of what looks to me to be an exhaust port of sorts I did this
and then glued the interior bay into one of the halves the other half was then
glued and left to dry.
I
then noticed that there was a gap between the one door sill and the cargo bay
floor which I filled with Tamiya putty and sanded flat. The gaps left in front
of the instrument panel and the nose of the aircraft and the fuselage and
cockpit floor (this was done using plastic card and modelling putty and sanded
flat later on).
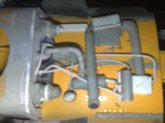
Next
the time came for me to cut open the nose lid and then build the avionics bay, I
did so by using plastic sheet and various parts from the spares bin over a
period of a week. After this was finished the fitting of all the various other
small parts was done as per the instruction sheet.
After
fitting almost all of the parts, I decided that I would also try my hand at
building the hydraulics bay on the roof and then leave it open for display. I
built the hydraulics bay out of .......yes you guessed it plastic rod and sheet
and various pieces of sprue and spares from the bin. After completion it was
once again painted and left to dry. The silver areas were masked off in some
spots to simulate chips and also some of the previously heli drab and sand areas
were also masked to illustrate wear and sun bleaching of the water based desert
paint scheme. The interiors were also masked off with wet tissue paper.
The
time for the coat of desert yellow was now upon me and I misted it on layer over
layer to build it up to a presentable level. The painting was now complete and
it was sealed in with floor polish in preparation for decaling.
The
decals came straight from the box and went on without any problems and
afterwards sealed with the local equivalent of future. Lastly the sealing of the
paintjob was done with a matt clear cote in preparation for final weathering and
pin washing.
All
photos of helo’s that I have show them as being filthy for most part while
operating in desert circumstances and I wanted to try and capture this look.
For
the weathering I used pastel chalk to simulate dust on the hawk. I applied chalk
liberally to all places where dust might be expected to accumulate in the desert
and sealed it in with future. Next I used artists oils undiluted to simulate
grease on all the shafts of the helicopter and waited for it to dry. Lastly I
used watercolours to try and simulate hydraulic oil leaks; this is however the
part of the build that I am least pleased with due to obvious reasons. Lastly a
pin wash was applied to the panel lines to highlight them and sealed in with
future and once again dull coated.
Lastly
I glued the doors and the rotor blades onto the project. From start to end this
project took me in the vicinity of three months.
I
hope that you all enjoyed viewing my little project and happy modelling.
I
would like to thank my friend Charley Deale for his constant help during the
project, my dear wife for always encouraging me and last but not least Mr.
Bamford for the superb site. Shaun
”Vapour Trail” Naude
Click on
images below to see larger images
|