|
Kawanishi’s
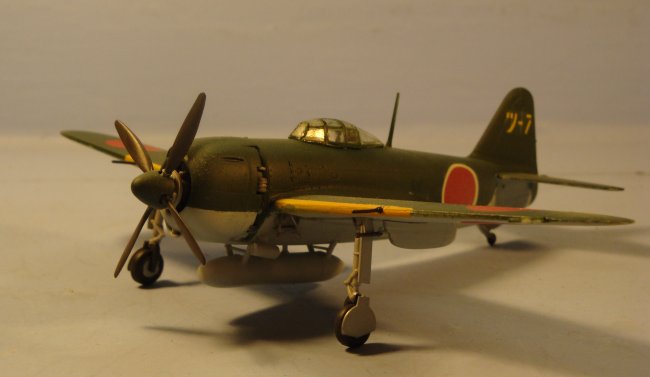
Shiden (Allied code-name “George”) was a land-based variant of the N1K1
Kyofu floatplane (“Bea”). Employing
the smaller, more powerful Nakajima NK9H Homare Type 21 radial engine, the new
design required a large four-bladed prop to take full advantage of the added
power, which in turn necessitated the development of longer main gears, giving
the plane its unique stance. The complicated folding mechanism on the gears,
among other things, plagued the type with difficulties on the ground; but the
Shiden displayed superb flying characteristics, and proved formidable in air to
air combat. In all, 1,007 were produced beginning in early 1944. (see Axis
Aircraft of World War Two by David Monday, (London: Chancellor Press, 1984)
pages 137-139)
Tamiya’s
1/72 “George” is, as one would expect, a marvel of precision engineering in
miniature, and builds up into a model with real presence and
character—assuming one can avoid certain pitfalls in the process where
painting considerations affect construction. It took me three tries finally to
get this one right, but, eventually I figured out what I needed to do.
Click on
images below to see larger images
Prior
to construction, I pre-shaded all panel lines with a mechanical pencil,
periodically sharpening the lead on a coarse sanding wand. The building process
itself began with the cockpit, which was fully assembled before painting. I
sprayed the entire subassembly as well as the fuselage interior with Tamiya XF
71 (Japanese Cockpit Green), and used the kit-supplied decals for the seatbelts
and instrument panel.
The
plastic in this kit is not typical of Tamiya’s more familiar product, being
somewhat softer with a dull, light-gray-green hue, as opposed to the usual
glossy neutral gray. While the fuselage and wing sections went together quite
well using Testors Liquid Cement (applied from the glass bottle with a
Microbrush), there were two fairly substantial gaps at the wing roots, which had
to be filled with Tamiya Basic Putty. The
circular nub/engine mount, which comes together horizontally when the fuselage
halves are joined was slightly out of alignment and had to be re-shaped with a
rifler file for the engine to fit properly.
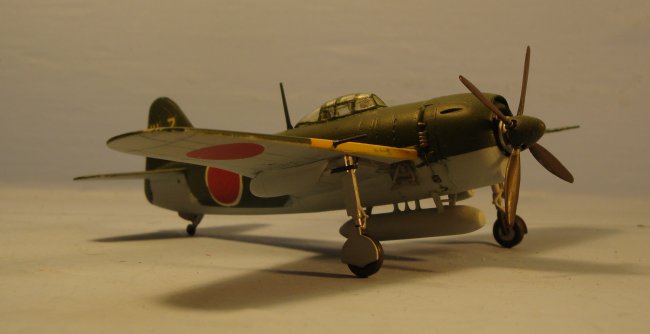
I
assembled the nicely detailed three-part radial engine, hand painting it with a
combination of Tamiya Metallic Gray, Model Master Acryl Steel, Citadel Chainmail,
and a wash of The Detailer, black. I waited to attach the engine to the fuselage
until the exterior painting was complete, tacking the cowl in place with poster
putty, and masking off the empty engine bay with scraps of wet paper towel.
The biggest mistake I’d made
when trying to build this kit in the past was attaching the centerline fuel
tank, oil cooler, and under-wing machine gun pods before painting. Do this, and,
believe me, all kinds of wackiness ensues when you try to mask off the
undercarriage. For one thing, Tamiya’s tolerances are so precise that the
protruding machine guns will interfere with the upper gear doors, making it next
to impossible to attach one or the other at the end; for another, it takes a lot
of masking tape to cover all those bumpy components sufficiently to avoid
unsightly bleed-under. After some head-scratching, I decided to build and paint
the various protuberances separately, keeping them off the main body of the
model almost until the end. This time, it worked.
I
sprayed Polly Scale IJN Sky Gray on the underside (as well as the separate
under-wing components), ghosting it in several light coats to allow the
pre-shading to show through. After masking, Polly Scale IJN Green was ghosted on
to the upper surfaces, followed with a couple light coats of PS Clear Gloss.
Reluctantly, I went ahead and used the kit-supplied decals, typically thick and
somewhat sluggish, but serviceable and fairly sturdy when actuated in extra-hot
water. The yellow leading edge stripes gave me the worst fits, though, to me,
their rough and ragged appearance gives the model a certain battle-weary
look—call it character. Decals were sealed in with an additional coat of PS
Clear Gloss, followed up with another light coat of PS Clear Flat. Markings
represent a plane of the Tsukuba Fighter Group of the Imperial Japanese Navy
circa 1944.
The
main gears and wheels were sprayed with Tamiya AS 12, Bare Metal Silver directly
from the rattle can. Machine guns were hand-brushed MM Acryl Gunmetal. Polly
Scale Grimy Black was used for the tires, applied with a Microbrush. The prop
was hand-painted Polly Scale Roof Brown to simulate the Tea Brown color of the
original, and the spinner was mounted on a glob of poster putty impaled on a
decapitated Q-Tip, and sprayed Polly Scale IJN Green.
They
say the third time’s a charm. All I know is it’s nice to finally finish a
model, and actually get it right. Thanks for looking.
Jerry
Hawhee (Old Blind Dog)
|
|