|
Here's a kit I
haven't seen built very often. I wasn't even aware that Revell had
released a 1/144 B-52G, so when I saw this kit on ebay I snatched it right up.
I had built Revell's B-52H kit a few years ago in overall FS36118, so I was
looking forward to adding this kit next to it on the shelf. The kit is
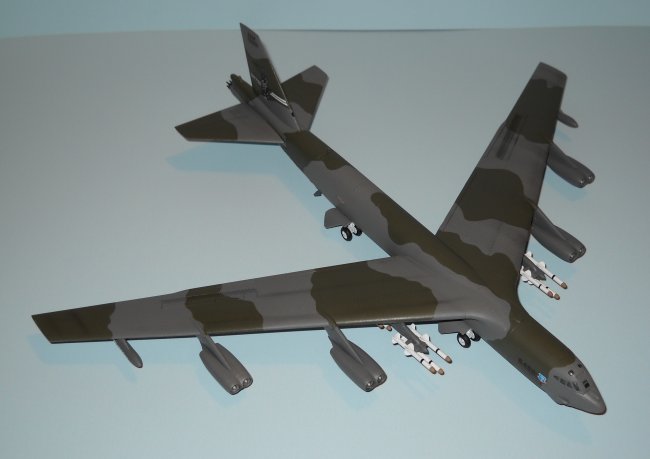
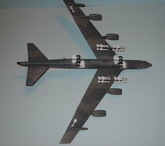
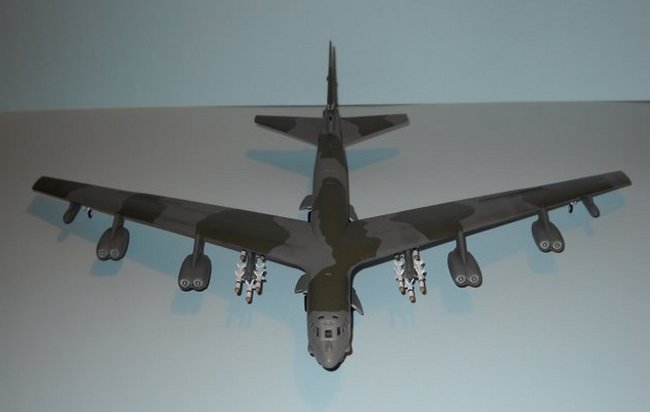
pretty much the same thing as Revell's H, but it has the correct engines and
tailguns for the G-model. It's molded in that hideous green plastic which
I didn't much care for. It also comes with a nice set of twelve AGM-54
Harpoon missiles. Markings are provided for two different planes, one from
the 97th Bomb Wing at Eaker AFB, AR and one from the 416th Bomb Wing at Griffiss
AFB, NY. I chose the Griffiss markings since they were a bit more flashy.
It should be noted that the only B-52G's equipped to carry Harpoons were based
at Loring AFB, ME and Castle AFB, CA, so the markings aren't really accurate for
the weapons loadout, but I didn't care.
Click on
images below to see larger images
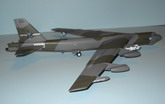
Construction was fairly
straightforward. I had the usual problems of getting the fuselage
halves to go together nicely. I chose to pay close attention to the
wing-fuselage seams only on the top. For the bottom, I simply
used the putty and fingernail polish on the Q-Tip method to fill the seam.
The seam is still visible, but it's no longer the canyon it once was.
Masking was also a bit of a challenge since you have to install the
landing gear struts before cementing the fuselage halves together.
For painting, I first sprayed the entire aircraft with Model Master
FS36081 Euro 1 Gray from a rattle can, which seemed a bit lighter than
what I've experienced before, but I could live with it. After
letting it sit for a few days, I then brush painted the FS34086 Green Drab
camo on the top and the FS36118 Gunship Gray camo on the bottom using
Model Master Acryls. This is a technique I just recently discovered.
MM Acryls brush on real nice over an enamel base coat and any visible
brush strokes disappear after you apply the final spraying of Testors
Dullcote. The kit decals went on nicely. At first they have
that milky, rubbery appearance that we've all grown accustomed to with
early Revell and Monogram decals, but they looked very clean and nice
after drying for a few hours. Lastly, I attached the Harpoon
missiles. I fretted a few hours about how detailed I wanted to get
with these, but in the end I decided to just paint the tips tan and
paint one black stripe on each missile. I didn't have the patience
to get any more detailed than that. I just knew I didn't want them
to be plain white. For weathering, I just brushed on some charcoal
here and there over some major panel lines and behind the engine exhausts.
Be careful with the kit's
instructions, because their paint guide is completely wrong. Revell
recommends you use FS35237 and FS34201 for the camo pattern. They also
show no camo pattern on the bottom of the aircraft, which is incorrect. My
only guess is that Revell probably used as their main reference an aerial
photo of a B-52G baking in the hot Arizona sun, in which case the correct colors
have probably faded enough to look like Revell's recommended colors. For
my primary reference, I used Wolfpak Decals sheet 72-013. I had no
intention of using the decals, but the paint guide provided was excellent and
gave a very nice four-view of the B-52G's strategic camouflage pattern.
Overall, a very nice kit that was
fun to build. And it also looks great sitting on the shelf next to my
B-52H! Cheers from the great Pacific Northwest!
Tony Granata
|
|