|
Hey Folks, this is
my first helicopter I've put on ARC.
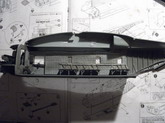
The kit offers two
options for the build, a Combat Transport Version and the
mine hunter. also you can choose between three decal options. The Academy kit is
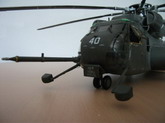
really very nice detailed excepted the Browning M2´s that came with the
kit. I
replaced them with homemade resin guns which are alot better. I also replaced the
ammo boxes mounted on them with selfmade resin parts. Overall I would say the
Academy Sea Dragon is a really good kit. The only really big minus for me were
the decals. They look good, but they bubbled like crazy and are very glossy which
made it necessary to apply four coats of varnish.
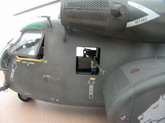
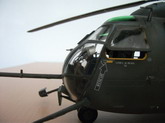
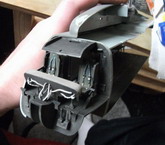
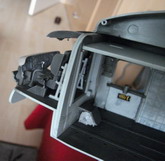
I added the Eduard
Photoetched detail sets for the cockpit interior and cargo seatbelts which were
hell of a work!! Unfortunately you can hardly see them. But I know they are
there. Also I added some wiring to the rotor head, the air refueling boom and the
two things on the nose, well, I don't know what they are...I call them the rear
mirrors! I also added a lot of wiring on the back of the instrument panel.
Click on
images below to see larger images
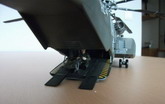
I added a door gunner on
the loading ramp with another resin M2. In his old life he was a ground
crew member from Hasegawa.
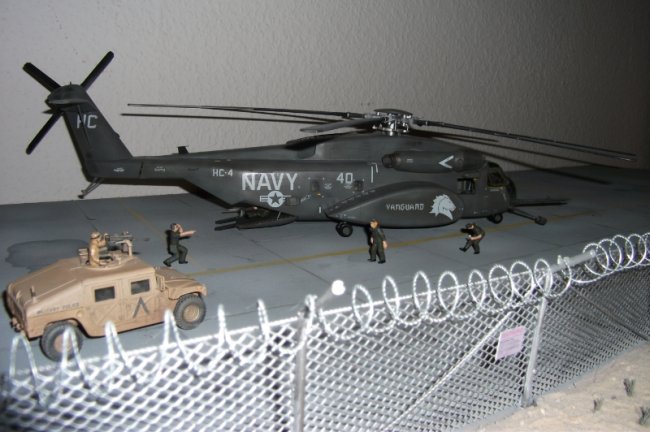
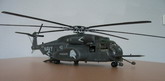
I decided to build the combat transport version used in Iraq in 2006 used
by the "Stallions". The build went without bigger problems till I
was almost finished. But more of that later. I built this thing strictly as
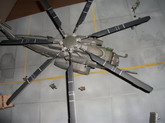
it was explained in the instructions. The first thing was the huge main
rotor. I
added the wiring and painted it with the Modelmaster Gunmetal Metalizer
color. The blades were painted with Revell flat black and a mix of light
and dark ghost gray. When I applied the decals I made the first mistake and
messed up some of the white stripe decals. But no problem, I masked and
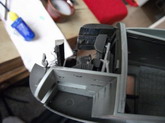
brushed them on. After weathering the rotor it was time for the
Interior. Painted with different grey tones and weathered with the Tamya
master, I added the seats and the cargo belts. It took me about four days
only for the f***ing belts. But finally I made it and thank god you
can't
see the little mistakes I made with them and the 2 tiny parts that I
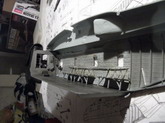
lost. But overall it looked very nice. In the meantime I painted the big
exterior parts with a mix of Revell's olive drab, gunship gray, dark ghost
gray and light ghost gray. I wanted the used bleached look that the real
heli has on pics and for that I mixed the color over and over with
different colors for lighter and darker spots. The fit of the parts is
really excellent, almost no spot had to be filled and sanded. After putting
everything together except the front window (which is one big part, not
like in the Revell kit) and a first satin matt clear coat, I applied the
first decals. And instantly made the next mistake. I messed up the big
decals on the side with the Stallions logo. That's why I had to use the
Vanguard option that came along with the kit. But as you can see now there
is a little misfit cause the stencils that I had already added are for
the Stallions. Well, I have to live with that.
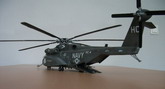
When I finally had put all together
and it was time to paint the nose/front window section. And there was my last mistake and it was the
worst. I had to remove some paint from the front window and the thinner made some really bad matt spots on the
window. Well alright, I thought and used my Dremel which I had all new to polish the windows clear
again. But the RPM was a little too high and I melted the front window a
bit. After I tried to repair it I accepted that I had to order a new nose section which took about a month and
cost me 15 euro. But finally the big thing is ready and looks really
nice, you can see that I am not really experienced with helicopters but I am pleased with the results of my
work. But I would never again build this monster, one time is enough.
Have fun and tell me what you think.
See ya
Philipp
Click on
images below to see larger images
|