|
This model is built
from the Airfix re-box of the Academy kit for the B-17 Group Build competition.
A lack of spares became a big problem for the 8th Air Force as the intensity of
raids increased. Bill Carleton, the Squadron Engineering officer from the 351st
Sq, 100th BG, told me that to change the paperwork to increase the allocated
spares, would have taken longer than the war was going to last. They got around
the problem by 'Midnight Requisitioning' and canibalising damaged and war weary
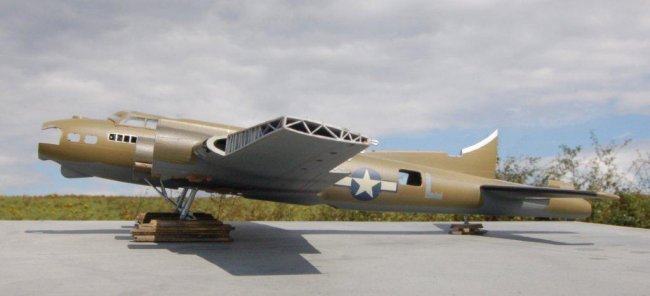
aircraft. This diorama is one such canibalised aircraft. The build was based on
several original photos of 'Hangar Queens' I have found during my research.
I didn't want to
spend a huge amount on the build, and I've never bought after market parts, just
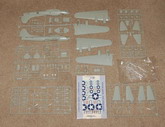
scratch built. So when I spotted a kit on ebay for £5.00, it sounded about the
right price. There were no instructions or decals, but all the plastic parts
were still bagged. I found the instructions on the net, bought some star decals
from an ARC member, and by the time paint is factored in, the whole build was
probably under £10.00.
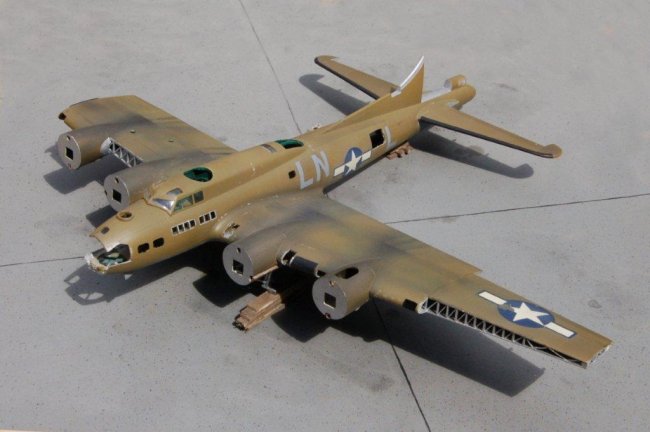
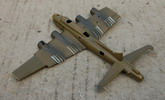
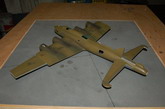
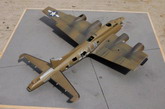
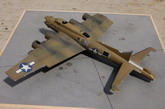
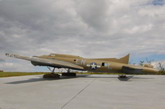
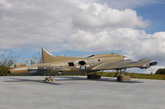
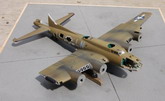
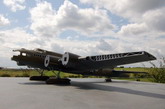
I planned a little damage here and there, missing one outer wing panel and fin,
numerous access panels removed, along with oil coolers, elevators, and the
remaining aileron. The wheels are missing and the aircraft standing on it's legs
on piles of wood ( based on a wartime photo ). Glazing will be mostly missing,
and one of the cheek gun pressings removed.
Click on
images below to see larger images
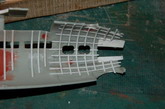
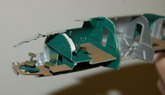
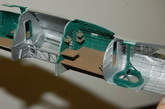
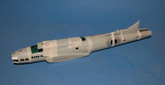
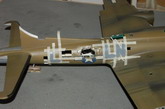
FUSELAGE
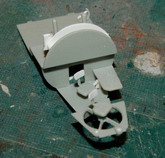
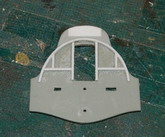
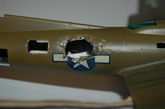
Starting from the front, on the fuselage, I removed the panels over the side of the cockpit, and added styrene strips to represent the formers visible inside. I cut out most of the right side of the nose, much like the picture of B-17 '8 Ball' in the Mighty Eighth War Diary book. A section from B-17 'Sweet Pea' ( a wrecked Fort ) was cut out and grafted onto '8 Ball'. So my hangar queen gained a big hole where it has donated the right side of the nose to repair another aircraft. This gave a better view into the gutted nose. The inside of the nose was all sanded to thin the wall thickness and remove the jigging tabs that hold the formers and cockpit floor in place. The nose section floors and formers were joined after the structure below the bombardiers seat was opened up. The bombardiers seat was added, but modified from the kit version with a new back rest fitted to a shorter support. The navigators table was fitted with a new support, and was thinned quite a bit from the kit version. His seat from the kit was replaced with a scratch built version on the welded swing arm that hinges from the table support. It was a fiddly little piece to make, and is a bit oversize, but looks ok.
The cockpit floor had the crawl through hole opened up that leads to the nose compartment, and the original seat jigging holes were filled. The cockpit seats are missing on my model, but the angled reinforcing either side of the crawl tunnel were made and added. Blocks of styrene were added to form the canvas boot around the base of the control columns and were trimmed to shape with a sharp scalpel once dry. A number of things were wrong with the kit instrument panel, so a new one was scratch built.
The former behind the top turret had its door opened but the opening on the bomb bay side was slightly different to that on the cockpit side. The structure was sanded off the cockpit side, and was replaced in the correct position with microstrip. Another error in this Academy/Airfix kit is that some parts are for earlier versions of the Fortress. Academy produced two versions of the B-17, an early C/D version and late mark, and there are some early parts included on the late mark sprues. These include the control wheels, but no late mark wheels are included. To correct this, the angled control wheel spokes were cut out and replaced with styrene rod glued in horizontally. Both control columns were glued into the canvas boots, but only one control wheel fitted; the other having been removed for another B-17. Working with parts this small, in the case of the control wheel a little less than 1/4 inch across, was pretty taxing on my fat fingers. When I was a kid building 1/72 scale, the planes seemed huge, so now I've been mostly building 1/48 scale. As I said earlier, I wanted a cheap build that I could get done in the 6 month limit, which meant working in 1/72 scale.
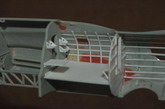
In the radio room, the table is there, and all the wooden shelves for the radios, but the radios have gone, chair missing, rear roof glazing gone. The stringer spacing isn't scale as it would be impossible at this scale. There should actually be another two stringers between each one I've fitted, but there just isn't space. Behind the radio room, the ball turret ring and suspension frame were scratch built.
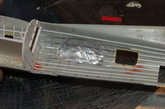
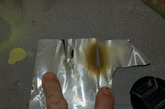
On the starboard side of the fuselage, the kit gives you the option of a forward or rearward waist gun, to build an early or late waist configuration. I opened up the rear window ( to make it an early 'G' model ) and removed the rear entry door. A hole was cut in the right side of the waist for battle damage. The plastic fuselage skin was thinned and the torn skin simulated by self adhesive aluminium foil. The outside of the fuselage in the location of the flak damage was recessed slightly to allow for the thickness of the aluminium foil. Very thin strips of foil were attached inside for the stringers in the damaged area. It isn't a large hole, but the explosion caused enough distortion in the fuselage on a war weary airframe, to make the plane a 'Category E' write off, hence it became a 'Hangar Queen'. Since this was a cheap build, I cut my own microstrip for the rest of the fuselage stringers.
The small panel at the start of the curve on the fin strake was also removed, and with the fin removed, the fairing at the base of the fin/fuselage joint was cut away. The top of the fuselage, where the fin used to be, was filled after the fuselage sides were joined.
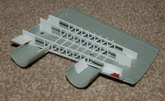
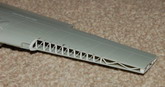
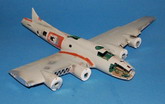
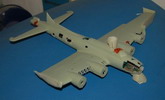
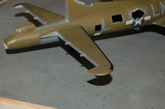
WINGS
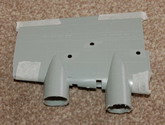
The port wing has the oil tank hatch opened in the top of the nacelle, the ram air intakes opened up, battery box lids removed, several hatches removed ahead of the aileron. The oil coolers were cut out, but it turned out the moulded panel line was too far back, so I had to glue a piece of styrene back into the opening. The leading edge was removed to show the spar structure. The top and bottom member of the spar was made from 0.75mm square microstrip. Vertical spacers were then cut and trial fitted one by one. The diagonals were cut to 0.75mm wide from 0.25mm sheet, and glued in place. The starboard wing ahead of the missing fuel tank also had the spars added in the same way.
The nacelle lengths were cut down, taking them back to the firewall position, and styrene sheet firewalls added. They had their access panels cut out, and the holes for the exhausts and intakes drilled. The wing to fuselage joint was adjusted to give the correct diheadral, as the kit has too much. Aileron hinges were made from thin copper wire. The landing gear was missing one drag strut. I don't know if this is a kit error or whether they were just knocked off my kit parts. Replacements were made from thin brass wire. Some 1/4 x 1/8 strip wood was cut up on my bandsaw, stained, and glued together to represent the planks seen in the original "Hangar Queen" picture I based the model on.
TAIL
The tail turret was a very poor fit, being about 0.5 to 0.75mm smaller in diameter than the fuselage, so much filler was needed to blend it. The tailplanes had the elevators cut off and the trailing edges filled. Elevator hinges were made from thin copper wire.
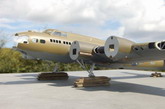
PAINTING
The interior was painted as I went while the exterior had the underside grey sprayed first. Once dry, this was masked with a combination of paper and masking tape over the larger areas, and 'Blu-tack' sausages on the dividing line between the olive drab and grey. The nose section was masked out with wet tissue and the waist and radio hatches with pieces of foam. A few different shades of olive drab were sprayed around the model, but the overall colour is a fairly tired, faded OD. 'Blu-tack' was then used to mask out the areas of wing behind the wing vents. The left side dirt trails are generally straight, while the right side curve inwards. This is a combination of the interaction of the air passing over the wing and being drawn inward at the trailing edge where the air is sucked under the fuselage, and it's interaction with the prop wash. The fuselage side seems to block the spiralling effect on the port side, but not on the starboard side.
A few shades of black were then sprayed freehand across the nacelles. When the 'Blu-tack' was peeled away, the edges were a little harder than I wanted. To help correct the vent pattern, a thin lithoplate mask was cut and held just above the wing while combinations of olive drab and black were sprayed through until I got the result I wanted. Additional staining was added with slight cream/browns after the black. The underside of the wings had a light dusting of exhaust staining, using photos of B-17 'Liberty Belle' as a guide. After the main colours and weathering were painted, a little more detail painting was done by brush. The colours on the photos I took, looked odd both indoors with the flash and out doors under natural light. I tried a number of different camera settings when the model was complete to get pictures with a fair match to the actual model. The areas where the decals would be were 'Futured', and the star decals applied. Once dry, they were chipped with a scalpel blade. Squadron codes were masked and painted as I had no kit decals to use. The stars and codes were then dulled down with an overspray of olive drab and grey. The model was then given an overall matt coat.
With that done, I loaded the model and camera into the car, and took the couple of miles drive to a country lane near by for some nice photos with a decent back ground. Well, that's it, game over, all done, and I'm very happy with the finished result. A bit fiddly at times in 1/72 scale, but good practice for my 1/48 kits.
Stephen A. Carr
Click on
images below to see larger images
|
|