|

Components
-
KP 1:72 Mi-8/17 kit
-
Pavla 1:72 Mi-8/17 bench seats
-
Pavla 1:72 Mi-8/17 tailplanes, main gear wheels
-
Eduard 1:72 Mi-8/17 interior detail set
-
Eduard 1:72 Mi-8/17 exterior detail set
-
Eduard 1:72 Mi-8/17 exterior detail set
-
Ciro Models Mi-17 detail set
-
Ciro Models Mi-8/17 armament set
-
MAV Decals Uganda Air Force national insignia/numerals
-
Fantasy Printshop Luftwaffe serials
Fuselage: Initial preparation
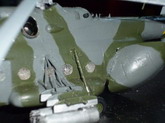
The breakdown of the kit is quite conventional, with the fuselage apart from the engine 'doghouse' split into two halves. Later Revell issues of this moulding have the aft clamshell doors moulded separately to save sawing them off, but not this old 1990 one. As I was replacing the kit 'doghouse' with that from the Ciro set, I had to replace the quite reasonable raised panel lines with scribed ones.
Once this was done I removed the clamshell doors with a razor saw, and also the external tanks. These were of the old first generation Mil Mi-8 shape, with the broad, shallow, indentations for the main gear legs. The Ciro ones replicate the initial Mi-17 configuration, but the aircraft I was modelling had the later, higher capacity, four-strap tanks. So the rather nicely moulded tank straps had to be removed as well.
The expansion takes the form of adding an inner section of constant cross-section, but the short port tank is also slightly lengthened. To begin with, I attached spacers of 40 thou plasticard to the inside faces of the tanks and sanded them to shape. I sawed off the nose of the Ciro tank and mounted it slightly forward on the spacer, filling the gap with Milliput. With the exception of the aft one, the straps have to be repositioned and a fourth one added. I rather carelessly failed to check my photoetch sets, which have replacements for the kit items, before fashioning straps from 10 thou Plasticard! The latter eventually detached from the tanks anyhow, saving me the trouble of undoing my work.
Once the tank assemblies were finished, I attached them to the fuselage halves with cyanoacrylate gel, making good the sizeable gaps with Milliput.
The rather broad depressions inside the fuselage where the kit windows are to be mounted were filled with Milliput and sanded flush with the interior walls. The slightly domed windows of the Mi-17 were originally to be trimmed to fit the embrasures. This did not work out, as described below.
Interior
The interior is divided into the flight deck and cabin, both spacious. The kit supplies basic bench seats and cockpit detail, but the former were replaced with Pavla items, and the latter with the Ciro parts, augmented by Eduard brass where necessary, the more modern interior detail set containing a fine cabin floor surface (which folds down to represent the aft face of the fuselage). The Eduard metal was attached to the kit floor (after sawing off the flight deck floor) with medium viscosity cyanoacrylate and the sides folded up to suit using my brand-new Photofold folding tool wherever I could (the aft faces of the cabin heater/seat support fairings still broke off). The Pavla seats were then assembled and glued to the floor with medium viscosity cyanoacrylate. The set does not include the ties at the ends of the bench seats (although the flat metal representations in the Eduard set do), so these were added from very fine plastic rod. Careful test fitting ensured that the projecting piece on the port side fitted the cabin doorway.
The same Eduard set also includes the central ceiling panel. I attached this too early, and the constant sanding of the interior eventually wore a fissure in it! One lesson learnt. I made the upper cabin soundproofing panels from strips of 20 thou plasticard, cut to shape and blended in with Milliput. Naturally, they had to be trimmed further to shape when fitting the Ciro cockpit parts. To complete the cabin walls, the curtain panels were added from the Eduard set.
The second Eduard interior set includes detailing for the inside of the clamshell doors that is as extensive as it is welcome. The interior framing was first on, consisting of a web of ribs and longerons that are pressed into shape against the concave interior of the doors. Once this was firmly set in place with medium viscosity cyanoacrylate, the remaining detail, consisting of extra seats and miscellaneous structural details was added. Some photos I've seen of parked Hips show the corners of the doors folded up when open, but I thought that that would be going too far and ruining a good thing. Some photos depict additional fire extinguishers mounted behind the extra seats, but I did not model these.
The forward door required little work, merely the filling of the window with Clearfix, levelled with Kristal Kleer.
The Ciro cockpit parts comprise replacement seats, instrument panels, ceilings, bulkheads (forward and aft faces cast separately) and a floor. For some odd reason, the pour stubs were on the inside face of these parts rather than one end, with the exception of the ceiling, which made removing them rather longer, dirtier, and more difficult than need have been the case. Once the parts were made ready, I fitted the aft face of the bulkhead, then the forward face and cockpit floor after the first had set into place with the aid of high viscosity cyanoacrylate. I inspected the Eduard photoetch and added those parts to the aft bulkhead face that were not already cast in, and also the kit extinguisher, for which Eduard supply a tiny handle. Plenty of test fitting ensured that the resin pieces fitted the fuselage adequately, after having sanded down the flight deck floor mounting lugs. The exact location of the bulkhead is not entirely clear, so quite a lot of test fitting was required before gluing the parts into place.
With the fuselage halves thus prepared, the cabin interior was painted in Humbrol 141 mid-grey, then washed with an acrylic dark grey, prior to being highlighted via a rather uncertain drybrush with a mixture of Humbrol 141 and 34 matt white. The floor was treated in a like manner. The seat cushions can be found in a number of colours, but I plumped for a dark brown, using Humbrol 10 dark brown as the base coat, shaded with Citadel Dervlan Mud dark brown wash and drybrushed with a mixture of 10 and Humbrol 9 tan. The seat belts were painted Humbrol 83 Mid Stone, with the buckles picked out in Humbrol 11 silver. The clamshell door interiors were treated in the same manner, but the extra seats were painted in Humbrol 125 Gunship Grey to match photographic sources. The kit access ladder was replaced by the Eduard item, painted in exactly the same way as the interior.
Once the cabin interior was ready, with the wiring and fire extinguisher on the aft bulkhead face being appropriately picked out, the floor was glued into the port fuselage half with a mixture of cyanoacrylate and polystyrene cement, a supporting batten of scrap plastic having been earlier glued in. Once this had cured, the two halves were mated and the fuselage joint filled. A significant amount of Milliput was required along the cabin seams, particularly towards the aft and forward ends of the ventral face, but the fit along the boom was very good.
Flight deck
The pilot and copilot's seats were assembled using the Ciro etched belts, although it would probably have been a better choice to use the more detailed Eduard ones. They were painted in the same manner as the bench seats and set aside.
The cockpit ceiling panel was painted in the same manner as the cabin interior =, before picking out the console faces in Xtracolour Soviet Interior Blue/Green and the roof hatch panel in Humbrol 125. Note that some Hips have two rectangular windows in the hatch, which would need to be added to the Ciro part. The switches and buttons were picked out in Humbrol 33 matt black and occasionally Humbrol 19 gloss red, and areas of insulation in Humbrol 40 gloss grey. The ceiling panel was then set aside until the rest of the flight deck was complete.
The flight deck floor had the collective levers from the Eduard set fitted, along with a smaller lever for the pilot. The pedals came from the Eduard set as well, and were sufficiently delicate for one to break off the bar during attachment. The kit cyclic levers were used, being attached to the floor with high viscosity cyanoacrylate. The instrument bezels for the central console, an auxiliary console for the copilot from the Ciro set (both with backing film attached by Humbrol Clearfix), and some piping from fuse wire along the sides of the cockpit and beneath the pedals completed the fitting-out. The ceiling panel was then glued into place with high viscosity cyanoacrylate.
The flight deck was finished overall in the same manner as the rest of the interior, the avionics in the racks behind the seats being picked out in various black and metallic hues, as were the pipes along the sidewalls and beneath the pedals. The prominent first aid kits were painted in Humbrol matt white and gloss red. The levers were in overall Humbrol 21 gloss black, with matt black heads and Humbrol 201 metallic black shaft roots on the collectives. The rudder bars were painted in Humbrol 201, with silver pedal faces and grey straps. The auxiliary seat was painted in the same colours as the others, and the base of the cyclic levers were painted in Humbrol tan. The central console face was in Xtracolour Soviet interior blue-green, and the details were picked out in matt black. The auxiliary console was painted in the same manner.
Once the painting of the flight deck was complete, the crew seats were attached with high viscosity cyanoacrylate. Meanwhile, the kit instrument panels had been sanded down and their legs trimmed to fit the slots in the replacement floor, extending one leg with scrap plastic and high viscosity cyanoacrylate where I had been slightly overenthusiastic. The faces and films from the Eduard set were added, along with the Eduard shrouds. These latter were quite some trouble, taking several attempts to bend into place, and Mr. Surfacer was needed in places to reinforce the joint. Eduard outdo themselves to include two tiny fans on struts, but these were only added after the rest of the console was complete. The films were glued in place with Clearfix, and the panel faces on top of them. The faces were then painted – it would probably have worked better to paint the faces on the frame before attaching them. They were painted in Xtracolour Soviet interior blue-green, but other sources show a medium grey. I opted for the former for the sake of variety. The rest of the panel was painted in black. Both fans broke off during painting and were reattached once the panels were installed into the cockpit. On the instrument panels, and the other consoles, the instrument apertures were filled with Kristal Kleer once the paint was dry.
Two sunshades were made from clear acetate sheet painted with Tamiya clear green and attached in folded position beneath the ceiling with Clearfix. Once these were secure, the instrument panels were glued into place and the flight deck was effectively finished. The interior faces of the windscreen struts were painted prior to its being glued into place with Clearfix. I didn’t even attempt to correct the far too flat upper windscreen edge, the single biggest problem with this kit. Some photoetch furniture was added to the pilot and copilot’s sliding window panels.
|
Click on
images below to see larger images
|
|
|
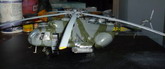
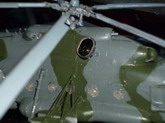
Engine housing
With the fuselage now assembled, work could begin on the engine compartment. The kit includes a very thoughtful rectangle, intended to keep the cowling halves in place, which was retained. Also added at this stage is the main rotor mast, reinforced with a length of heavy gauge metal rod, cut to length so that it didn’t intrude into the cabin. The whole area was painted in matt black, as was the inside of the cleaned casting (in preparation I managed to fracture the thin lip of the rotor mast aperture, so be careful here), which mainly needed attention around the exhaust openings. The casting was then bonded to the fuselage with epoxy, with only the aft end where it was faired into the tailboom needing any more than perfunctory filling. With this complete, the Eduard ceiling panel was added to the roof of the door region, which is otherwise quite plain.
The exhausts themselves were painted with Humbrol matt black inside, with a topcoat of Xtracolour Exhaust, while the outsides were painted in Humbrol aluminium and Metalcote aluminium, being eventually tinted with Gunze Sangyo clear blue at the base and a brown/aluminium mix at the lip.
Fuselage Sealing
Once the undercarriage and horizontal pylons had been completed, the various doors were temporarily glued into place using PVA. The cabin windows were then added using successive layers of Clearfix. Unfortunately, the several layers required to make up the shallow domed profile meant that the bubbles that are the bane of this otherwise excellent material multiplied to such an extent that the windows became almost totally opaque. Attempts to trim the kit windows had come to nothing, so a complete replacement had to be carried out. In retrospect, it would probably have been better to use the kit parts, masking them inside and out.
Undercarriage
As the aircraft I was modelling did not feature the spats, I had to dispense with the crisp Pavla castings and make do with two sets of metal rod. Originally I had hoped to solder the two of these together at their joint just inboard of the main wheels, but this failed and epoxy had to be used instead. Prior to this, however, the compression struts were glued to the fuselage halves, and the Eduard details added. The nose strut was added at the same time, care being taken to achieve maximum rigidity.
The nose wheels were weighted using a steam iron, but the Pavla replacement main wheels, being resin, were not amenable to this treatment and had to have a flat base sanded into them, the sides being thereafter built up with Milliput.
Empennage
The Pavla set also included replacement tailplanes, which I opted to use rather than rescribe the kit examples. I set them at a slightly positive angle of attack, typical of aircraft on the ground. An almost precautionary amount of blending with Milliput was then carried out. The resin replacement radar altimeter housing under the tailboom was also added at this point, with negligible filler required.
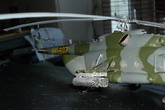
Stores and Pylons
The Ciro armament set includes resin replacement pylons, intended to fit the kit beams. This worked out rather well, and would have done better had I not fitted the port as the starboard! An expensive mistake, as the pylons snapped when I attempted to rearrange them and had to be glued back together with cyanoacrylate. The chin armour plates were added at this point – a rather more straightforward operation, naturally. I also cut the flight deck dorsal escape hatch from 10 thou plasticard. Sometimes this component includes windows, so check references.
Another addition was the intake guards. I managed to lose one of the Ciro replacements down the plughole, so had to press one of the kit parts back into service, rounding it out aft with plastic tube and Milliput. I obtained a surprisingly good match.
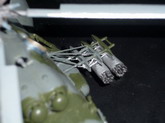
Out of the extensive stores options provided by Ciro, I plumped for the B8-V-20A 80mm rocket pods. Although the Mi-17 has six stores pylons, I have never seen more than four of these being carried, and these always on the outer two pylons, so there may be a clearance issue with the tanks. Ciro’s castings are nicely detailed, but murderously fragile. The forest of tubes at the forward end of these had lost a significant proportion of their number before the set had even got to me, and more were to go during assembly. I had to use lengths of plastic rod, and drilling out the forward apertures, even with the greatest of care, was very difficult, with multiple applications of extra strength medium viscosity cyanoacrylate and accelerator needed. Eventually I got them into a fit condition to be painted, using a base coat of Humbrol 56 aluminium, followed by Metalcote matt aluminium and an old Citadel armour wash, suitably lightened. I believe that Ciro have re-released these as a standalone set, with both the main bodies and the forward ends made from reinforced resin. If so, it’s not hard to see why! The lugs need a little trimming to fit the pylons, something I didn’t do before painting and paid for as a result.
The interpylon bracing and two pairs of upper ties were added with thin gauge plastic rod.
Final assemblies
The aerials and antennae were added to the upper tailboom, with one of the aerials being replaced by two whip aerials made from scrap plastic. The prominent navigation light was made from clear sprue. Two small holes were drilled into the base of the engine housing and two matching notches cut into the fins, for later addition of the HF aerials. The intakes were accessorised by struts and takeoff pipes from scrap plastic and thin tube. The projection ahead of the gearbox intake was added from plastic rod, and I could be convinced that it was too long. The ventral pitot heads, which may also be too long, were added from the Eduard set. Needless to say, these would prove to be very awkward. The winch mechanism was added from the Eduard set, that provided by Ciro seeming to be too large. The kit tail bumper was replaced by the Eduard one, with a scratchbuilt foot to replace a part lost to the carpet monster. Numerous small hinges, runners and other such miniscule additions as Eduard display such prowess in were added to complete the assembly process. The wing mirrors had to be replaced by those from the Ciro set, which were much more robust, being of one piece.
Tail Rotor
This was essentially the kit part, with the Eduard photoetch linkage replacing the kit item, which set ever so slightly off-centre. Fuse wire was used to add the cabling up the end of the tailboom, whilst the very fine Eduard hose was just about recovered for application.
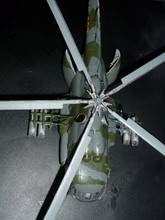
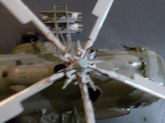
Main Rotor
The more recent Eduard hinges looked far too flimsy, so I used the solid brass from the earlier set instead. After having painstakingly completed the rotor, two of the blades snapped off, and panicked reinforcement with internal metal supports and high viscosity cyanoacrylate was necessary to save the situation. This problem might be familiar to those with extensive rotorcraft experience, but it came as a nasty shock to me.
I had fully expected the blades to have been moulded straight, but KP provided a pleasant surprise in that, after I had made enquiries about how best to bend them to represent a realistic droop when unloaded, I found that such was already moulded in. So that was one thing off the ‘to-do’ list.

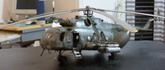
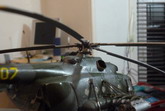
Painting
I had intended the model to represent a modern-day (as opposed to 1970s) Ugandan Hip, as a long-promised present to a friend. Quite apart from being an unusual choice, this also posed some research challenges, as Uganda’s present-day fleet is fairly heterogeneous, with a fleet of a dozen or so machines including four distinct variants. Enough photos were available online for me to gain some idea of what I was doing, but nobody has so far made a through study of the modern Ugandan air arm as far as I know, not even Small Air Forces Observer.
The fuselage and, separately, the main rotor, were undercoated with Hycote grey primer, which worked just fine. A first attempt at preshading followed, but the airbrush came out too coarse and a brush had to be used. I’ll test the jet width much more rigorously next time.
Choosing the main colours was not easy. Ugandan machines wear a wraparound grey/green scheme, the shades of which took some blending of various Tamiya greys and greens. Eventually I found two shades that seemed to work, but the first grey coat came out far too green. After I found a grey that satisfied, I masked off the fuselage with Kabuki and normal masking tape, no mean feat in view of the amount of delicate projections present. I then applied the green. A good, if heavily matt, finish was achieved, with some infraction of the necessarily provisional demarcation , but not as bad as I’d feared. The wheels were brush painted with the same green mix as used for the fuselage, and the tyres painted in Xtracolour Tyre Black, then being shaded with Citadel Nuln Oil wash.
The main rotor hub was painted in a mixture of Humbrol Authentic Track Colour and aluminium, the cables being picked out in black and the dampers in Humbrol 128 grey. The central boss seemed to be a darker, bluish grey and Humbrol 145 seemed a good match for this. The blades were painted in Humbrol 165 Medium Sea Grey overall, with a leading edge of Metalcote polished aluminium and tips of Humbrol 197 Lufthansa Yellow, the corners being picked out in Xtracolour Natural Steel.
The tail rotor hub was painted in Humbrol aluminium, with Humbrol silver used as a faint drybrush. The blades were again Humbrol medium sea grey, but with a bright red tip of Humbrol 19, rather than a yellow one. The leading edge was again Metalcote polished aluminium.
Post-spray details were thin on the ground, the domes of the radar altimeter being painted with a mixture of Humbrol 29 Dark Earth and Medium Sea Grey, while the navigation light was painted in Tamiya Clear Red. The dorsal blade aerial was painted in Humbrol Medium Sea Grey, whilst the windscreen wipers were painted in Humbrol 53 Gun Metal, the gearbox shaft housing in Humbrol aluminium and the bulk of the pylons in Humbrol aluminium and Metalcote matt aluminium. The rotor mast was painted in Humbrol aluminium, and the various minor exhausts in Humbrol Gun Metal and Metalcote Gun Metal. The tail bumper shock strut was picked out in Humbrol silver.
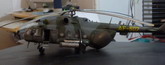
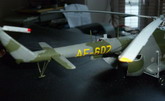
Markings
Strangely enough, Ugandan Hips do not seem to bear national insignia anywhere, so I was unable to use MAV’s competent rendition of this attractive roundel. The only markings I could determine were the codes on the tailboom, making this a quick job indeed. I used MAV’s numerals for AF-207, but the serials had to come from another source as matching ones are not provided. Fantasy Printshop’s Luftwaffe serials were the
closest match that I could find, so I hurriedly ordered a sheet, which took a more than reasonable time to arrive. Some overpainting with Humbrol 197 was necessary to blend the two together, as well as to cover the joints in the numerals (MAV’s sheet only provides for dashed, not solid numerals,
although the shapes seem the same). The dashes were made from the two halves of an I.
MAV’s decals seemed rather thick, and I wasn’t entirely able to eliminate wrinkling, even with the Microscale system.
Uganda’s aircraft seem conspicuously clean, and therefore I didn’t bother with weathering. From the admittedly few photographic sources available, there didn’t even seem to be any of the exhaust staining that can often be prominent on these aircraft.
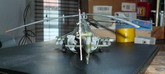
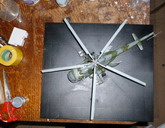
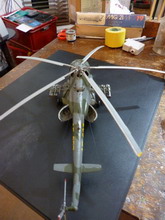
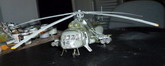
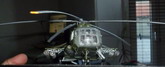
Final Assembly and Basing
Firstly, the wheels were attached, careful test fitting paying off here. The doors and windows were carefully opened up with a scalpel and the dry PVA stripped off, fortunately doing little damage to the paintwork. They were then reset in their open position using high viscosity cyanoacrylate for the doors and Clearfix for the windows, a process rather simpler than had been expected. The model was then offered up to the base, forming part of the Trumpeter clear acrylic display case. This was only just big enough, clearance being measured in millimeters, and not very many of them. In fact, I foolishly sited the model without taking the tail rotor into account, which necessitated a pair of incisions into one face of the 316x276mm case. Once I had definitively sited the model, a set of holes were drilled into the black plastic base and the model attached with epoxy. The rocket pods and engine exhausts were then attached, followed by the cabin ladder and the HF aerials stretching from the base of the tailboom to the tips of the tailplanes. These were made from stretched sprue. Finally, the main and tail rotors were attached, the main with epoxy and the tail with high-viscosity cyanoacrylate.
References
-
Kagero Topshots No.14: Mi-17 (Mi-8 MTV-1)
-
Kagero Topshots No.23: Mi-8
-
Flugzeug Profile 41: Mi-8
-
TBiU 94: Mi-8
-
Replic 146, p34-42.
-
Plans from unidentified Russian publication, January 1996.
-
Lotnictwo Wojskowe, p55-61, January 2001.
Internet resources:
Gavin
Parnaby
|
Click on
images below to see larger images
|
|
|
|
|
|