|
For your viewing pleasure, here are some photos of my Eduard ProfiPack MIG-21 PFM.
The Mikoyan-Gurevich MiG-21 (NATO reporting name: Fishbed) is a supersonic jet fighter aircraft, designed by the Mikoyan-Gurevich Design Bureau in the former Soviet Union. Early versions were considered second-generation jet fighters, later versions are considered to be third-generation jet fighters. Some 50 countries over four continents have flown the MiG-21, and it still serves many nations a half-century after its maiden flight. North Korea and India are said to have many MIG-21s still in service.
Aviation history shows the MIG-21 as the most-produced supersonic jet aircraft and the most-produced combat aircraft since the Korean War. It also had the longest production run of any combat aircraft (1959 to 1985 over all variants). A total of 10,645 MIG-21s were built in three factories in the USSR. The MIG-21 has seen its share of combat over the years in a number of wars and conflicts. Its kill to loss ratio is not all that great, but with a well trained experienced pilot, the MIG-21 was a formidable fighter aircraft.
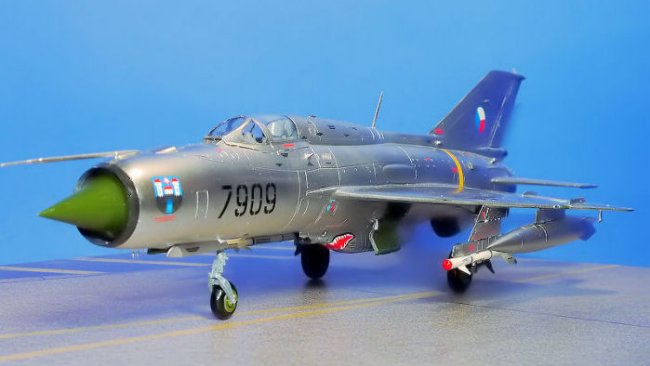
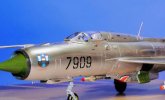
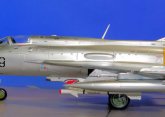
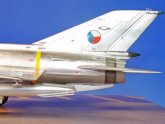
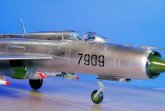
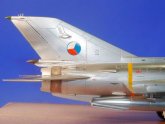
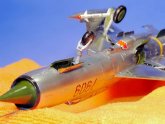
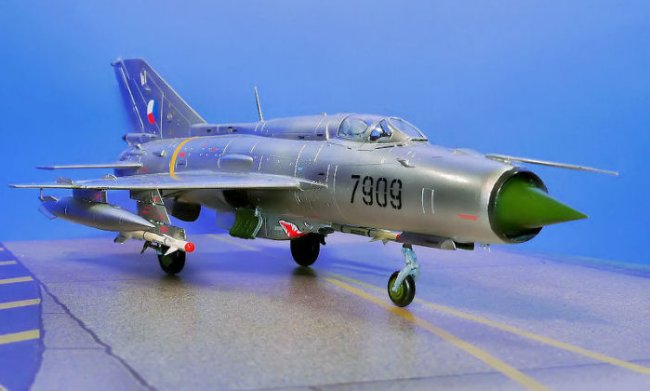
The model here depicts a MIG-21PFM (aircraft number 7909) serving with the 11th Fighter Regiment of the Czechoslovak Air Force, stationed at Zatec AFB, Czechoslovakia, March, 1991. In factory documentation, PFM indicates an export version of the MIG-21. NATO assigned the MIG-21PFM the codename Fishbed F.
|
Click on
images below to see larger images
|
|
|
Construction
This was an out of the box build—no after market accessories. Overall, construction is straight forward just following the instructions, which are very good—the illustrations are excellent. The parts fit was pretty decent Some gap filling and sanding was required when joining the two halves of the fuselage. Also, some seam filling was required when joining the wings to the fuselage. The rest of the kit went together nicely—very little filler was used.
I did have a bit of trouble attaching the main landing gear struts to the landing gears—the attachment points are very poor. Construction of this kit took a long time because there are so many parts, for example, the ejection seat is made up of 20 some parts, not including the PE parts for the ejection seat belts. Unfortunately with a closed canopy, which I prefer, you cannot see much of the cockpit detail
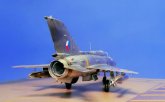
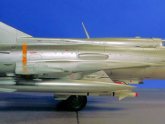
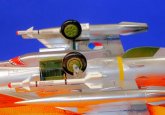
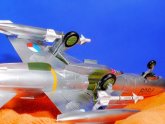
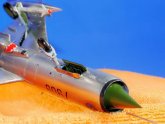
Eduard gives you the option of using decals for the instrument panels or using PE parts. I chose to go with all PE parts. For under wing and fuselage things I equipped my MIG-21PFM with two R-3S air-to-air missiles, and two under wing fuel tanks. The kit provides two fuel tanks but only one fuel tank pylon (N6). I went to the spare parts cache and found another N6 fuel tank pylon. The kit is designed for either a center line fuel tank or a 23mm cannon. If you install the 23mm cannon, you cannot install the centerline fuel tank. I went with the cannon and two wing tanks which is typical for MIG-21s.
Painting
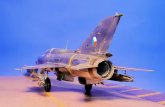
My MIG-21PFM depicts a MIG-21PFM of the Czechoslovak Air Force with a bare metal finish. Once the model was built I primed it with a coat of Model Masters Gloss Black and let it dry and cure for 48 hours. To achieve a shiny bare metal finish I airbrushed the of the model with Alclad II Polished Aluminum. I followed the recommended airbrushing method, 12 to 15 PSI air pressure and kept the airbrush close to the model surface while painting. The result was a very nice shiny bare metal finish.
Decals
In preparation for decals I hand brushed on two coats of Future and let it dry and cure for three days. Alclad recommends that you not use Future on the finish. Future does dull the finish a bit but, as the Future dries the shine returns. The kit provides two decal sheets; one sheet for the national insignias and one sheet for the stencils. The decals on the insignia sheet were excellent, the stencil sheet not so good.
This is an intense stencil decal model and most of the stencils are quite small. The instructions recommend using blue decals for bare metal aircraft. I found that the blue stencils almost disappeared on my model. So I used red and black stencils.
The decals for this kit were a bit fussy. Typically I cut out a decal and immerse it in warm water to loosen the decal. However, immersing the decals for this kit in warm water made the decal difficult to place on the model and even curl
up. I found that as the water cooled, it was easier to move a decal on the model. In fact you could use cold water with these decals. Note also that these decals come loose from the paper almost immediately after hitting the water.
Despite the fussy decals, they adhered nicely with no silvering. Just as a precaution to prevent silvering I applied a touch of Micro Set setting solution to each decal. Solvaset is too strong for the decals. Once decaling was complete I cleaned up the model with a damp cloth, then applied a light coat of Future over the model. To finish off the model, I airbrushed it with a coat of MM Gloss Lacquer Finish.
Comments
To sum up, I found this kit challenging to build, mainly because of the large number of parts, and the fussy decals. This is definitely not a week-end build. The parts fit was reasonably good and the cockpit and external detail was good. Additionally, the instruction illustrations were excellent. Despite the problems and the large number of really small parts, I was satisfied with the look of the finished model. This is not a kit for beginners. I would recommend that only modelers with a good deal of modeling experience tackle the Eduard MIG-21PFM.
Burt Gustafson
|
Click on
images below to see larger images
|
|
|
|