|
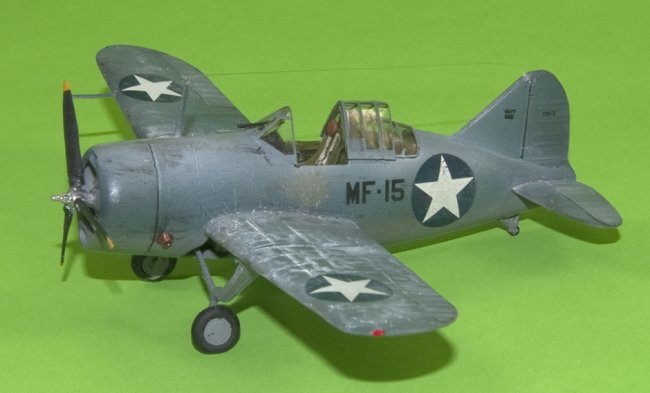
This is one of a series of aircraft I am doing in honor of the U.S. Marines at the Battle of Midway. If not for the valiant efforts of these men there is a great likelihood that the U.S. would not have won this battle, because Japanese carriers were caught at a bad time by the later arriving U.S. Navy forces, because the Japanese force commander could not decide quickly whether to arm his aircraft with regular H.E. bombs for a second strike against Midway, or armor-piercing explosives for an attack on U.S. carriers. These few, proud and brave Marines took off against a superior force with mostly obsolete aircraft, of which the Buffalo was probably the worst.
This is a very nice little kit. The hardest part of building it was fitting all of the cockpit resin components inside the fuselage. It took a lot of sanding and test fitting. The major annoyance of this kit is the way the propeller blades attach to the hub. The end of each blade half-laps onto the hub stub. (Think a cylinder cut in half vertically, then each half needs to be joined to the other.) This is a clever way to assure that the propeller pitch is correct, but since the hub is resin and the prop blades plastic, CA glue had to be used. For me, the joint kept failing. Finally, after three separate glues, one seems to be holding. I would rather have seen a male/female joint or even flat spots that could have been drilled to take a re-reinforcement wire.
You might just start with epoxy for this joint.
The minor annoyance is that the fit of the rear turtle-deck canopy is not that great, and the provided framework is so tiny that there's no room to fill it. I glued on and filled the seam for the front windscreen, then white-glued the center and rear parts, so they could be removed after the aircraft was painted. After painting, I was afraid to disturb the white glue joint on the rear canopy, so I just accepted
it. It should be gap-free like the windscreen where it joins the fuselage.
|
Click on
images below to see larger images
|
|
|
The Battle of Midway was fought between June 4-7, 1942. At this time, these aircraft were painted in a two-color paint scheme, Neutral Grey (FS# 36270) on the bottom , and USN Aircraft Blue-Grey (FS# 25189) on the top. Then of course it was faded and salt-whitened and just generally fried to heck in the hot Pacific sun! The Neutral Gray is readily available. The Blue-Grey, not so much. I was fortunate enough to snag a couple of tins from White Ensign Models a few years ago, which was dead on. Alas, they are now
defunct, but thankfully the paint line is now owned by UK-based Sovereign
Hobbies http://www.sovereignhobbies.co.uk
and the photoetch and resin are now under Tom's Modelworks, which appears to
have obtained the WEM name https://www.whiteensignmodels.com/page/About+Us/1/#.VYpKlhtVikp
However, don't despair! After some good weathering and aging, you can barely tell the original color anyway. Here's how I did mine:
First, the canopy area was airbrushed with zinc chromate (FS# 34187), then a coat of the Grey and Blue-Grey color in their proper places. Then each color was mixed with about 10 percent white, and sprayed again, top and bottom, to sort of high-light the center panels, and random for and aft passes on the wings and horizontal stabilizers, and vertical streaks on the tail and fuselage.
Then the base colors were mixed 30 percent white on the bottom and the Blue-Grey mixed 30 percent with light grey on the top side. Then everything else was masked off, exposing the cloth-covered control surfaces. These were all sprayed with the appropriate top or bottom colors. Then, everything but the canopy was unmasked.
All surfaces were given a coat of Model Master Clear Gloss Acrylic to provide a glossy surface for the decals. Normally I use Future (or whatever the current name is...) so this was kind of any experiment for me. Next, all the decals were applied with Micro Set and Micro Sol; allowed to dry, and then sprayed over again with MM Clear Glass Acrylic. (By the way each paint "coat" was given 12-24 hours to dry before the next step).
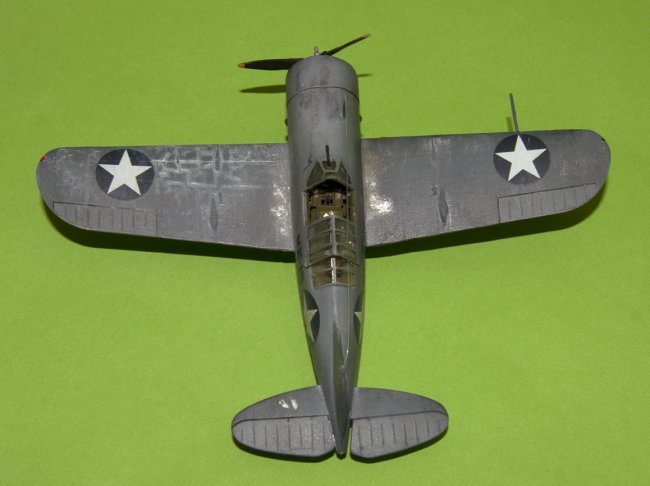
Then, I began to try to use a panel wash. Problem is, the panel line were so small and delicate that the wash would barely stay in place! Anyway, a little grime, some wear-through zinc chromate and the some silver wear and tear, and that was about it. I then had a mind freeze and sprayed some flat acrylic sealer from a spray can over the model, promptly killing the metal effect on the worn areas, which I had to redo. The last piece was that I dug out a bottle of old Floquil "Dust" (very thin, translucent tannish color) and sprayed over the spine of the fuselage, crowned area of the wings, and then lightly all over. The problem was, I forgot that the Floquil was lacquer-based, so the next day, I open the paint booth and am greeted by little tiny cracks (alligator skin, it's called in the paint biz) here and there, mostly on the left wing.
I panicked for a moment, then grabbed some 3600 grit paper and smoothed it down. Then, In a flash of genius (luck) I tried some Doc O'Brien's Weathering Powders here and there, and the cracks suddenly worked in my favor. I'll let you be the judge from looking at the photos.
Lastly, I unmasked the canopy, glued the moveable part over the rear canopy, painted the nav lights, added the antenna wire, and it was done! Hope you like it as much as I do. This is really a great little kit.
Oops -- looking at the photos, I see I forgot to flatten the exhaust tubes, spray the exhaust stains, and paint the oleos on the landing gear silver!
DuH!
TheRealMrEd
|