Manufacturer website:
www.eduard.com
Mfr Stock No.: 8268
MSRP: $49.95
Direct Link to Item: http://www.eduard.com/store/Eduard/Plastic-kits/Profipack/Aircraft/1-48/Bf-109G-6-1-48.html
Having built the Eduard MiG-21PFM and the Spitfire Mk.IXs I had high hopes for the new Eduard Bf-109G, my favorite airplane. The MiGs and Spitfires are some of the finest fitting and most accurate kits on the market. They are about as perfect as you can get a kit. So each kit should get better right? Well not always.
After the big promotional build up there was quite a lot of energy and anticipation for the new kit. And then something happened, something drastic for some, the model wasn’t 1/48th scale. The wings were 8mm too long. Oh the horrors. There were other issues with the kit, such as nose profile being suspect, the lack of access panels, strange parts breakdown and a mismatched tall tail. I’m not sure how it all happened. I’m not even sure Eduard knows how it happened but it did. After initially denying the inaccurate scale, Eduard finally admitted that they made a mistake and would be retooling the kit. Now many modelers won’t care about the scale issues, but others will find the kit unbuildable. I’m not going to take sides on the issue. I want it perfect as it is MY favorite airplane, but understand sh*t happens. It is up to the modeler if the kit is buildable. With that said I still wanted to build it.
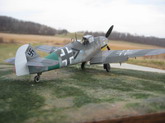
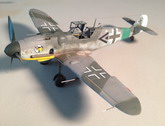
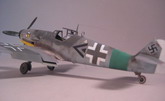
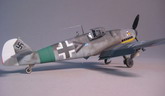
Packaged in a big cardboard box, the kit is molded in medium grey plastic with no flash that I could find. The plastic has beautifully engraved panel lines and restrained rivets. Some will not like the rivets, but I love them. There are four sprues of plastic along with one sprue of clear plastic. I did notice that there were sink marks on the aft end of the prop blades and at the bottom of the wing/fuselage area. That surprised me a little bit. Nothing that some filler wouldn’t take care of, but I figured they shouldn’t be there. As with all of Eduard’s Profipacks this kit comes with paint masks and pre-painted photo etch. The decal sheet is beautifully rendered and printed by Cartograf. The decals include markings for five aircraft.
|
Click on
images below to see larger images
|
|
|
As usual the construction begins in the cockpit. The cockpit consists of a nice mixture of photo etch and plastic. With both components the cockpit is very complete and quite accurate. In the weekend edition the cockpit will be missing some pieces. One of the things that is very nice in the cockpit was the clear fuel tube. The first time this has been available in a kit form. I tried the new fabric seatbelts and I have to say they are awesome. They will require skill though as they are tiny, but they look great.
Once the cockpit is together it was time to close up the fuselage. Don’t forget to add the exhausts from the inside to the fuselage halves PRIOR to assembly. The exhausts seem to be a little large. Once that is taken care of the fuselage mates up beautifully. Take care as you assemble the fuselage as it is ‘flexible’ but if you take your time you will have a perfect join on a panel line. The two places I had an issue with was the panel in front of the cockpit and the lower forward cowling. Both of these places needed just a tad of filler. The upper cowling hand holds had to be
rescribed. Luckily for me, Eduard made a scribing template for the Hasegawa Bf-109G kit and it included the handles. The shape of the lower cowling appears to be too squared, but again that is a matter of judgment.
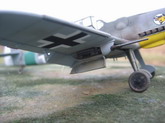
One other thing Eduard didn’t get quite right is the shape of the supercharger intake mounting point. On the G-6 it has a slight cutout to make room for the cowl bulge. Eduard’s is molded in an airfoil shape. I just cut a little bit out and filled the background with some putty.
The tail surfaces fit perfectly and mount securely.
The wings are too big. Okay get over it. They assemble perfectly though. The bulge is properly embossed on the inside which is the first time this has been done properly. The only ‘issue’, and it wasn’t an issue with me, is that the wheel wells are totally enclosed by a canvas cover. The war time aircraft had their wheel wells only partially covered. I don’t think this is a big deal. Don’t forget to open up the appropriate holes for the drop tank if your example is equipped.
Okay now comes a little bit of an issue. The wing gondolas from the kit are too large to fit the wings. Luckily I had the Brassin replacement items which fit the wings perfectly. The kit ones are two mm too long.
Mounting the flaps is actually really easy. I didn’t add the lower inboard flaps initially. If you add the inner wing upper flap and the outer flap you can literally lay your model on the table and that will hold the angles perfectly. Once that is done you can add the lower flap and radiator. Perfectly angled flaps.
I added the forward and aft portion of the canopy after adding the masks. I used the center portion of the canopy to mask that area. The fit was that good. A quick covering of RLM 66 allows the model to be wiped down with Plastic Prep.
A coat of Alclad Grey Primer showed very few areas that needed to be cleaned up.
Pre-shading the model with Tamiya Flat Black starts the painting and weathering process. This was followed up with some Model Master Acrylic RLM 76. Once dry the RVD band was painted Polly-S RLM 25 and masked over. The tail was painted Tamiya Flat White. The lower cowling was given a coat of Tamiya Flat Yellow. All these areas were masked off. Model Master Acrylic RLM 75, which I think is the best match was used on the wings, tail and spine of the model. The mottling was done in keeping with the photos of the real thing. Polly-S RLM 74 was used to round out the camouflage. Some care was required to mask off the fuselage crosses which were filled with the RLM 74. The RLM 74 was also added to the mottling to give it depth. The trim tabs were masked off and sprayed Alclad Primer to even out the color and then sprayed Tamiya Flat Red.
While the paint was drying the landing gear struts were added. They had previously been pre-shaded and painted Polly-S RLM 02 then the oleo was ‘painted’ by adding some Bare Metal Foil to that portion of the strut. The landing gear fit perfectly and snuggly into their corresponding holes in the wings. The tail wheel was also added at this time. I had painted the wheel with Vallejo Dark Rubber and then the white wall was masked and painted Tamiya Flat White.
The whole model was allowed to dry in place overnight. After that a coat of Future with a few drops of Tamiya thinner were sprayed over the model to make it ready for the decals. This little tip was passed onto me from Rafe Morrissey and it certainly seems to work perfectly, even for me.
The decals, both Eduard and Cartograf, worked perfectly. No issues were noted anywhere. The decals were thin and reacted well with
Solvaset. The decals didn’t really need any setting solution. I did it more out of habit than requirement. After drying overnight, the entire model was sprayed with Alclad Flat.
I added some Brassin Bf-109G-6 wheels. When that had cured I added the rest of the cannon pods and guns.
Once dry the model was given a burnt umber artist oil wash along the panel lines to give it some depth. This was followed up with a very thin coat of Tamiya Buff to fade the paint scheme. Some silver pencil and sponge chipping was added to the wing root. Mig Pigments were used to replicate the exhaust stains. Some burnt umber and sienna were used on the bottom of the model to add the oil streaks common on 109s.
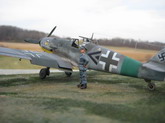
The final minor things were added like the antenna on the belly, the DF loop on the spine, antenna mast and finally the canopy. An EZ Line antenna was run from the mast to the tail after adding the photo etch piece to the tail. And the model was done.
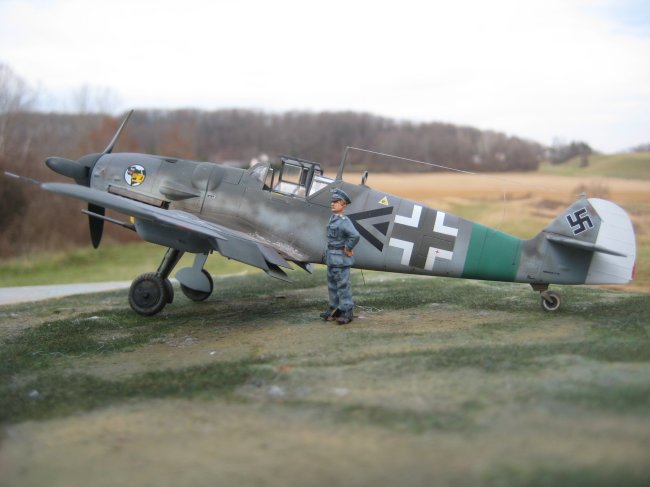
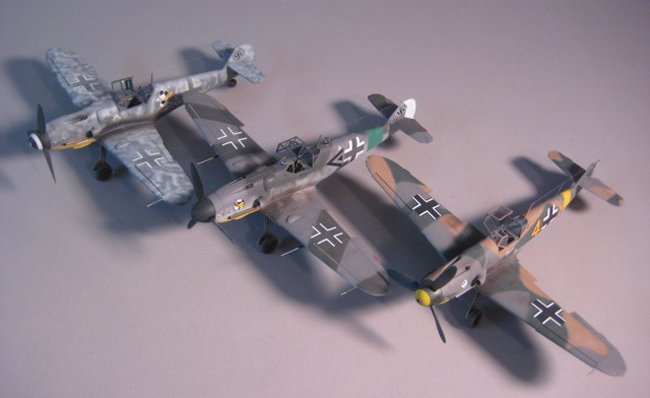
Was it fun? Yes. Was it the ultimate 109? Unfortunately no. Does it look like a 109G? Yes it does. I compared it to the Zvezda F (the best 109 in any scale
IMHO) and the Hasegawa kit. It didn’t look out of place. If you looked hard enough you might notice that it was slightly bigger, but it wasn’t drastically noticeable at least to me.
Eduard could have done better. This isn’t as good as the MiG-21s or the Spitfires.
On the downside
-
Wings too long
-
Fuselage too long
-
Exhausts are too large
(IMHO) and have the wrong angle.
-
The wing tip lights are not separate clear parts. Even Hasegawa does this. I did not know how to make them look realistic on grey plastic so they were just painted like the wings.
-
Landing gear angle incorrect fore and aft. It should sit further forward than molded.
-
Landing gear are molded with no weight on the aircraft so it sits higher than it should.
-
Lower cowl shape and oil cooler are incorrect. Both being a little too square.
-
Decals for the fuselage cross are too large even for the longer fuselage
-
Gondolas too large even for the too large wings. If you want a gondola aircraft you will have to get the Brassin set.
-
The supercharger mount is missing the cutout seen on most 109G-6 aircraft. By the way, this is depicted properly on the Brassin Engine cowlings in the engine set.
-
The supercharger front is missing detail
-
ETC rack is not correctly shaped. This seems to be a difficult shape for model manufacturers.
-
The drop tank is a strange version
-
The little bump on the wing root were easily taken care of with a sanding stick.
-
The mounting of the wing in a ‘V’ shape is a curious oddity to me. Typically Eduard has made joins on panel lines. They should have done it here too.
-
The missing access panel on the belly of the fuselage is an oversight that shouldn’t have happened.
On the plus side-
It does look like a 109
The cockpit is nice in the Profipack but it will be missing key parts in the weekend edition Decals worked great, even with the fuselage cross being large.
Fit is very good throughout
I love the rivets. They look awesome. Some like on the vertical tail are not accurate but they don’t detract from the look.
I did enjoy building the kit.
Would I build it again? Yes I will build it again. I am finishing up the Royal Class kit right now and I have two more in my collection to build up at a later date. Is it worth the money? That is up to the modeler. I’d say yes. If you are driven by it is not exactly 1/48th scale then just wait for the retooled version to be released. Hopefully Eduard will take their time and incorporate the changes that need to be taken to make this a world class model.
Recommended
Thanks to Eduard and IPMS/USA for the review copy. You can obtain yours by contacting Eduard directly at
www.eduard.com
, your local hobby shop or online retailer.
Floyd S. Werner, Jr.
IPMS No.: 26266
|
Click on
images below to see larger images
|
|
|