|
Between late 1970 and early 1972, my father, Paul “Jack” Kerr, was a Major in the Army serving his second tour in Vietnam. During part of this tour, he was an advisor in the Rach Gia / U Minh forest area on the west coast of what was then South Vietnam. On several occasions he called on the nearby “Black Ponies” of the Navy’s Light Attack Squadron 4 (VA(L)-4) for close air support. He is convinced that without the accurate and persistent close air support from the Black Ponies, he would not have made it back from this tour. He has said that no matter how bad the situation, just hearing the Black Ponies coming up on the radio gave him hope that he would make it through the night.
A few years ago, I built a model of the USS Wasp (CV-7) for a long time family friend who had served on her from commissioning to her loss in 1942. (If you’ve never made a 91-year-old man cry, it’s an interesting experience.) On our drive home my father and I talked about how a sailor would always want a model of their ship, and a pilot his plane. A tanker, even if his tank were a flaming metal death trap, would want a model of his tank, because it was HIS flaming metal death trap. There really is nothing you can build for an old infantry solider. My dad
said that wasn’t true, he would like to have a model of a Black Pony.
When the Kittyhawk 1/32 scale OV-10A kit came out, I immediately bought one, and the AOA decal set. Since by the time my dad left Vietnam, the Black Ponies had run out of Zuni rockets, and were dropping fuel-air cluster bombs, I also bought the Trumpeter 1/32 scale US aircraft weapons kit. My plan was to give the finished kit to him as a Christmas present. However, my dad promptly
threw a monkey wrench into these plans by having serious heart problems during the summer. Hoping it would be a quicker build, I bought a 1/72 Academy Bronco kit, decals from Fireball Models, and several detail sets from Czech Master Resin.
|
Click on
images below to see larger images
|
|
|
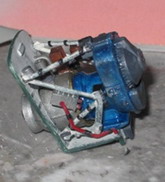
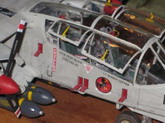
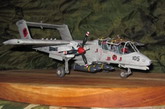
The only real problem with building the Academy kit was large gaps where the top of the canopy fit into the wing. These were filled with Squadron putty. Some of the antennas needed to be removed, and the kit has cockpit steps on both sides of the fuselage. They should only be on the right side (Oops!). There were some minor issues with the detail sets, but nothing terrible. I used the CMZ cockpit set, general detail set, engine set, control surfaces, and landing gear set. I used the kit parts for the main landing gear bays to detail the nose gear bay. I scratch built the under wing Zuni rocket pods out of styrene rods, and strip. I drilled out the ends of the rods, and inserted the tips of some small nails to represent the rockets (picture 3). The model was brush painted Model Master gull grey, and the panel lines picked out with either a very sharp pencil, or a water color wash. I then dry brushed streaks of engine grey, Russian underside grey, and white over the model to give the paint a “lived in” look. I toned down the weathering by dry brushing another coat of gull grey over the entire model. The model was then sprayed with Testor’s gloss coat. After dipping the clear parts into “Pledge” 3 times, I painted the canopy frames, and painted the top of the canopy, and the windscreen Tamiya clear blue. I opened the left side of the cockpit, and used a bent piece of styrene rod to represent the spacer between the two windows (pictures 4 and 5).
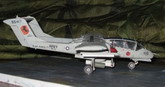
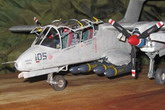
I picked aircraft #105 from the Fireball decals because its markings had “Black Ponies” on the tail boom. After applying the decals, I dry brushed some gull grey to blend them into the finish. I then brushed on Testor’s dull coat. I mounted the model on an Eduard pressed steel plank base, and made a couple of decals on Bare Metal Foil decal paper: the squadron patch, and a description of the aircraft.
I drove home, and gave my father the model along with two Black Pony squadron hats I purchased from the Black Pony Association web-site. I told him the model was a “Rough Draft,” and that they sold me the hats because he was a “Satisfied Customer.”
 |
|
Picture
2 |
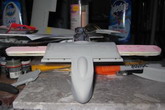
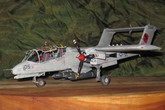
By the time I started working on the Kittyhawk kit, my dad was doing much better. Actually, the build of the Kittyhawk kit was much easier than the smaller kit. The most common problem with my kit was injector pin holes, lots of large injector pin holes. Most of them would not be visible on the finished kit, but there were several in such places as the cockpit walls, and the inside of the landing gear bay doors that had to be filled with Squadron putty and sanded. There were also “towers” of plastic on a few parts that had to be dealt with. On several parts, the locator pins were missing, and on others the locator holes were filled in. The biggest problem I had was figuring out how to attach the outer wing / tail boom assembles to the center wing section. I had never built a 1/32 scale model, so someone with more experience probably wouldn’t have had this problem. I glued two sanding sticks together, and glued them into the center wing to give the wing joints some support. As an added benefit, the rough surface of the sanding sticks held the parts together while the glue dried (picture 9). There are a couple of omissions. The most serious is the lack of one of the fueling ports on the top of the wing. There should be 5 ports, and the model only has 4. I used PowerPoint to draw a fueling port. I drew it much lager that it need to be so I could get the rivet holes to match. I then reduced it to the correct size with my printer/scanner, and printed it out on Bare Metal Foils clear decal paper. There are two small hand holds on the top right side of the cockpit that are also missing. I made these out of some L-shaped rod. There should be 5 access steps on the right side of the cockpit, the kit only has 4. I used one of the kit’s decals to show this step in the closed position.
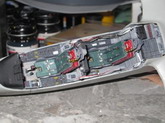
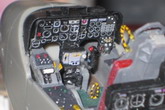
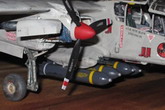
I used red, black and white sewing thread to represent the wire bundles in cockpit. I used the instrument panels decals from the kit, and after a couple of applications of Solvaset, they fit nicely over the raised details of the instrument panels. I painted the model the same way I painted the smaller one, except I used Vallejo’s black wash for the panel lines. I cleaned up the wash the Testor’s lacquer thinner, and sprayed the model with gloss coat. I selected decals for “The Gaboon Viper,” because I always loved the story of the Gaboon viper being named that, because as you passed it in the jungle, it would reach up and bite you on the “Gaboon!” (It wasn’t until I saw the two models side by side that I realized that this was also aircraft #105.) After dry brushing some gull grey over the decals, I sprayed the model with dull coat, and attached the cluster bombs from the Trumpeter weapon set. I painted the bombs to match pictures on the Black Pony Association web-site. After a three dips into “Pledge,” I painted and attached the canopy.
I bought a wooden plaque from Lowe’s, and after sanding and staining, attached the model to it. Once again, I made a decal of the squadron patch, and a description of the aircraft, and attached them to the base.
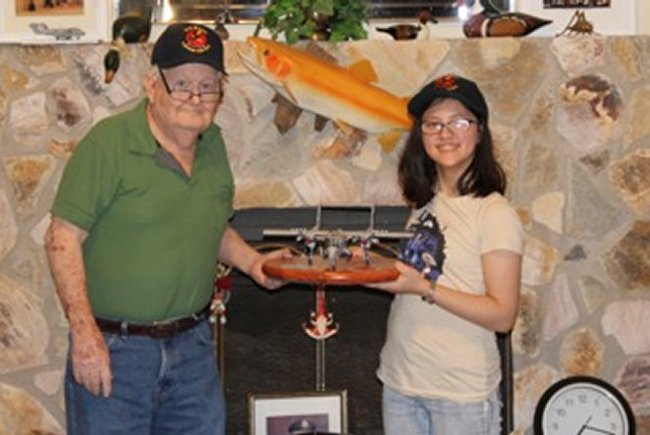
My daughter gave the model to my dad for Christmas, and he gave her one of the squadron hats I had given him earlier. They are the founding members of the Lake George Black Pony Appreciation Society (Picture 2).
I took most of the photos with my wife’s Canon PowerShot SD960 IS mounted on a tripod. I used the macro setting, auto-flash, the 2-second delay timer, and the ISO was set at 200. I used what may well be the last Vietnam era poncho liner still in captivity as the background.
Micah
Kerr
|
Click on
images below to see larger images
|
|
|
|