|
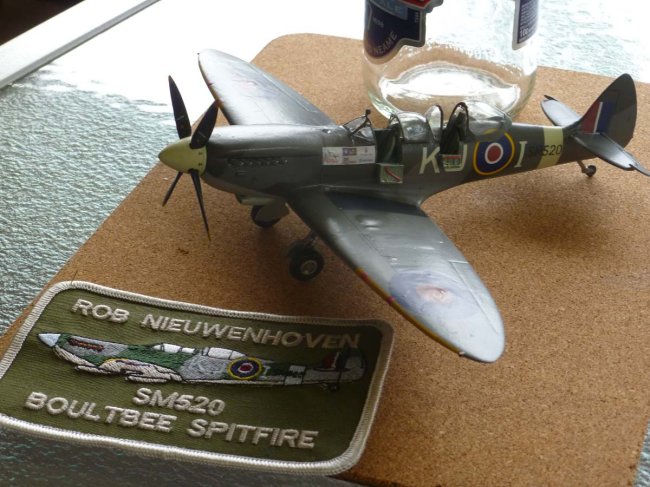
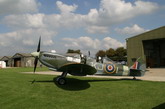
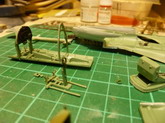
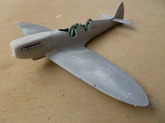
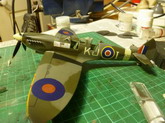
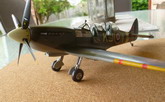
A couple of years ago, I was lucky enough to convince my wife to allow me to spend a stupid amount of money to attend a course run by Boultbee Flight Academy which gives Private Pilot Licence holders the opportunity to undergo an abbreviated RAF flying course. Starting with the Chipmunk (a great, fun little aeroplane!), we progressed onto the Harvard (heaps of power but very heavy), before moving onto the pinnacle – Supermarine Spitfire Tr9 SM520. To say this was a fantastic experience is an understatement – this was simply the best experience of my life (apart from getting married to the wonderful woman who let me do this and having our kids)! I knew I had to build a model (well, three eventually but I’ll start with the Spitfire) to commemorate the event. Brigade Models make a 1/48 Spitfire Tr9 conversion set for the Hasegawa Spitfire IX but research revealed that Revell produce the same kit as their own (Spitfire IXC/XVI). This was a much cheaper option, so I bought one of these. The Brigade Models kit is harder to get but appears occasionally at Hannants and I was lucky enough to get one after a few months on backorder. The kit is essentially a new fuselage and rudder, with an additional seat, canopy, instrument panel and basic controls with Irish and Dutch decals. They recommend the now-rare Aeroclub controls to replicate the additional controls in the rear and I managed to get a set from the manufacturer. An aftermarket seat was fitted from my spares box and two Eduard Spitfire IX detail sets were ordered to detail the cockpits and the whole lot was assembled. The Eduard instrument panel needed modifying to fit the rear cockpit and a new throttle/prop control quadrant was scatchbuilt for the rear. Both seatbelt sets were modified to reflect the modern sets fitted to SM520 and were painted semi-gloss black as modern webbing is used, rather than reproduction Sutton harnesses. The gunsight was left out as SM520 doesn’t have its fitted.
|
Click on
images below to see larger images
|
|
|
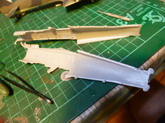
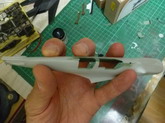
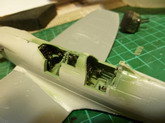
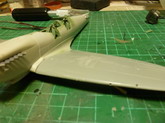
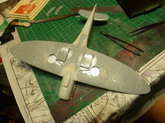
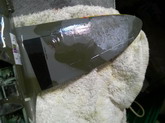
After getting a little carried away with aftermarket on my Seafire XV, I decided the rest of the existing parts would largely suffice and I drilled the correct exhausts, detailed the undercart and cut the elevators from the horizontal stabilisers so I could depict them drooped in the down position. The new fuselage was tackled next and it went together without too many problems, being a nice fit almost straight from the box. The plastic is quite soft, so care is needed to prevent taking too much away with the flash (plenty of it, as you’d expect from a limited-run kit). For reasons best known to Brigade (maybe due to mould or box size?), they cast the fuselage and engine separately, which adds to the fun of ensuring everything aligns correctly! The under-fuselage didn’t quite fit to the donor kit wings but the upper surface wasn’t too bad. The usual filling, sanding, filling routine commenced and eventually I was satisfied with the result, unfortunately much of the engraving was sanded off and had to be rescribed. The cannon blisters were removed from the wings and the holes for the cannons filled as the Tr9 had no cannons fitted, using the space to carry additional fuel (the lower fuselage tank was lost when the cockpit was moved forward two frames to make room for the rear cockpit). SM520 was never (re)built by Supermarine as a Tr9, the conversion actually being done as per Supermarine’s specifications during the aircraft’s restoration to flight. As a result, some things differed from the factory versions. In my case, I missed the fact the lower wings didn’t have the machine gun ejection ports under the wings (MJ627, which was also resident at Boultbee when I did my course, does have these present) and I left them fitted. The lower identification light was also filled in and the rear canopy was cut open along with the access door (which doesn’t align inside with the engraving outside and needed some modification as a result!) With the horizontal stabilisers fitted, it was time to paint.
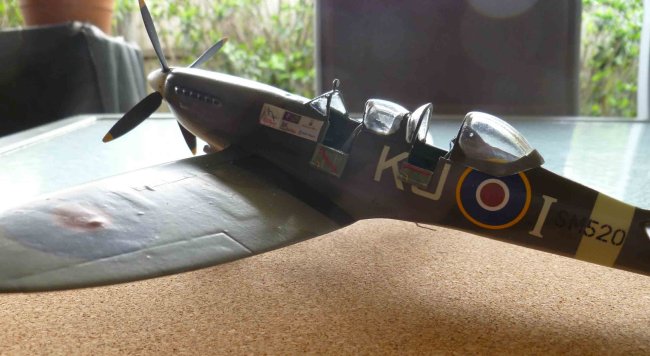
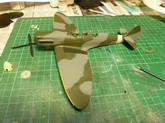
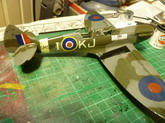
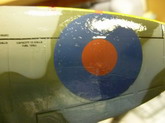
The paints went on without problem (Humbrol enamels) and, after curing, the Future coat was applied for decaling. Decals were a combination of kit, BarracudaCals (mainly for the post-war prop blade markings!), Eduard stencils, Xtradecal’ Squadron codes (cut down to size to reflect the shorter letters used on SM520), Ventura 8 inch serials and Almark’s RAF Type B roundels, along with some custom-made decals on my printer (Boultbee stickers and the additional stencilling for the Tr9 not found on other stencil sheets, along with the autographs of all the WWII Spitfire pilots who had flown it with Boultbee – and HRH Prince Harry! These are on the forward cockpit door interior). All went on easily with some Micro-Set and Micro-Sol – except the Almark roundels. They didn’t want to leave the backing sheet, then wouldn’t clean up properly and were thick, refusing to suck down after repeated coats of Micro-Sol. Eventually, I managed to obtain a reasonable result and the Future sealing coat was applied. Then – disaster! The roundels had cracked – not a lot but enough to be noticeable. The only option was to remove the Future coat and the offending decals. This was an epic mess and ultimately ruined the model. Those decals were as stubborn to come off as they were to get down! Much Windex and scraping later…have a look at the photos. After a quick paint touch-up, it didn’t look too bad, so I reapplied Future, found a set of replacement roundels from my Mosquito (which is getting RAAF markings, anyway) and the mess was resealed looking a little worse for wear. A small amount of weathering was then applied as the aeroplane is kept almost immaculate (remember, this is a warbird, not an operational fighter – oil leaks are quickly removed and stains just don’t get a chance. Only the walkways show any sign of scuffing or wear. Then the matt coat was attempted. Another epic. The Tamiya flat I used was the wrong one for a matting agent but it took me several coats to work out why it wouldn’t flatten after drying. By this time, most of the surface detail was gone. I’d had enough by now and accepted the final flat coat without the obvious detail. The undercart was now fitted, along with the cockpit doors, canopies, propeller and the crash axes (I made one from sprue for the rear cockpit). A modern VHF whip antenna on the fuselage undersurface completed the build.
This was an interesting build and I generally enjoyed it until the decals ruined it for me. The completed model is still right next to me as I type this in a prominent place in my cabinet and everyone who’s seen it loves it but I know there are too many faults with it to ever be happy with it. Would I build another? Maybe. Would I take another opportunity to fly a Spitfire? Absolutely! There are not enough superlatives to describe how it feels to fly the legend!!
Now, how can I get Airfix to make a 1/48 DHC-1 Chipmunk…
Rob
Nieuwenhoven
|
Click on
images below to see larger images
|
|
|
|