Manufacturer website:
http://www.kittyhawkmodel.com/
Mfr Stock No.: KH80125
MSRP: $44.95
Vendor Web Site: http://www.kittyhawkmodel.com/
Direct Link to Item: http://www.kittyhawkmodel.com/#!80125/c1eup
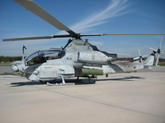
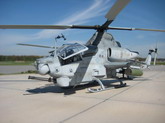
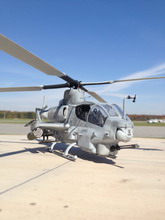
The AH-1 Cobra, the world’s first attack helicopter, first developed in 1967 and deployed around the same time frame has evolved into a modern badass helicopter. The latest version is the US Marines AH-1Z Viper. The helicopter has changed its skins more than a real snake. The latest incarnation of the helicopter is just like it was in the 1960s, built around the same airframe as the UH-1Y. With 85% compatibility of components the Huey and Cobra will minimize the logistics footprint on the US Marines maintaining them. The new Cobra is the first production version to sport a four bladed main and tail rotor.
Before I begin this review I must point out that I am on the staff to review Kitty Hawk’s helicopter designs. I advise on which kits and the accuracy of the CAD markings. I accept all responsibility for any mistakes with the kit.
Packaged in a cardboard box with a removable lid, the kit is neatly packed inside. Four sprues of light grey plastic contain all the parts that are flash free. All the panel lines are crisp and nicely engraved. The rivet detail is quite nice and restrained.
There is a single sprue of clear plastic that is packed into its own cardboard box to prevent damage. The main canopy is broken down into five pieces. A ball bearing weight is included as well to keep the model from being a tail sitter.
The instructions are printed in color on the front and back cover. There are 18 pages that are easy enough to understand.
There is also a fret of photo etch that would rival anything Eduard has to offer. There are two decal sheets. The first one has the grey markings and the other one has the full color markings. One note, the full color markings of black, red and gold are beautiful but the serial number on the airframe is not quite right. The serial number as printed is 168000 and should be 168800. This is a very minor thing, but I missed it.
|
Click on
images below to see larger images
|
|
|
The construction begins in the cockpit. The cockpit is a beautiful rendition of the real thing. The instrument panels has some great relief and would respond well to painting. Kitty Hawk offers you decals as well. The Multi Function Displays are shown in the powered up mode which is really neat, especially if they fit. After painting them flat black I added the decals right over the relief. I just tamped them down and applied Solvaset and let them sit overnight. The decals conformed perfectly with the plastic parts and looked awesome. I like the look of the MFDs especially. I built most of my cockpit and then painted it various shades of black. There are decals that go on other components in the cockpit. I did notice that there are two other decals that aren’t called out. One is the circuit breaker panel on the pilot’s right side. Once done, the cockpit received some dry brushing and some Mig Pigments for some dirt and wear to bring out the detail. Remember even when deployed these helicopters are relatively new. Kitty Hawk calls out Dark Gull Grey for some of the interior. It isn’t wrong..always. A few of my pictures show the grey on the bottom of the cockpit and others are all flat black. You can’t go wrong.
The engines are next. They are really good representation of the real thing. Out of the box they are very convincing. Since I was going to build my kit with all the doors and access panels closed I just set the engines aside as I wouldn’t need them. You still need to add the bulkheads. It did take a little tape to ensure that the fuselage fit the bulkheads matched up. That is important as the rest of the fit of the engine access panels are built off of that.
Part D50 does have a gap when added but it is not an issue as it is hidden so save yourself the time to fill the gap.
In step 7 the photo etch mesh covers are added. The instructions call out PE5 but it should be PE9. PE5 goes on the engine access doors C6 and C7. The fit of the fuselage halves with the cockpit was flawless. I didn’t need any filler. Various parts are added to the fuselage and they all fit perfectly. The engine inlets are done. There is a little bit of a mold mark inside the intake. This was easy enough to take care of with Perfect Putty. Some of the photo etch parts added now will need to be bent slightly. I used my Small Shop Photo Etch Bending & Rolling Deluxe Brass Assist tool. It is an expensive tool but so worth the money.
The turret assembly is next. Now I was going to use the Master barrels that are available. When compared to the kit parts I elected to use the kit parts as they fit perfectly and were suitably thin. One thing that I didn’t quite like on the model was the turret should be open on the bottom and the innards of the gun should be visible. Well I have plenty of Monogram AH-1Fs so I cut the gun off of that and hollowed out the turret and inserted the Monogram guts into the resulting hole. Werner’s Wings now has a CAD version of this turret, item # 48-08. What this did was take the space for the nose weight that was supplied by Kitty Hawk and made me have to move it.
The kit FLIR is molded in clear plastic. I added some mylar film on the inside of my FLIR. They were attached with Future. One I backed with Tamiya Smoke and Tamiya Clear Orange on the other. This added a nice touch even though they would be near invisible once assembled. The fit of the parts was really good and a couple of swipes of a sanding stick cleaned up the seam.
The fuselage has detail added in plastic and photo etch. Again there is some photo etch that has to be bent. Without the bender from The Small Shop this bending would not be easy. It was at this point that you have to decide whether or not to have access panels open. I wanted my helicopter all cleaned up with the panels closed and the doors opened. After that decision I didn’t add anything in the ammo bay. What I should have done was add the weight here but the build was progressing rapidly and I was caught up in the moment and forgot.
The engine doors DO NOT touch the bulkheads at the middle. Add the doors so that they fit with the fuselage and then adjust them to fit to the other door. If you do this they fit perfectly with the front inlet and the aft exhaust.
Moving onto the wings, Kitty Hawk mentions that you need to make a hole for the wingtip Sparrow missiles, but the holes are already there. If you don’t want to add the missile rails then you will have to fill the holes. My aircraft had the rails fitted. I opened up the holes in the wing for the Hellfire and the 19 shot pods. This is one part where KH could have done better showing which holes to open up.
The exhaust fits perfectly. I did hollow out the area where the inlet on the side fits. Because this is slightly visible though the opening it is better to hollow out the center and then add the side inlet. The fit of the exhaust was perfect.
I built up the tailboom next instead of the blades. Again this was a perfect fit. I test fitted it to the fuselage and found again a perfect fit. I then realized that I didn’t add the weight to the nose. Doh. I was able to glue the weight in from the back of the fuselage. I would need a little more which I added in the front prior to adding the FLIR turret assembly. I added the driveshaft cover and glued it to the tailboom. That was a slight mistake. I added the tailboom to the fuselage.
Then I added the large photo etch piece, PE2, and discovered that my driveshaft cover was ever so slightly off. Nothing I could do but live with it. What I should have done was add the photo etch part and then add the driveshaft cover and moved it into place.
Now was the time to add the photo etch parts. The key here is to remove all the attachment points. If you do this the photo etch will fit perfectly. Some parts will need some slight bend to blend into the parts.
Adding the glass pieces was easy enough and they fit perfectly. I was going to have my doors opened so I left them off. I was worried that the windows wouldn’t fit but they were perfect.
The armament was built up now. There is one issue with the armament, but if you don’t use it then there is no issue. The seven shot pods are mounted on a angled mount. This is incorrect. Just mount them the same as you would the 19 shot pods on Part 41 and 42. My Hellfire launchers were going to be empty but they fit perfectly.
My rotor blades and tail rotor blades fit well. This is the first part that needed some filler. The bottom side of the blades just needed a little bit.
All the canopy pieces were masked off and the canopy area was sprayed Tamiya Flat Black. Then the whole model was sprayed with Alclad Grey Primer, my primer of choice. After fixing the areas that needed attention, which were surprisingly few, it was time to paint.
Painting the model proved to be interesting as this was my first Marine ‘grey’ aircraft. They prove to me that there are more than fifty shades of grey. I pre-shaded my model with Tamiya NATO Black. Not only did I highlight the panel lines but I also used the color here and then in a random pattern. This was the first level of the random pattern. Once dry I decided to paint the lower color which is FS36375. I used AK’s new paint to give it a try. It was a resounding success. I really liked the paints. They sprayed well and were sturdy enough to stand up to most handling. I’ll use them again. I had some other colors of grey that I used here and there to break up the monotone look.
On the upper surface I used AK’s Blue Grey (FS35237) but found it too blue for my liking so I oversprayed it with Model Air Barley Grey over it. This allowed me to break up the monotony of the color. I also used some of it to ‘touch up’ places on the lighter portion of the camouflage just like the Marines do.
My subject aircraft had some old markings overpainted on the tailboom with a very light grey. I used some light grey from AK’s Naval Aviation set.
I was going to use flat black for the wing walk areas but only some Cobras have that. Others have a grey wing walk. The Werner’s Wings decals mention which aircraft had black wing walks. Mine did not have black ones. I chose a Tamiya light grey and masked off the areas that needed it.
Masking off the landing gear anti-skid areas was tedious but a necessary evil. They came out really nice. I painted the non-slip areas with Gunze Metallic Black. When I do my next Viper I’ll paint these before I add the skids to the kit. It is easier to do without the wings in the way.
With that the entire model was sprayed with Future to prep for the decals. I thought the Kitty Hawk decals were a little dark, not too bad but I had options. I produce Werner’s Wings decals and I wanted to try them out on the model for advertising purposes and just because they are cool. I elected to do one that was well used and had some combat time. One of the options had the markings overpainted and it had a dragon on it. That was my candidate. The decals, both the Werner’s Wings and the Kitty Hawk ones, worked well. I used the Kitty Hawk for most of the stencils and the Werner’s Wings for the aircraft markings and the few stencils on the sheet.
The decals were sealed with Alclad Flat. They were both so thin that they didn’t need a gloss coat to level them out.

It was time to start weathering. The first thing I did was to add a SIN filter of Blue for Panzer Grey on the upper camouflage. This brought back a slight blue tint to the color. I tried to use the filter on the lower color but it was way too blue. I had to overpaint those panels that I did the test on. That worked out better than I expected and it broke up the monotony. Funny how that worked out.
A burnt umber artist oil wash was added to the panel lines. This was also used on various panels to represent oil residue. Mig Pigments black was used to represent the exhaust stains, as well as, discoloration in the areas that the mechanic would work. While this all sounds nice and pretty it was not all rosy. I didn’t let the wash dry completely so I had ‘clouds’ in the area where the pigments reacted with the wash. I had to go back in and repaint the area slightly. Then I had to go back in and add the exhaust staining again. I was surprised at how nice it turned out and with that the weathering was done.
It was time to add all the small pieces. The AADS boom or whatever the Marines call that pitot tube on the left side required I drill a hole. What is nice about this part is that it can be placed in any position. I purposely placed it at an awkward position so that there would be no question in a judge’s mind as it was purposely placed that way.
The armament was added to the underwing area. I chose the Hellfire launchers on the inner weapons stations and the 19-shot pods on the outer ones. The gun built up beautifully and a coat of Testor’s gun metal made it ready for the model. I left off the chaff dispensers as the aircraft wasn’t armed up.
The canopy sections fit like a champ. Next time I will add the support struts to the canopy. Final painting of little things was done before the rotor blades were added. The tail rotor assembly was added now as well.
The main rotor assembly was added last. I decided to glue the swashplate (circular thingy where the rotor attaches) so that it would not rotate. I did this so that there would be little stress on the links but more importantly because the swashplate was loose and moved around too much for my liking. Once that was done adding the blades and aligning the Pitch Change Links (actual name) to the holes was easy.
That was it. The model was done. I was impressed with the finished product. This is my first Kitty Hawk model and I was impressed. Kitty Hawk is to be commended for a superb model. The fit was near perfect, with filler only being required on the bottom of the main rotor blades. The rest were easily taken care of with a little Mr.
Surfacer. Is the kit perfect? No. I’ve never met one yet. I apologize for missing the ammo box and the lower part of the turret. I missed that when I proofed the CAD work. I’ll try to do better on the UH-1Y. On the plus side, the turret (48-08) and the ammo box (48-11) are now available, as well as, an Aux tank (48-10) from Werner’s Wings.
The Werner’s Wings decals were awesome, but what else would I say.
Highly recommended on the kit and the decals but I’m biased. You be the judge.
Floyd
S. Werner IPMS No.: 26266
|
Click on
images below to see larger images
|
|
|