|
This project was inspired by a gift from my son. He knows my fascination
with aircraft nose art and he gave me a book, complete with photos and chapters
about the artists who painted the original nose art. One of the photos is a
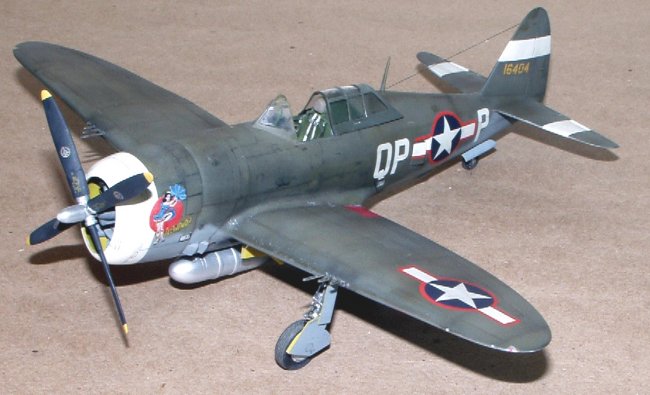
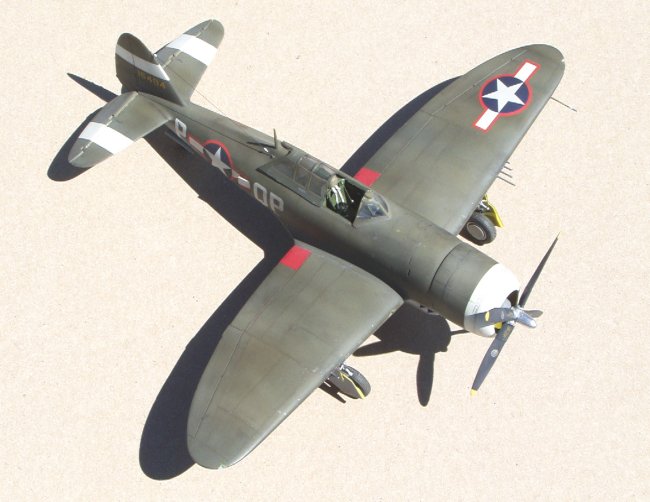
black and white image of “Ill Wind?” a P-47 flown by Captain Nicholas
“Cowboy” Megura of the 334th Fighter Squadron, 4th
Fighter Group, and painted by Don Allen. Since the Thunderbolt is my favorite
fighter of the WWII era, I became interested in modeling this aircraft as the
start of a planned 20 plus aircraft collection of “Jugs” to range from the
“C” model that first saw combat in England, through the “N” models used
against Japan at the end of WWII.
I started researching
the project by studying the photo in my book. The cowl flaps seem to indicate
that the P-47 is a –C. Other items I could see in the photo were a bulged keel
with an external 108-gallon fuel tank, a Curtis cuffed 12’ 2” propeller,
early domed style engine gear casing, an early high camouflage demarcation line
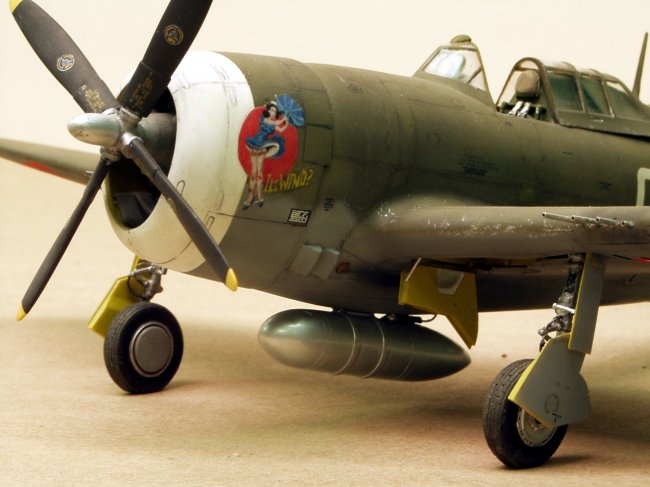
and covered wheel hubs. The nose art depicted shows a pretty, dark haired girl
with an umbrella. A gust of wind is raising her skirt and slip to reveal her
legs and nylons. But, the photo is in black and white. What were the colors of
the nose art? What were the squadron codes and individual aircraft letter? Which
style of national insignia was on this aircraft? What was the serial number? How
many victory marks were there and what style were they? Obviously a lot more
research was needed before I could model Captain Megura’s “Ill Wind?”
properly.
Research began in
earnest on the web. Two sites in particular were very helpful in gathering
information on this aircraft and Captain Megura. They are the 4th
Fighter Group Association web site and Little Friends.uk.com. The more I
researched, the more I became fascinated (obsessed?) with modeling this
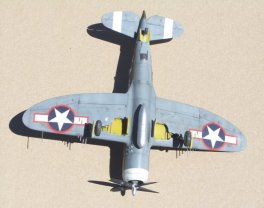
airplane. The 4th Fighter Group site has a section with full color
reproductions of Don Allen’s nose art, showing “Ill Wind?” as a black
haired girl dressed in a light blue dress, with a blue umbrella, flesh tones as
appropriate, against a red circle background. Other data recovered from this
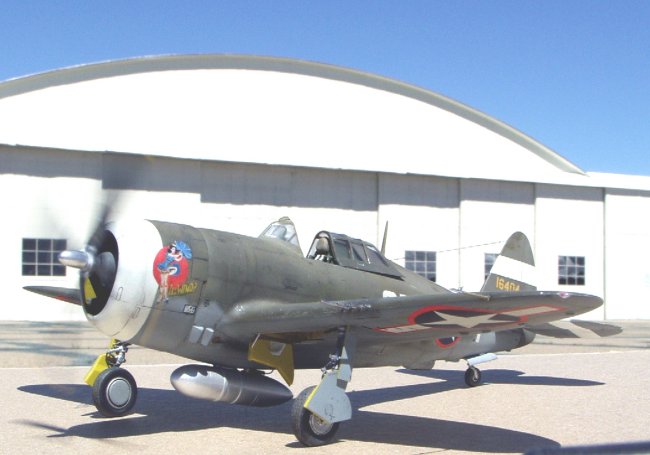
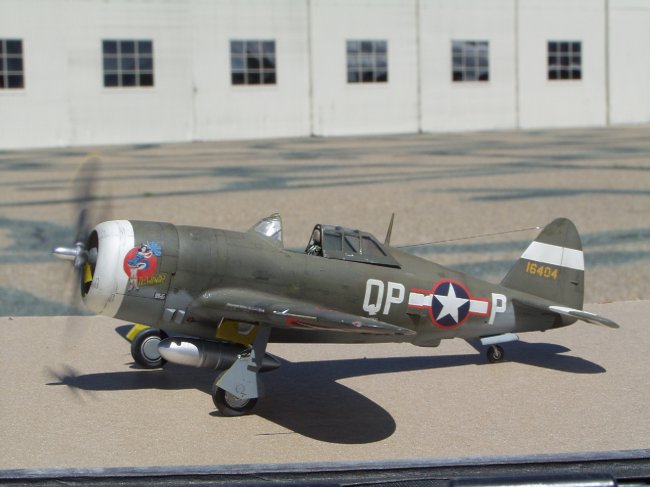
site indicates the aircraft was a P-47-C, coded QP*P, with serial number
unknown. At this stage, I had confirmed “Ill Wind?” was indeed a P-47 C, and
now knew the squadron codes and the colors for the nose art.
Captain Megura was researched in
the 4th Fighter Group site. His research wound up being a research
project in its own right that space does not allow for in this article. Some of
the information found on him was used to further research the aircraft. He
joined the 4th Fighter Group on 3 July, 1943, was credited with over
15 confirmed victories (almost all air-to-air), was shot down accidentally by a
P-38 pilot during an attack on 3 Me-109s on 22 May, 1944, force landed in
Sweden, returned to the 4th Fighter Group about a month later, but
did not fly any more combat missions.
I searched decal
companies for the P-47 nose art and found that decals for his P-51B “Ill
Wind” were produced, but the P-51 nose art is different from the “Ill
Wind?” P-47 nose art. I would have to make my own nose art decals. This was a
major project that added about two weeks to the build. Details of the process
could become a whole new article. In a nutshell, I used the color reproduction
on the 4th Fighter Group Association web site as a basis for my own
artwork, scanned my artwork into a computer, used Photoshop to color it and size
it and then printed it onto decal paper. I must give a lot of credit and thanks
to several computer literate friends who helped me and put up with my ignorance.
Although it doesn’t look too bad from a short distance away, I am not entirely
satisfied with my nose art decal, as it is not as sharp as when printed on
paper. I may yet have it printed by someone with an ALPS printer (for a
reasonable fee) and replace it on the model. Are there any volunteers out there?
The
other web site, Little Friends.uk.com, was beneficial in tracing the serial
number and other information about the aircraft. I searched the 334th
F.S., 4th F.G. data base for P-47 “Ill Wind” with codes of QP*P.
The data base lists two P-47s coded QP*P. One is a –C serial number 41-6404.
The other was a –D. Since I had confirmed “Ill Wind?” was a –C, I
concluded that the serial number 41-6404 would be correct. In tracking the
aircraft with that serial number, I found that it was a –C-5-RE, had
originally been coded QP*R, and had been damaged in a landing accident about 2
months before Captain Megura joined the Group.
Repaired
and older aircraft were often recoded as newer replacements were received. I
felt that this was the case with ”Ill Wind?” and that it had been recoded as
QP*P when it was returned to combat worthy status and assigned to Captain Megura.
Now I had the serial number, the squadron codes and the nose art. What style of
national insignia did it have?
I believe that the original
insignia, before the landing accident, was the white star in a blue circle with
a yellow surround. That would look cool. But, Captain Megura joined the group in July ’43, and
orders changing the national insignia to the red surround star and bar had been
in effect for a month or so before that time.
|
I reasoned that the repair depots
would have repainted the national insignias to comply with the red surround
orders before returning the aircraft to combat status. I know that some aircraft
used the earlier yellow surround insignias late in the war, but I really like
the look of the red surround star and bars freshly painted onto faded olive drab
airplanes. That would look WAY cool. It wouldn’t be too far fetched
historically, so that is the paint scheme I decided on. I would depict “Ill
Wind?” soon after having the nose art painted on. |
Click on
image below to see larger image
|
 |
|
The
next item I researched surprised me. Interestingly, Captain Megura achieved all
of his victories starting from a few days after the Group converted to the
P-51B. Simply put, he didn’t record any while flying the P-47, so the P-47
“Ill Wind?” wouldn’t have any victory markings. That simplified my
modeling tasks.
Paint
and markings decided upon, I needed to settle on which kit to use for this
project. I would be trying some new techniques and didn’t want to invest much
money in the basic kit, in case my experiments failed. I decided that the Otaki
kit has accurate shape, separate parts for the wing pylons that could be left
off for a proper -C wing, proper alignment of the wing guns, proper dihedral
molded in, finely engraved panel lines, a good representation of the Curtis
cuffed 12’ 2” propeller, an adequately detailed front engine half (since I
wouldn’t be opening any engine panels), and conversion of the kit’s cowl
flaps would be a simple matter of filling panel lines and some minor reshaping.
Best of all, I could pick one up from a friend for $5.00, a fraction of the cost
of the newer better detailed kits.
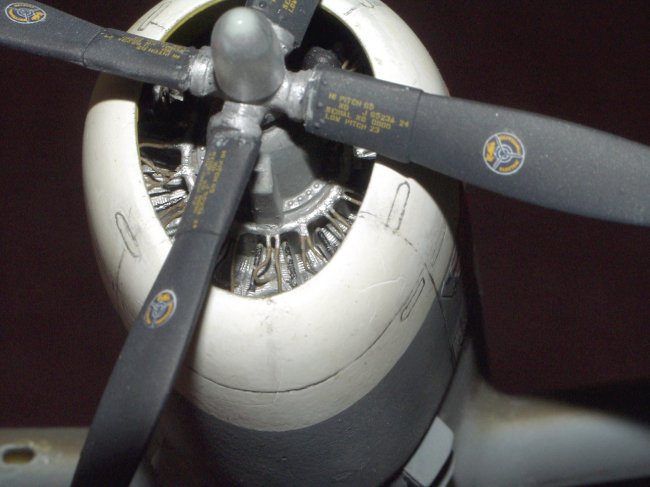
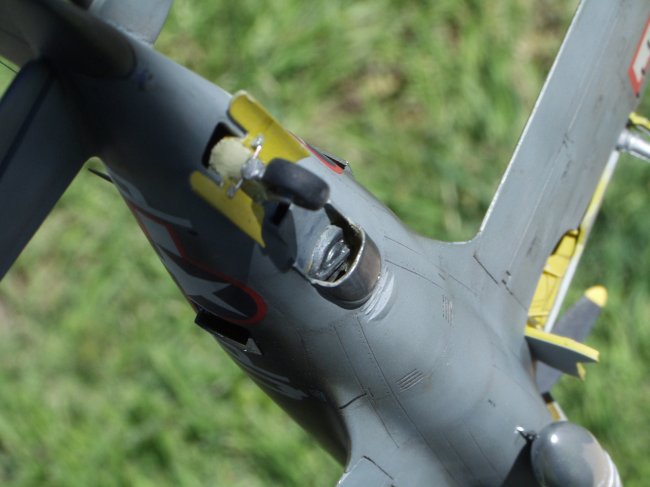
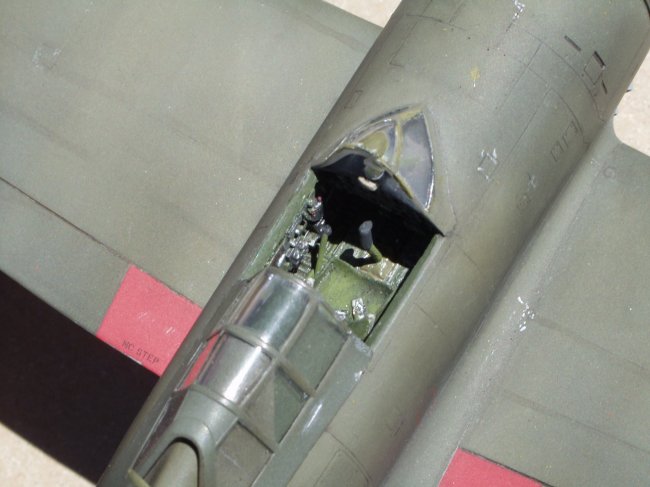
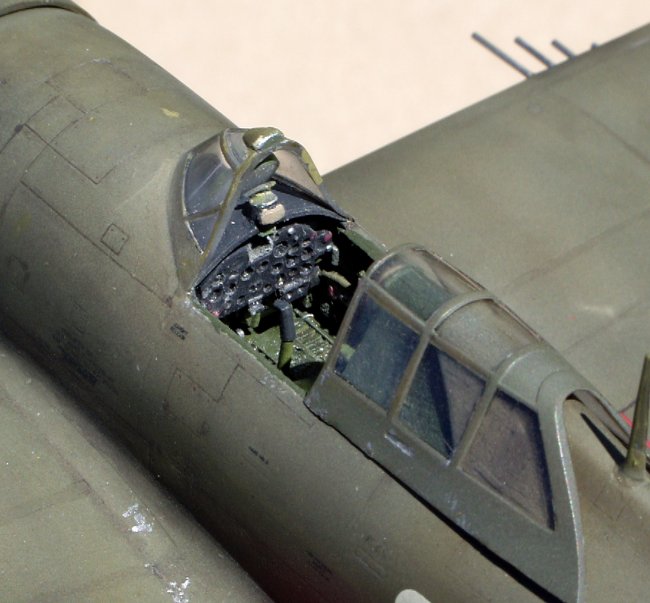
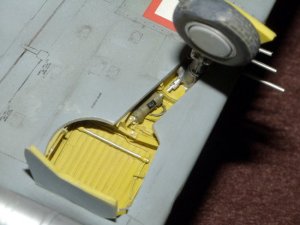
The
shortcomings of the Otaki kit were assessed. The cockpit would have to be
completely replaced with a resin set. I used one from True Details, supplemented
with etched metal rudder pedals from an old Monogram Hi Tech kit. The instrument
panel sits too low for the fit of the tub in the Otaki kit, but it was partially
covered with a scratch built instrument hood and scratch built gun sight, so the
gap isn’t immediately noticeable.
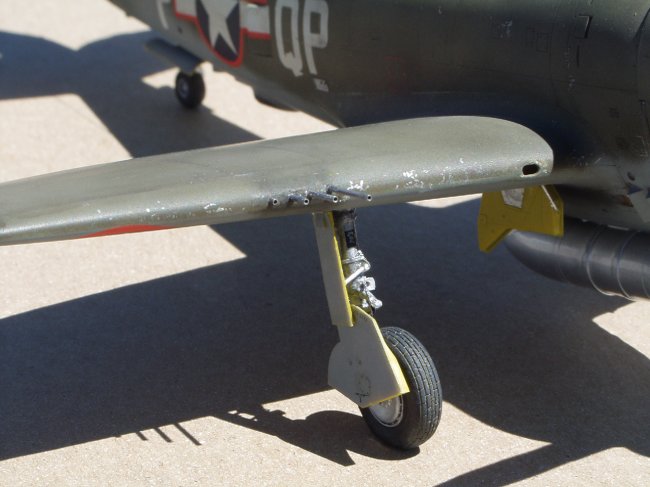
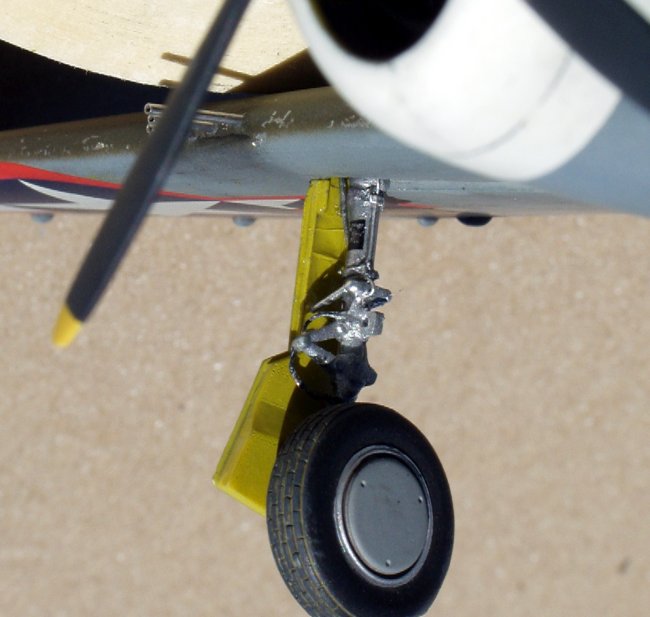
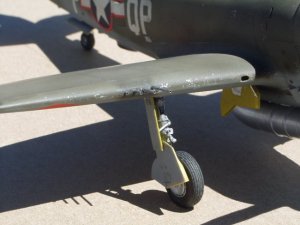
| The kit’s main gear struts are too long,
and would have to be either replaced with brass gear legs from Teknics, or
modified and detailed with scratch items. I couldn’t justify the expense of
the Teknics gear legs, so I opted for the latter. The wheels and tires were
discarded in favor of Ultracast resin block tread covered tires for the mains
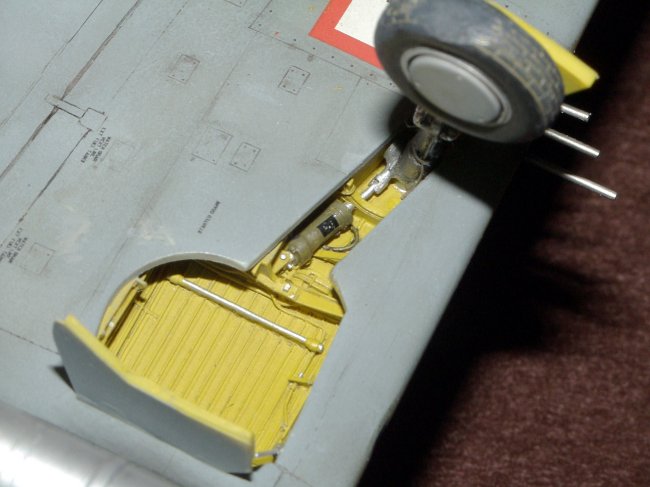
and a modified Monogram tail wheel. The only other after market resin I used was
the Aries wheel wells. These are real gems. They required modification of the
fuselage wing joints and a LOT of dry fitting, but once fit, added a great deal
to the final appearance of the model. |
Click on
image below to see larger image
|
 |
|
I decided that since I
was using resin sets to detail the Otaki kit I might as well do some other
detailing while I was at it. I added a scratch built ignition ring and plug
wires to the front of the engine. A brass rod prop shaft and tubing shaft
bearing replaced the plastic kit parts. The oil cooler vents and intercooler
exhaust doors were replaced with parts made from sheet plastic. I also added
scratch built exhaust piping and a scratch built supercharger. A 108-gallon
external tank was stolen from an old Testor’s kit and a fuel line was added.
The main gear legs were drilled through their entire length and a wire stiffener
inserted for strength. I used a Monogram gear leg to get the correct length and
cut the Otaki gear legs to size. They were additionally detailed with scratch
built tow rings, brake lines, data plates, retraction struts and upper gear door
“lollipops.” The tail wheel doors were thinned and retraction links and
hinges added. A Milliput canvas boot was fashioned for the tail wheel strut. The
elevators were cut apart and reattached in a slightly dropped position. I added
an antenna from black nylon invisible mending thread. All wing guns were
replaced with hypodermic tubing. I cut apart the windscreen from the rear canopy
and made a rear view mirror from Milliput. I probably should have used a vacuum
formed canopy, but I have never had good results with them. I also added an MV
Products railroad lens for the landing light and fabricated the wingtip
formation lights.
Once all the detailing was
completed, I began painting the cockpit parts, engine and wheel wells.
I used interior green with a base coat of black to paint the cockpit. It
seems to be a little too dark to suit me. I painted the wheel wells with
Testor’s yellow zinc chromate with a touch of brown and green added. This was
weathered with a wash of brown and black watercolors and dish soap. Assorted
hydraulic lines, nuts and bolts were picked out with black and silver paint, and
I made a data plate for the retraction cylinder with black decal and silver
paint applied with a toothpick. All major parts were then assembled and all
seams attended to. The engine cowl opening, wheel wells, lights and cockpit were
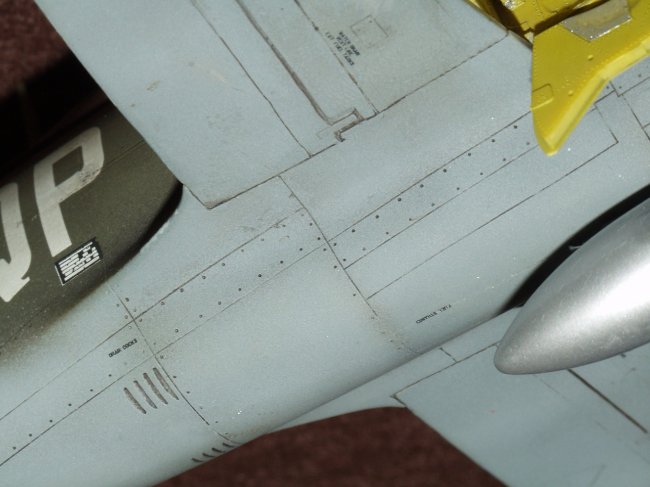
all masked off, panel lines rescribed as needed, and the airframe was painted.
One of the experiments
I wanted to try was painting with acrylics. (Every time I have tried them in the
past, I haven’t had good results, but my wife doesn’t like the smell when I
paint with my beloved enamels…go figure.) I used techniques for painting that
I learned from the modeling websites. I used pre-shading, panel fading, and post
dirtying. I started by spraying panel lines with dark brown. Black is too much
of a contrast for later steps. Then I sprayed the front of the cowl and tail
surfaces white. Once the white had dried for a day, I masked off the theater
striping and applied overall neutral gray. The basic neutral gray was then
lightened with white and applied to the middle of random panels to represent
fading. I lightened the gray in four separate stages, each one slightly lighter
than the last, so I have at least five different shades of gray on the bottom of
the aircraft. The contrast is subtle, and it may not show in the photos. The
gray was allowed to dry for a few days before being masked off for the upper
surfaces painting. The fuselage demarcation line was sprayed freehand. The upper
olive drab was applied in the same way as the gray, with the base olive drab
paint being lightened with white in 5 separate stages. I masked off some upper
panels for contrasting faded colors, and tried some freehand streaking of the
lightened olive drab paint. Once satisfied with fading, I let the acrylic paint
dry for several days before continuing. I applied decals at this point, so they
could be dirtied up and weathered with the paint. I used an overall coat of
Future as a base for decaling.
|
Click on
images below to see larger images
|
 |
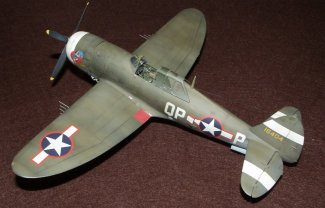 |
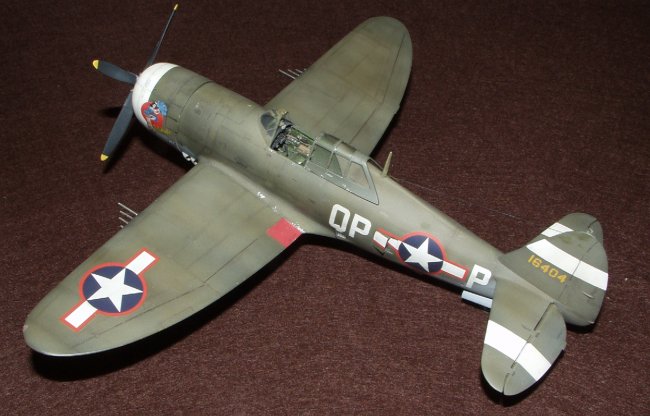
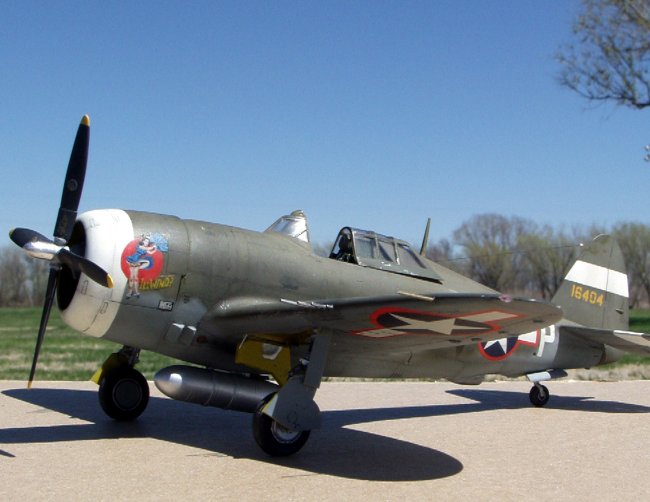
For the markings of “Ill Wind?”
I used Aeromasters 4th Fighter Group The Early Days aftermarket
decals. I cobbled the serial number and used the squadron codes from two other
aircraft to get the proper codes and serial number for “Ill Wind?’ I also
used full stenciling, even though I think the repair depots would have painted
over them when painting any damage from the landing accident. The red used for
the surrounds of the Aeromasters decals is rather bright, as if it has recently
come from the paint shop, so I didn’t want to weather the decals as much as I
did the underlying paint. Once the decals were dry, excess decal residue was
rinsed off and a coat of Testor’s flat coat lacquer was applied overall as
“tooth” for the dirtying process.
|
I use a brown and black
sludge wash of watercolors and dish soap applied to the panel lines for
the dirtying process. I let the sludge dry and then use a dry cotton swab
to scrub away the excess sludge. This actually grinds some of the sludge
into the underlying flat paint, slightly staining the adjacent panels. I
find that it can be built up gradually until the desired degree of
weathering is achieved. Once I had “Ill Wind?” as dirty as I wanted, I
applied final coats of Testor’s flat coat to seal everything and removed
the masking from the canopy and lights. |
Click on
image below to see larger image
|
 |
|
Final weathering was done
with a silver artist’s pencil for paint chipping and ground up pastel
chalks for gun and exhaust staining. I tried to minimize the staining, as
Captain Megura didn’t fly this P-47 very long before converting to the
P-51B. When the detail parts were attached, the project “Ill Wind?”
was done.
|
Click on
image below to see larger image
|
 |
|
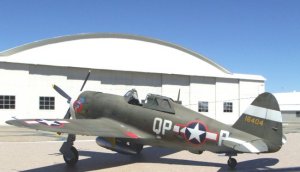
Overall, I am pleased with the
results of my experiments. The acrylic paints do have a much less offensive
odor. (Thanks, Dear.) For the first time using aftermarket resin sets, my P-47
doesn’t look too bad, even when compared to the new “shake and bake” well
detailed expensive kits. I could have scratch built belly tank sway braces, done
a better job of fitting the resin cockpit, and a myriad of other small things,
but I had already spent too much time in building “Ill Wind?” to suit me. I
don’t build for contests anyway, and I’m pleased with my efforts. I doubt if
I will be making my own decals again anytime in the near future, as my results
were somewhat disappointing. My modified and detailed landing gear legs don’t
look too bad. The Ultracast wheels make them look better than they really are.
Other scratch built details are good enough for me, considering the investment I
have in this model. Even adding in the resin sets and aftermarket decals, I have
less money in this project than what I would have paid for one of the new better
detailed “out of the box” kits.
What I do have
invested in this project is mostly time. It took me a lot longer than I
anticipated to finally complete this model, and I probably will be making a few
models out of the box before I tackle anything this complicated again. I know
that I have made some mistakes on this project. The theater stripes on the tail
surfaces are too wide, and I discovered too late that the 4th Fighter
Group’s Jugs sometimes had their outer wing guns removed to save weight in
order to address the fuel consumption rate of the Thunderbolt. The plastic pitot
tube broke off after some of the photos were taken, and it will have to be
replaced. For the most part though, I’m satisfied with stretching my skills
and learning some new techniques. And I now have a pretty decent early –C
model P-47, with unusual and colorful nose art that was flown by a triple ace to
start my planned collection of over 20 various “Jugs.”
Perhaps my following models will show some improvement.
Mike
|
|