|
The
B-47 was a revolutionary aircraft in that it is the grandfather to nearly
all modern large jets, with its swept-back wings and podded engines slung
beneath the wings. The swept back wings were crucial to high
subsonic speeds, while the podded engines reduced drag & air-flow distortion
and aided in maintenance. This design was safer in the event of an engine
fire as it kept the flames away from critical components. It would also
allow engine upgrades without changing the wing structure itself. The B-47
was also one of (if not) the first aircraft to utilize an anti-skid
braking system.
The
Stratojet became the world's first operational swept-wing jet bomber and
would form the backbone of the U.S. Air Forces Strategic Air Command (SAC) in
the early 1950's and would hold the line of nuclear deterrence in the Cold War
until more capable types like the B-52 came into service. Though
considered a stop-gap and overshadowed by the B-52 (which is the aircraft
General Curtis LeMay really had in mind at the time of the design of the
Stratojet), the B-47 held many important roles within SAC with some of the most
crucial roles being that of intelligence gathering to provide targeting
information for the worst case scenario.
Looking
for something with better speed and range to replace their RB-29's and RB-50's
which were rapidly becoming obsolete with the appearance of adversaries like the
Mig-15, the USAF tasked Boeing with development of a
photo-reconnaissance variant of the Stratojet and they initially focused on the
B-47B as the basis airframe. The RB-47B and YRB-47B were basically
standard B-47B's that could be converted from the dedicated bomber role to the
reconnaissance role through the installation of a bomb-bay pod that housed eight
cameras. These were predominantly used to train crews for the forthcoming
RB-47E which was to be solely dedicated to the reconnaissance mission.
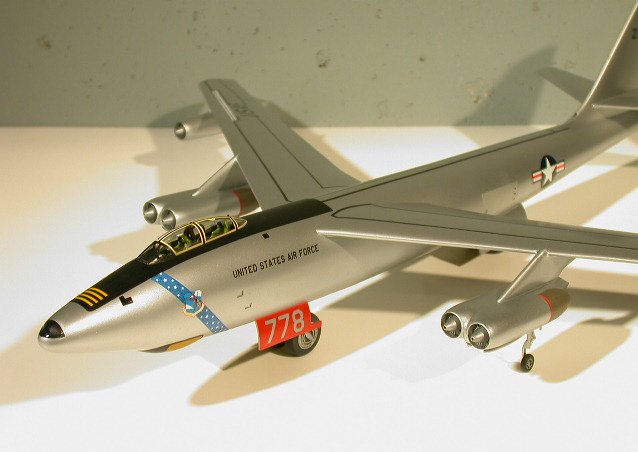
The RB-47E differed from the standard B-47E in that the nose of the aircraft was
extended 32.5 inches to house an air-conditioned compartment for cameras and
other sensitive equipment. These aircraft would be equipped with
photoflash bombs and photoflash cartridges (carried in a shortened bomb-bay) for
night photography, which gave rise to many UFO reports in the 1950's, as many an
unsuspecting civilian found themselves believing they had witnessed a UFO
when they had really just seen the results of a SAC RB-47 on another of their
numerous training missions.
240
RB-47E's were built by Boeing's Wichita, Kansas plant and distributed amongst 5
Strategic Recon Wings (SRW). One of these wings was the 55th SRW based at
Forbes AFB in Topeka, KS. who operated the RB-47E for a short period in 1954 and
1955 before the arrival of the RB-47H, in which the Wings E-models were then
transferred to the 90th SRW at the same base. My grandfather was assigned
to the 343rd Strategic Recon Squadron (SRS) of the 55th during this time and
worked as a mechanic on two different E-models, one of which is the subject
depicted here.
|
Click on
images below to see larger images
|
|

|
When
I was approximately 4 years old in 1978, the first plastic model kit I ever laid
eyes on was the Hasegawa 1/72 B-47E that my grandfather picked up at a shopping
mall we were at while visiting relatives in California. I remember
intently watching my grandfather build this kit over the course of a few
afternoons and him telling me about his time with the 55th in the 343rd.
"His" airplanes were not what the Hasegawa kit represented as far as
variant is concerned, but he built it anyway and then slapped on some small
black & gold metallic foil mail-box numbers (from a neighborhood
hardware store) on the tail for one of the ones he worked on. Little
would he know how this experience would instill a life-long love of
aircraft and plastic models within me. As the years rolled by and with
that originally built kit still a part of my collection, I always wanted to
build a more correct and accurate recon variant of the Stratojet my grandfather
worked on, but patiently waited for the day in which I felt my skills and my
reference collection would make it possible.
The Hasegawa kit is not really a bad kit, although many
be-moan its lack of detailing, raised panel lines, poor fit and Coke-bottle
thick clear plastic parts. All of which is true, but on the same token I
think it's a true sleeper of a model as this was really one of the most
enjoyable builds I've done in a long time... definitely better than the
experience I recently had with two Hobbycraft F-89 Scorpions! The build
itself went pretty smooth and was for the most part straight out of the box.
I gave thought to doing some extra detailing in the cockpit but decided that
most of it wouldn't be visible, so just painted it all and slapped the fuselage
halves together. Before installing the gear bays, I reinforced the inside
upper fuselage seam with extra Plastruct Plastic Weld, and a strip of fairly
thick Evergreen styrene that I added additional cyano over. I wanted to
make sure there'd be no chance that the upper fuselage seam would crack at a
later time due to stresses from the opposing wing pieces and filling &
sanding. Although, this may have been for nought as the wing pieces are
engineered in a way that they have pieces that slide in-between each other that
help take the stresses off of the fuselage and allow for a really strong wing
joint if liquid glue is liberally applied all around this area through the
opening for the bomb bay.
I decided to have my bomb bay doors closed, so did not
install the bomb-bay itself, but did add some reinforcing guides made from scrap
sprue. The doors were added along with the bomb-bay spoiler flaps which I
put in the closed position and then liberally applied 3M Acryl Blue auto body
putty and sanded this area all smooth.
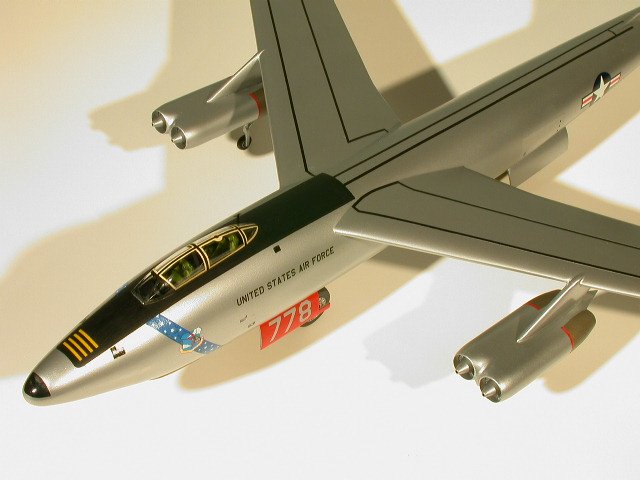
The
conversion of this kit from a B-47E to an RB-47E was a daunting task that I
spent many years trying to decide how I wanted to pull it off. I
originally thought about carving out a new nose piece from balsa wood to create
a rough master that could be better refined to create a mould of and then cast
in clear resin so that the windows could be masked off, while the rest of it
would be painted. This idea never really got off the ground so to say, but
one day last year in one of my more creative stages when I was scratch-building
my F-16 CFT's, I was also working on and off on the nose cone to my Stratojet.
I started by cutting off the kit nose on a raised panel line just forward of the
under-nose radome. Since these were already in halves, I sectioned each
half horizontally so that I had 1/4 pieces. I then blew up a side-profile
of an RB-47E to 1/72 scale and traced it onto some thin styrene sheet that was
cut out to give me a vertical profile piece to use for the center-line of the
nose conversion. Since I didn't have any 3-view drawings for the overhead
profile of the nose, I free-handed the outline of one side (with help from
many photographs and the Mk.I eyeball) onto some paper which I traced onto sheet
styrene, then flipped the pattern over to get the other side. Once this
was cut out, I sectioned it down the middle and then butt-joined each respective
half to each side of the vertical profile which gave me a good skeleton on which
to use the 1/4-sectioned nose pieces from the kit. These were glued
towards the rear of the skeleton to get the round shape started and then the
rest of the area forward of the original nose cone was filled in with two-part
epoxy putty. This was all sanded down smooth and used as a master to cast
the piece in solid resin. Once I had a workable resin piece I was happy
with, I took Squadron's clear Thermaform and stretched it over this piece to get
the clear window piece I would add later. I traced this window onto the
resin and proceeded to start grinding it out of the resin with my dremel tool to
give the window some depth so that it appears that the nose piece is hollow.
This was painted flat-black inside and then the stretch-formed nose piece was
glued down with cyanoacrylate and the cyano was used to build up the slight
ridge of the Thermaform where I had trimmed it approximately a 1/4" behind
the window piece around the entire nose. This was all sanded smooth and in
the end provided a seamless window piece that came out pretty convincing in my
humble opinion (Why Boeing added this little window to the tip of the nose of
the RB-47E is anybodys guess though, as my grandfather stated that it was so far
forward of the navigator/photographers station and that with all the equipment
packed into the nose, one could barely get their head and shoulders far enough
up into the nose section to be able to see any daylight out of this little
window). My scratch-built nose was then attached to the fuselage
and faired in with cyano.
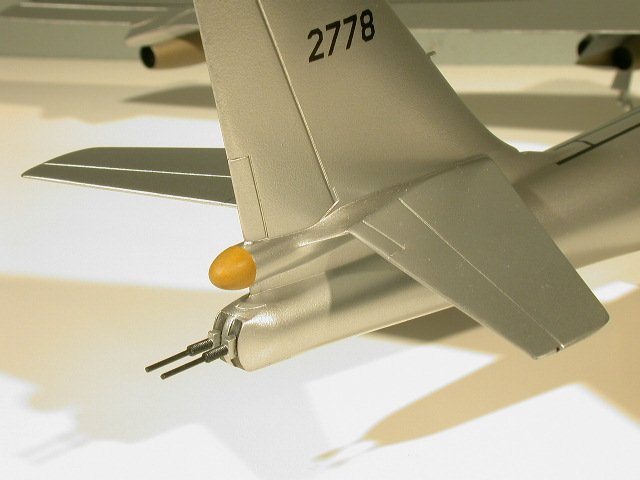
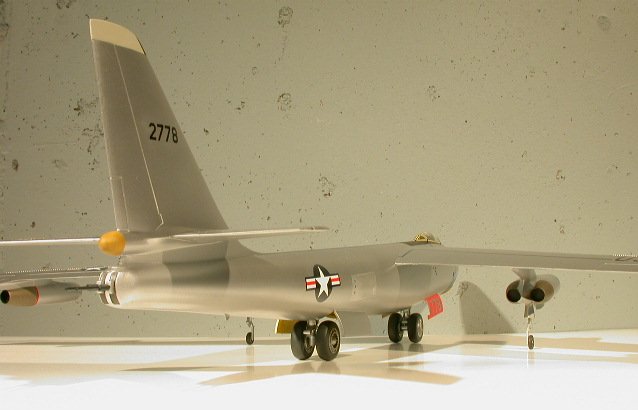
I
also took this time to create a new tail-turret piece as this is one of the
worst visible faults of the kit. It is almost a total half sphere
when the gun-track part of the turret has a flat face to it. I filled in
the 'open' gun tracks with sheet styrene and then created a new set of 'closed'
gun tracks by creating them with flat sheet styrene and styrene strip that I
sectioned down to the appropriate widths. Once this was all glued together
and dried, I vertically wrapped it around the tail turret piece and tacked it
with cyano. I then filled in the sides and blended it with 3M Blue Acryl
and sanded everything smooth. This was cast as a one-piece resin part, but
unfortunately, when I had sanded down the sides of the master, I sanded a little
too much and it was a tad bit thinner than the fuselage, so I had to go back and
blend it into the fuselage with cyano and then sanded this smooth. It's
not totally accurate, but looks a lot better than the stock kit piece.
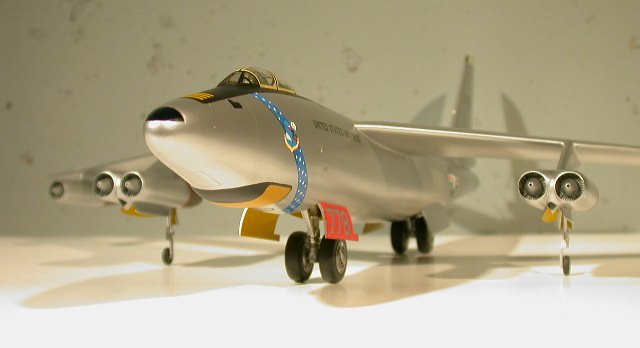
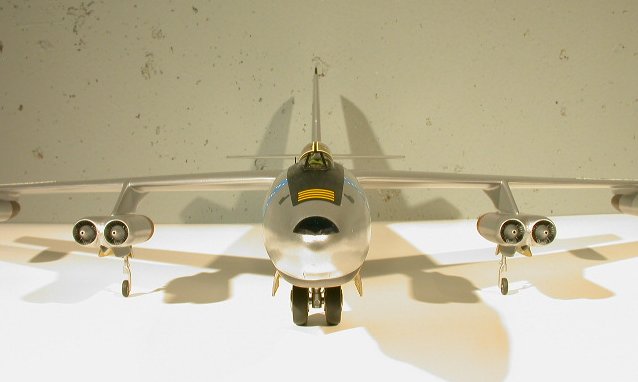
The
next major hurdle to overcome in this kit was the fit of the engine pods and pod
struts to the wings. The fit of these pieces is probably the single worst
culprit for why we do not see many of these kits built. I decided that the
best way to handle this was before gluing the wings to the fuselage. I
glued the pod struts to the wings and then filled/sanded them. To get a
good sharp joint between the struts and the engine pods, I wrapped cellophane
tape over the top of the pod to form a barrier to the plastic, then slopped a
bunch of 3M Blue Acryl putty onto the attachment point of the strut and smashed
the engine pod down over this and let it dry. Once dry, I was able to pop
off the engine pods, remove the cellophane tape from the pods and trim/sand the
dried putty on the strut so that there was hardly any gap between the pod and
the strut when they were dry-fitted together. I did not attach the engine
pods until almost all painting was done as that was the only way to get the
engine exhausts painted without much masking hassle. The outboard engine
pods were done in a similar fashion to the inboard pods and I do believe that
this system of using the cellophane tape as a barrier to the filler to get a
tighter joint between pieces is a great solution that I will be using on
future builds for aircraft that have podded engines/struts.
I
did not add the drop tanks in between the in-board and out-board engines as
these were only commonly seen on just the bombers alone. The recon
variants did not carry these except on very rare occurrences and the reason for
this was due to aerial refuelling capability and the general common availability
of tankers during peace-time operations. In the event of all out war
during the cold war, the availability of tanker assets would have probably been
questionable at best, thus the reason for seeing the tanks being more prevalent
on the bombers, which could've theoretically made it to their assigned targets
on one-way suicide missions if required. The wonders of mutually assured
destruction never cease to amaze, do they? Also the Stratojet was already
known for being an underpowered aircraft and the recon variant crews preferred
not having the additional weight & drag penalties associated with the drop
tanks as the recon birds were already overloaded with the additional equipment
added to them for their snooping duties. (As a side-note, the Stratojet
due to it's underpowered nature, was a prime candidate for RATO (Rocket Assisted
Take Off) which can be seen being demonstrated at airshows today by the Blue
Angels C-130 Fat Albert)
The rest of build was pretty straight-forward as far as
attaching the main components went. I used very little filler on the wings
and fuselage joints as I made sure to get enough liquid glue down in the joints
to get it to ooze out when the pieces were pressed together so that there was
excess plastic to sand smooth instead of having to use filler.
As you can probably tell, I sanded off all the raised panel
line detail and did not bother to rescribe much of the kit. I won't go
into my reasoning for why I did not feel that the panel lines needed to be
re-scribed, but I did go back and re-scribe some other minor details that I
felt should be on the model and would also help aid in painting guidance later
on.
One thing I highly suggest for anyone building this kit,
take some tape (used as a guide) and putty of choice to re-shape the rear
corners of the under-nose radome as Hasegawa got the shape incorrect here.
You can tell by closely examining photos that these rear corners should be
higher up on the fuselage and I think this makes a big difference in the look
of the finished model, once the radome has been painted. I initially
believed that Hasegawa did not mould the radome deep enough as far as
protruding from the fuselage... thus throwing off the look of the kit in this
area, but now I think that is an optical illusion due to the way in which the
moulded rear corners make the radome look thinner in profile at the back.
If looking at the radome from below the aircraft and towards the nose, it
would look like an inverted U, but the way Hasegawa did it makes the top of
the U look pinched and too rounded when it should be squared. I hope
this makes sense, as I am not sure how else to describe it.
The overall model was air-brushed with Floquil's Bright
Silver from their railroad enamel line and then lightly buffed with an old
t-shirt. I masked and sprayed the exhaust sections of the engine pods
with Modelmasters Jet Exhaust enamel. The panels on the sides of the
rear fuselage which covered the former locations for the internal
RATO bottle system, were masked off and sprayed with Tamiya Aluminum acrylic.
The under-nose radome and the fire-control radar for the tail turret were
painted with Pollyscale's Middlestone acrylic as I felt this color best
represented the un-painted fibreglass radomes seen in many color photos of the
B-47. Check your references though, as the radome for the fire-control
radar in the tail could also be black or light gray. The top tip of the
vertical stab was also air-brushed with with Pollyscale's Light Gull Gray.
The black anti-glare panel was masked and air-brushed with Tamiya Flat Black
acrylic.
Once painting was completed I was ready to start on the
markings for my grandfathers aircraft. I had no actual photographic
evidence for this particular aircraft, but I did have photographs of others in
the unit, so I based it on those since most of the aircraft in the unit appear
to have been fairly uniform with minor differences between them. Seeing
that this was a spy unit, they generally were not too crazy about advertising
their identity and preferred anonymity, so it was rare to see the 55th SRW
badge on top of the SAC slash on the right side of the nose, but some aircraft
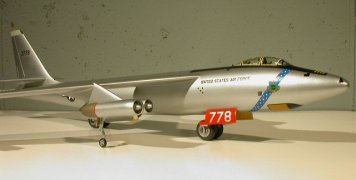
did carry it, so I decided to have it on mine. The squadron color for
the 343rd SRS was red and sometimes when the planes were state-side their
forward gear doors would be painted in red and the last three digits of the
aircrafts serial # would be repeated in white, black or even in natural metal
as the number would simply be masked off on the bare metal before the red was
painted, so this is the option I chose for mine. The red color and the
numbers on these doors would be removed if the aircraft deployed overseas on
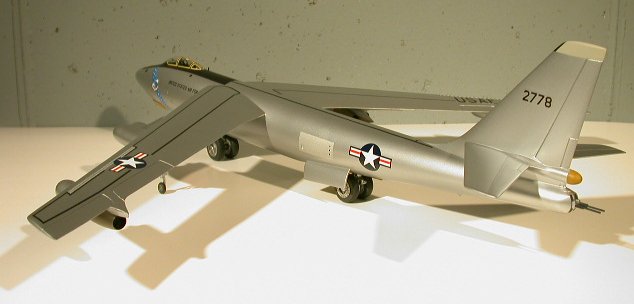
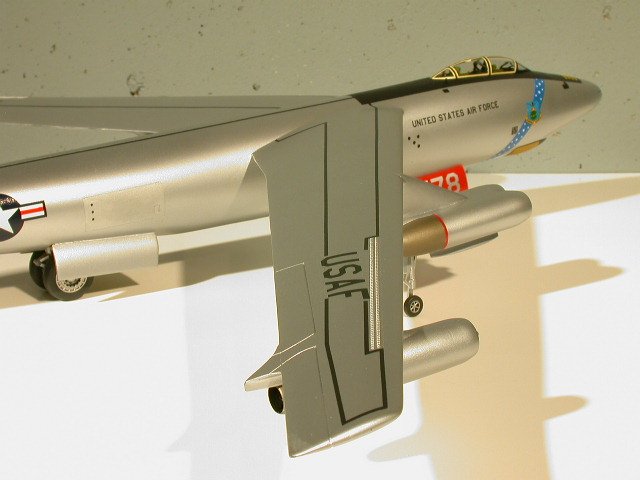
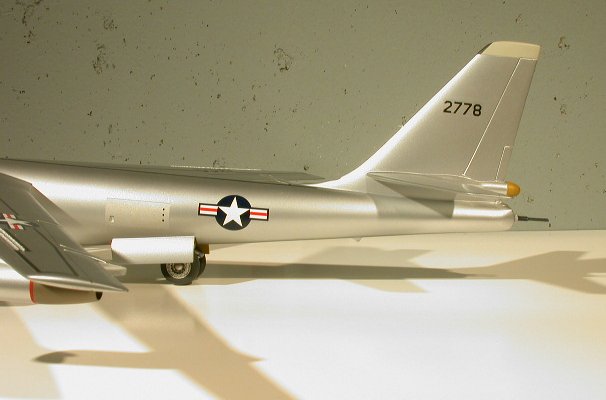
TDY. My grandfather was always adamant about the fact that his aircraft
only displayed the # 778 on the vertical stabilizer during the time he worked
on it, but this did not jive with photographic evidence of any Stratojet I
have ever seen in photos. I interviewed several former squadron
personnel at a 55th reunion and queried them about this. The overall
general opinion I got was that this was simply a disinformation exercise to
confuse the Reds when these aircraft were deployed overseas. Sometimes
the aircraft would display 3-digit, 4-digit or 5-digit serial # 's...
sometimes they would have no serial # at all!... AND sometimes
they even wore the serial of another aircraft! There is a story of
two RB's that were sitting in a hangar a Forbes AFB that were both wearing the
exact same serial # and one of them needed some maintenance work carried
out... and as you can probably guess where this story is going, the aircraft
that got the maintenance was not the one that needed it! Since many
Stratojets of this era displayed a 4-digit number, I tracked down my
grandfathers aircraft to the production block it belonged to and added the 4th
digit to the front of the serial # and called it good.
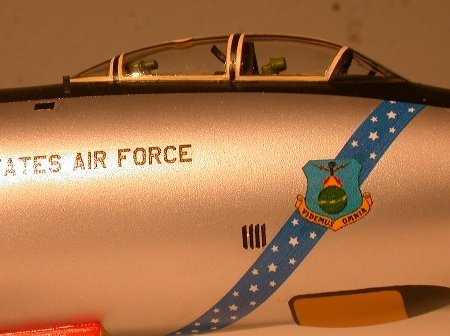
| Nearly
all markings were created in Adobe Illustrator and printed onto Testors
clear or white decal film using an Epson Stylus C66 Durabrite printer.
The blue SAC stripe was printed onto clear film and then applied over a
strip of white decal film on the model. The 55th SRW badge was
printed onto white decal film and carefully trimmed out before
application. |
Click on
image below to see larger image
|
 |
|
The
SAC slash had to be created because I could not find any existing SAC stripes
in decal form with the correct star pattern to those I noticed in pictures of
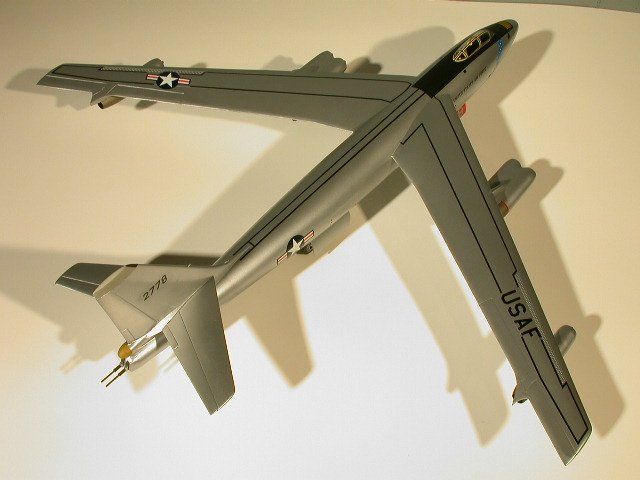
the 55th Stratojets. The four yellow alignment lines in front of the
slip-way doors for the aerial refuelling recepticle were trimmed from solid
yellow decal film. The walk stripes on the wings and down the spine of the
plane were replicated with railroad HO-scale 4" decal strips from
Microscale and laid down pretty nicely. They may be just a tad bit thick,
but I think they did the job pretty well.
I
picked out the navigators small windows on the sides of the nose with black
paint and also painted the the rectangular wing-lights just below and behind the
canopy that shine out onto the wings when lit at night. These were some of
the details that I had previously scribed.
I
had to go back and carefully trim the gear doors in red with a paint brush, as
they did not print very well onto the clear decal film, being almost more of a
dark maroon color once applied to the model, but I'm happy with the way they
turned out as far as replicating the natural metal serial #. The national
insignias, USAF and the SAC badge came from a Superscale sheet on the Stratojet.
Once
the markings were done, I started working on adding the landing gear and ended
up trimming a few millimeters off of the top of the out-rigger gear struts
before attaching them up inside the engine pods, as they would've made the front
nose gear sit a few millimeters off the ground if used as is. I also
hacked off the nub of an axle that Hasegawa moulded on the out-rigger struts and
replaced them with new axles that I made from thin styrene rod.
|
Click on
images below to see larger images
|
 |

|
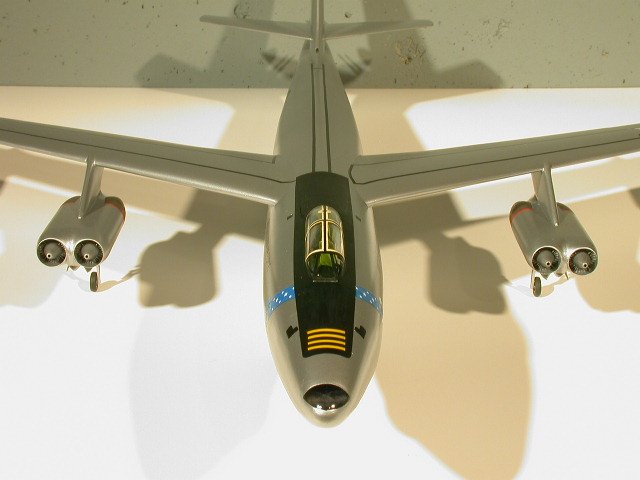
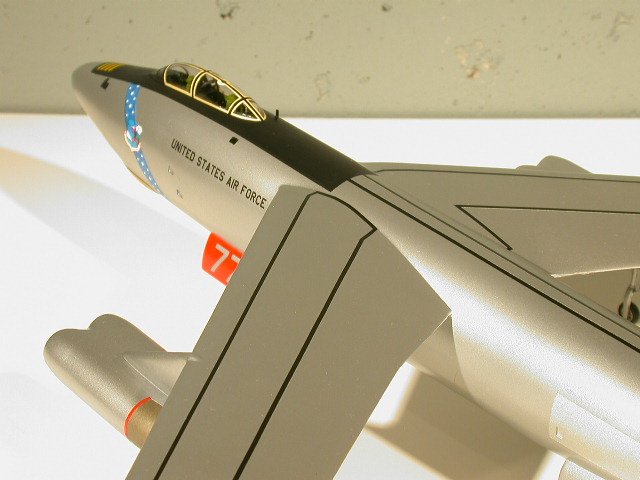
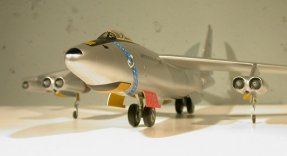
The
cockpit canopy area was the last area to finish up by removing the masking I had
on it. This had been installed earlier in the build and hand-painted, but
to ease the painting I took Dymo tape and carefully scribed in all the frame
bars, the round star-tracker sight and all of the thin yellow-ish
sealant lines around the edges of the canopy. The sealant lines may be a
bit on the thick side, but I could not see not attempting to replicate them
as they are pretty apparent in photos of Stratojets with this style of canopy
and I painted them with Pollyscale's Aged White acrylic railroad paint.
Before I had attached the canopy I added a little bit of detail in the form of
the direction finding antenna behind the co-pilot/gunners station and a
structural A-frame that was part of the canopy just behind the pilot. It
was not much, but did help to busy up this area a bit since that was about all
that is really visible. BTW - a dip in Future floor wax does wonders for
the clarity of the kit supplied canopy. I am not sure why, but it makes
the kit canopy seem much thinner instead of the "coke-bottle" thick
look that this part of the kit has become so well known for.
I
added a short earial antenna post to the right and rear of the canopy and a
short rod extension to the front of the vertical stabilizer for a later day when
I decide to add the aerial antenna wire, but am currently leaving that off for
the time being and waiting for a day when I will have more permanent display
arrangements and there is not such a risk of this possibly getting broken.
With
that the build is pretty much finished and out of all the model builds I have
ever done, this one was definitely a labor of love more so than anything.
I do believe there are things I could have done better on this kit, but not much
better. I know the accuracy of it is questionable at best since I do not
have actual photographic evidence of this aircraft, but If any of you out there
reading this ever track down an actual photo of this particular airplane in
service, I will congratulate you... because it is my own personal holy grail of
my modeling career! I would like to believe that this build is a pretty
accurate guess though, as I have spent many years researching these
magnificently beautiful aircraft and their use and history within the 55th
SRW and I honestly do not believe I could make a better attempt at it. I
suppose the best compliment I could have received was from the fact that it
nearly moved my grandfather to tears upon seeing it. I only wish I could
have had the privilege to have witnessed one of these machines take to the
air during a RATO take-off with my own eyes, as it truly must have been a sight
to behold.
Hopefully
my build article here (and two others listed below) are inspiring and
informative to others, as it is always a treat to see other modelers works and
this is definitely one kit that's not seen often enough in built form.
J.C.
A couple of other
excellent on-line build-ups of this same kit:
Some
of my favorite web-sites in relation to the Stratojet:
References:
- "We
See All: Pictorial History of the 55th Strategic Reconnaissance Wing,"
by Bruce M.Bailey, c. 1982, (ISBN 0-9609952-0-X).
- "Boeing's
B-47 Stratojet," by Alwyn T. Lloyd, c. 2005, by Specialty Press,
(ISBN 1-58007-071-X).
- "B-47
Stratojet In Action," by Lou Drendel & Tom Y'Blood, c. 1976,
by Squadron Signal Publications, (ISBN 0-89747-027-3).
- "B-47
Stratojet: Production Versions," by Alwyn T. Lloyd, c. 1986, by
Detail & Scale Inc, (ISBN 0-85368-619-X).
- "Boeing
B-47 Stratojet," by Lindsay Peacock, c. 1987, by Osprey Publishing
Limited, (ISBN 0-85045-763-7).
- "Variant
Briefing: Boeing B-47 Stratojet," by Bill Yenne, Autumn/Fall 2005
International Air Power Review, c. 2002, by Airtime Publishing Inc, (ISBN
1-880588-46-3).
- "Boeing
B-47 Stratojet: True Stories of the Cold War in the Air," by Mark
Natola, c. 2002, by Schiffer Publishing, (ISBN 0-7643-1670-2).
- "Flying
The RB-47," by Bruce Bailey, c. 2000, (ISBN 0-9726127-0-X).
- "By
Any Means Necessary: America's Secret Air War in the Cold War," by
William E. Burrows, c. 2001, by Farrar, Straus and Giroux, (ISBN
0-374-11747-0).
|
|