|
Well here it is.
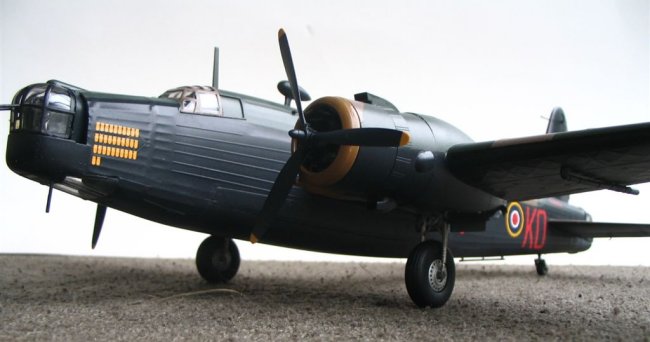
The
Mk III Wellington from Trumpeter. I built this model for a friend who has a
large collection of diecast aircraft, and couldn't see a 1/48 Wellington on the
way from any of the diecast suppliers around this part of the world. As you will
notice, this aircraft looks like it's come straight off the production line and
hasn't yet flown. This is the way I was asked to build it, and while it isn't
quite how I would finish it if it was mine, my friend is very happy the finish.
Trumpeter has done a
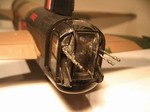
wonderful job with this model. Everything about it is crisp and parts fit just
about perfectly. The interior is very detailed, right down to a toilet,
which incidentally you can't see once the fuselage halves are closed up. As
usual the instrument faces were printed on film strip and were very clear. The
only thing that confused me inside, was the clear instrument panel which didn't
have the instrument holes cut out to see the dials once the panel was painted.
No aftermarket
parts were added to this model, partly because my friend didn't want any
added, but also because Trumpeter has added so many metal
parts to the kit it just about isn't worth buying any. This is evident
inside the wheel wells. Trumpeter have supplied metal side walls for
this area of the model, which have fantastic engraving to create wonderful
detail. While on the subject of wheels, the tires are rubber, and the legs
are made of metal to take the weight of the finished model. On to the
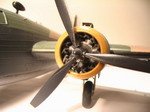
engines, while these have a lot of parts to get a finished product, it is
worth it. The attention to detail is outstanding. The two things
I might suggest in regards to the engines are firstly, use a sharp knife
to get any flash off the extractors, and secondly, make sure you push
the extractors fully into the holes supplied. I was sure that I did,
but once I tried to assemble the engine cowls, the front collector ring
(copper part) wouldn't fit. I ended up dremeling out the inside of the
collector rings, upon where everything slipped into place.
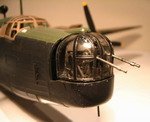
I won't go into
detail, but the gun turrets are truly outstanding. Everything inside the turrets
is there, and it all fits inside the glass perfectly.
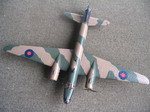
Much is said about
the fabric covered wings on every model of the Wellington ever produced, as you
can see here Trumpeter has made it quite obvious. I'm not sure what to make of
it, but I'm sure if they didn't put it there, much would be said about it.
If you don't like it, I'm sure sand paper could be used to good effect.
Click on
images below to see larger images
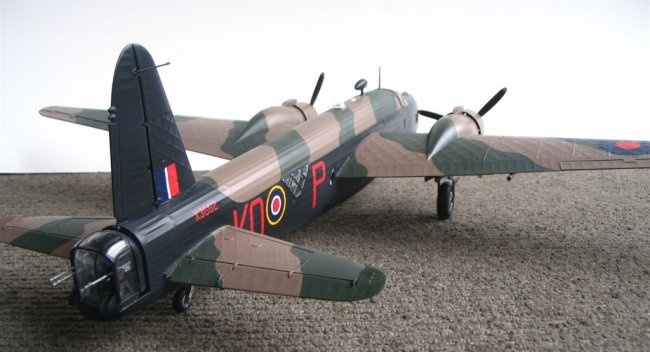
In
regards to painting and decaling, the paints used were Tamiya acrylics. I
painted the green, then hard masked the brown with Tamiya tape, waited 3/4
hour, then masked the black. So all the camouflage was painted in one day.
I have found with acrylics if I put a finger on the paint it tends to
leave a mark, or fingerprint on the aircraft. To combat this, straight
after applying the colour I apply a coat of Future (Johnson Clear where
I'm from) to the model, which makes the paint set very hard. Some people
have trouble with Future and acrylics, I'm not sure if it is the brand of
acrylic used, or if they thin the Future. I spray the Future straight, so
whether the solvent others use eats into the acrylic I'm not sure.
Applying Future straight after is also useful as it acts as a gloss on
which to lay the decals.
Decaling was straight forward. I
used micro set on the decals, and was expecting to use micro sol too, but
found the decals conformed to all the shapes without the need for it. The only
complaint with the decals is the colour of the letters on the side of the
aircraft. They are a very bright red, rather than the maroon which was commonly
used. My friend asked that I stick to the kit ones which I did. Finally I used a
flat clear from Microscale, which while it isn't that flat, would fit in well
with my friend's diecast collection.
I have really
enjoyed making this model which overall I had no trouble building. My friend is
happy with it, which is the main thing. As a model straight out of the box it is
superb. I can highly recommend it to any modeler wanting to experiment with
metal parts, and modelers of an intermediate level.
I hope you like it.
Alan
Click on
images below to see larger images
|
|