|
Greetings to all ARC readers from Ceki Erginbas.
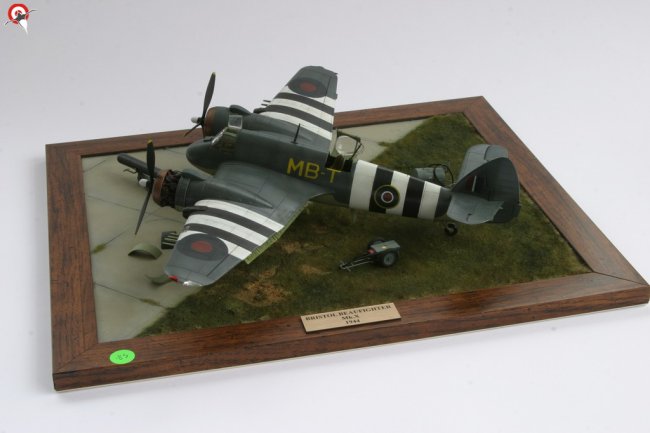
I was saving this article for a special day. And "May 19
Turkish Remembrance day of Atatürk and youth day" was appropriate for it.
I will try to share with you the building
steps of my Bristol Beaufighter Mk.X which has won the first place for diorama
category in the 20.th Ýstanbul Aviation Museum Plastic Model Contest.
The Kit I used is from Tamiya. It is a
wonderful kit with the usual Tamiya quality. But I wanted to add some
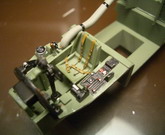
scratch built details to this model so I started with the cockpit.
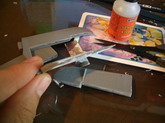
I used this photo as a reference for some scratch built detailing.
- I added the device that I don't know what it
is from sprue and copper wire
- I added the arm from stretched sprue
with Super glue at the tip
- Added the levers with thin copper wire.
- I also added the photo-etch seatbelts
from Eduard's RAF seatbelt set.
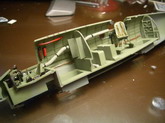
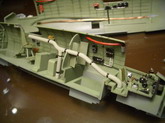
I wanted to add details at the back of the
cockpit, inside the aircraft, but I wasn't sure of which devices was inside, and
the where they were located. So I used some referance photos, some photos
of the resin detail sets, and most of all my imagination. Since when
the model is complete, only a very little portion of those details can be
seen, so I added them to give a busy, feeling inside the aircraft.
Plastic poker cards, copper wire, sprue
parts, and plastic hoses from Tamiya Motorcycle kits were used for the details.
Click on
images below to see larger images
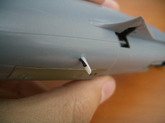
I also cut the rear cupola to display it in
open position. Then masked the clear parts using Bare Metal Foil.
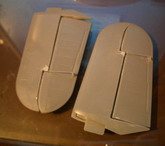
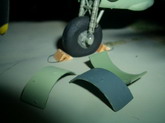
I wanted to display the elevators in an angular position. So I cut
the kit parts, separating the elevators. When you cut the
elevators, which consists of two separate parts, you make them unstable.
So you have to fill something between the parts to make them stable.
I used again plastic poker cards for this purpose filling the void.
Then used putty to smooth the surfaces.
The actuating arm detail of the kit is not
very good. So I cut them out, sanded and smoothed the surface and
added scratch built actuating arms made of plastic cards, and
stretched sprue. After all the work tail was looking like this
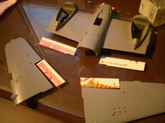
Then I did something really mad, and
decided to build the flaps in opened position. For this
purpose I first cut out the flaps from the kit pieces. Since the
parts from the kit was too thick for this scale, I replaced them with
again plastic card pieces.
Wings in the kit are given as a 3
piece assembly. So when you cut out the flaps, large wings becomes
really unstable. So you should again fill the inside of the wings
with a dense material. Plastic card was again really helpful in this
step. With some visual and metric measurements, I built the
necessary support for the wing assembly.
Lots of test fitting in this point is a must.
Since the weight of the wings can cause some problems in the following steps.
Later the edges were covered all over with putty
and sanded to obtain a smooth surface.
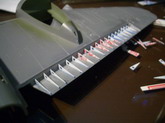
Inside of the Beaufighter flaps were looking like
this.
I again used plastic poker cards to build
the little triangular elements. First I made some measurements, then
separated the plastic card into triangles in the desired shape and proportions,
using a pen. Then with the Tamiya decal scissors, which is a very
nice tool, I cut the parts, and then drilled them with a 1mm hand drill.
At last fixed them inside the wing using super glue. I have to admit that
this is not the perfect application for the impatient modellers out there.
 It took about 2 days to complete these parts. Flaps were
build similarly.
At last I checked the overall
cleanness of the build by spraying interior green. The result was better than I
expected.
There's a piece called the aerial
fairlead at the bottom of the aircraft, which was a nice detail to add.
I used q-tips and some hose
from Motorcycle kits to build it.
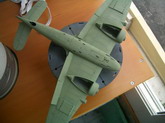
At last the model was ready for the
paintjob.
I started the paintjob with a
pre-shade at panel lines with flat black. Then Paint the bottom of the
aircraft with Tamiya XF-21 Sky, then added a little flat white into the
sky and sprayed it between the panel lines lightly to give a three tone
color variation.
The top of the aircraft was painted
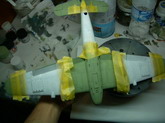
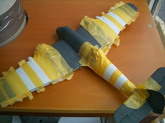
the same way. After that I started to paint the D-day stripes.
I masked the the aircraft step by step to form the stripes.
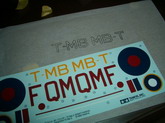
It was time for the decals.
Decals from the kit is usual Tamiya "very thick". After spending
that much time for this model, those decals were just not enough for this kit.
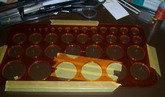
So I said let's do the markings with paint. I started by preparing the
circular forces at the wings. Circle templates from my technical drawing
class, came in handy at this part. Here's how I prepared the masks.
First find an appropriate place to
cut the masks, like a piece of glass. S tick some masking tapes, an then fix the
circle template strongly on the mask. Keeping the template fixed during
the cutting process is very important. Try to use new blades for your x-acto
knife since dull blades may rip the mask.
Place the mask, and spray the
appropriate color. You can use male or female masks that you prepared. In
the upper picture I first sprayed red and placed a male mask on it then sprayed
the Dark blue. If you want to add different color tones on the
markings, now is the perfect time, which I forgot during my building process.
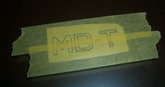
For the Letters, I copied them with
the transparent paper, coming on top of the decal sheets with the kit.
Fix the copy to a glass, with
masks on top. Then cut with a steel ruler carefully to obtain the masks.
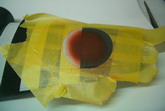
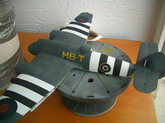
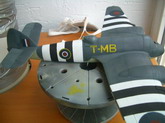
Making the circular markings at the sides of the aircraft was the hardest part,
since there are 4 circles in 4 different colors. My first attempts
weren't satisfactory, so I masked again and sprayed again until I get the
desired results. At last I made some little touch-ups with a fine
brush.
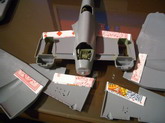
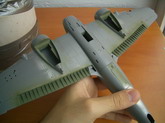
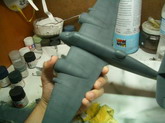
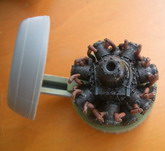
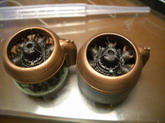
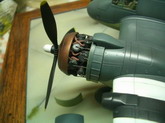
The next step is to build the Bristol Hercules
Engines. I decided to display the engines opened. By the way, the
aim of this project was to build a Beaufighter maintenance diorama. The
detail level of the kit parts was not enough for this purpose. So I bought
Cutting Edge's resin Bristol hercules engine set.
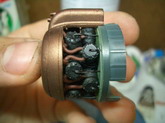
After the general assembly of the engine block
and cylinders, additional detail was added. Solder wire was the perfect
material both for its perfect size and workability, to be used as exhaust
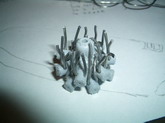
pipes. Two pipes from each cylinder, 28 pipes for 14 cylinders in one
engine. I also had to drill the cylinders to fit the pipes inside.
Then 2 pipes coming from one cylinder meets, and leads into the cowling making a
counter-clockwise turn. I cut the wires from desired places, and attached
with super glue. This process took about a night to complete.
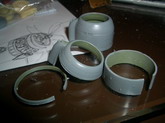
To display the engine doors opened,
I cut the cowling using Tamiya's modeling saw into 3 pieces. One
should be careful during this process since the pieces become very fragile near
the end of the cutting process.
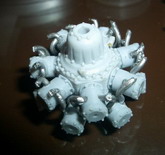
After that I added 5 other cables
around the motor block, indicated by the cutting edge. Engines were
painted to semi-gloss black and the exhaust pipes into rusty brown.
A little dry brush to show the cylinder texture.
Then added the spark plug cables,
coming from the center of the cylinders. 2 cables for each cylinder. I
used copper wire as cables.
At last I added the crankcase cowl-stiffeners to
give a more detailed look. I used stretched sprue for this purpose.
Drilled the cowling from desired points and fixed the stiffeners with super
glue.
I added some more detail after that:
Tail Aerials, using the spare parts from the kit.
Another little aerial at the nose.
And some other aerials, antennas, etc.
After removing the masks from the clear parts, I attached them in the opened
position. I also used the bulged wheels from a resin set which I don't
remember the name now.
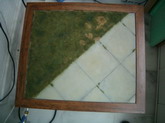
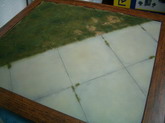
During the building process I also finished a diorama base to display the model
better, and added some piece of equipment from Revell's WWII ground
support equipment set. I also converted the bomb carrier from this set into a
torpedo carrier. It is not an accurate conversion but does the job for me
visually.
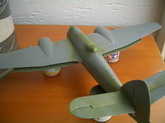
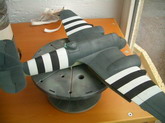
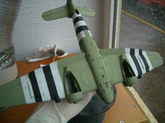
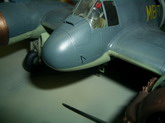
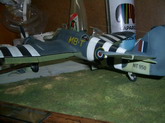
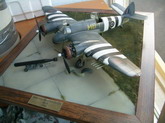
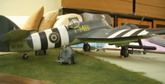
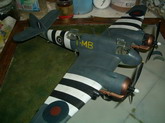
Here are final pictures. After these last
pictures I have painted the aerials and antennas flat black, sorry that they are
not seen in the photos. Also sorry about the general quality of the final
photos.
Happy Modelling Everyone
Ceki Erginbas
Click on
images below to see larger images
|