|
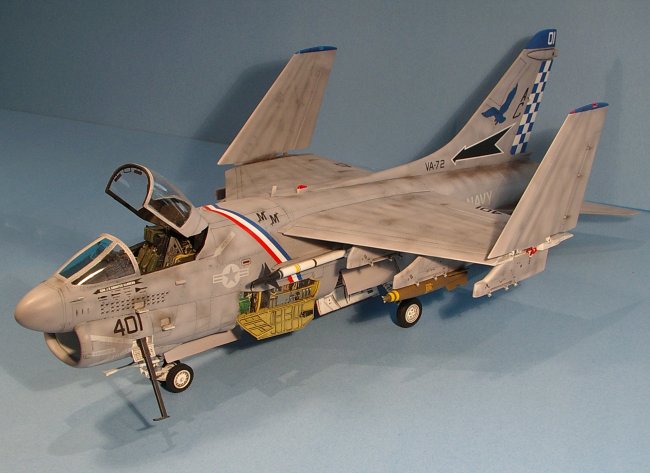
The USN A-7E Corsair II
needs no introduction, but I'll do a brief one anyways. The
original A-7A variant was designed to replace the A-4 Skyhawk as a
carrier-based light attack aircraft. The later A-7E variant
enjoyed a lot of success during the first Gulf War - ironically on the
eve of its retirement - just prior to the Hornet replacing it. It
was such a successful design that the USAF also procured a number of its
own A-7D's. It is also operated by Thailand and Greece.
The Kit
The Trumpeter 1/32 A-7E
needs no introduction either. I bought this kit during last year's
back-to-school sale, along with the following aftermarket add-on's:
Upon opening the box, I was
very happy to see the kit jam-packed with sprues, rubber tires, PE parts
and white metal struts. More than half of the parts were dedicated
to various weapons that you may not even use. In fact, I've never
built a kit of which half of the sprues are still sealed in bags after
the model is completed. However as the build progressed, I start
to see an overarching theme of Trumpeter tried very hard to impress the
modelers with various features, but they still manage to disappoint by
failing to cover the fundamentals.
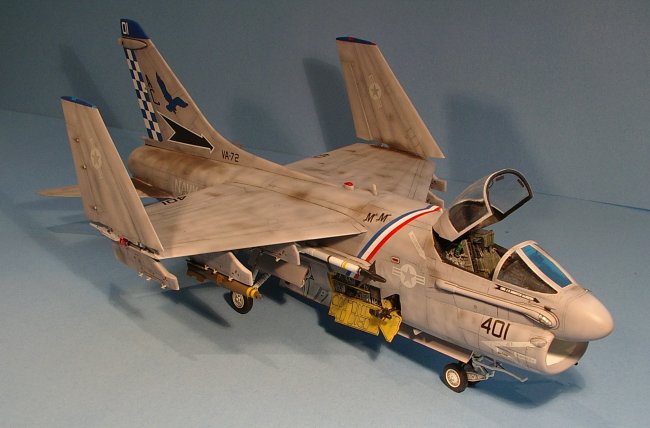
The VA-72 Blue Hawks
"SLUF" in the "Last Mission" markings is one of
the most modeled Desert Storm era birds, and it is the markings that I
chose.
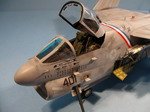
Intake Trunk and
Cockpit
This is the first airplane
model that I did not start with painting/assembling the cockpit.
The first piece I tackled was the long and prominent intake trunk.
In order to get a seamless trunk (without buying a resin replacement),
you'll need to saw off the closed end to reach the inside seam.
The work was fairly straight forward: Fill ejector pin mark in trunks
--> airbrush the inside flat white --> glue the trunk halves
together --> saw off the closed end --> putty and sand the inside
seam --> spray the seam white --> cap the open end with plastic
sheet. I used sand paper wrapped about a chop stick as a sanding
stick. It worked really well.
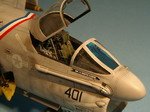
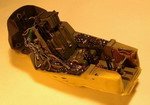
Black Box once again
delivered an outstanding cockpit set. Not only did it come with
the high level of detail you expect from BB, unlike their other
offerings, it actually fit very well inside the fuselage halves.
Unfortunately the seat that
came with the BB set was used for older versions of A-7E's -
DS Corsairs use the newer SJU-8 seats. I didn't learn of this
important fact until after my purchase, hence I needed to order the
correct Aires seat. Miraculously, the Aires seat slides into the
BB tub without any surgery! The only place that needed adjustment
was the BB throttle stick. In the end a hybrid BB-Aires cockpit
looks pretty good.
Click on
images below to see larger images
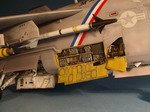
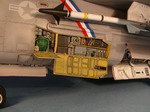
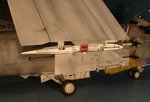
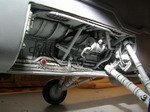
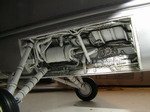
More Aires Goodies
In order to really showcase
all the details on this model, I've also bought the Aires resin avionics
bays and gear wells. Man oh man were these worth the money.
The details were exquisite, and they look very accurate when compared to
reference photos. Fit-wise they were also quite good. The
avionics bays need some trimming on the inside in order to fit the
intake trunk. Some minor gap filling was needed for the main gear
bays to fit the fuselage halves.
I painted them with Gunze
acrylics, Tamiya acrylics and MM enamel. The colours deviated from
the reference pics a slight bit, just enough to give some visual
variety. They were sealed with Future, a wash was applied and the
dry-brushing technique was used to pop out the details.
The gear bay set also come
with resin gear doors. Unfortunately their casting blocks were
part of the doors' smooth surfaces, hence a lot of careful trimming,
filling and sanding were needed. Since they were so close to the
edges (the "hanging" sides, not the "hinging"
sides), any chippings were noticeable and difficult to fix. I
ended up messing up one of those doors and had to resort to the one in
the Trumpeter kit.
Fuselage and
Wings
When all the resin
bits were attached to the fuselage halves, it was time to glue them together.
Speaking of fuselage halves, they are easily the biggest disappointment of this
kit. The incorrect profile of the intake lip is well-documented. The
engraved panel lines were too shallow, and there's also a very pebbly finish to
the plastic. None of these are hard to fix (except the intake), but it's
baffling that Trumpeter went through all the trouble to provide excellent
details throughout the kit, and plenty of ordnance to boot, but botched on the
most basic aspect of scale kit design and manufacturing. You get a sense
that they might have simply outsourced the production of the key fuselage
pieces to China to save money. Oh wait a minute...
When plastic finally
meets glue, I realized how bad the fit was on the belly. There was a huge
seam on the area between the nose gear bay and main gear bay. Sure, this
seam was covered by the air brake, but it throws the whole air brake to fuselage
fit out of whack. I had to use a lot of putty to essentially rebuild the
the area where the air brake meets the fuselage.
The
windscreen-fuselage fit was ok, but some putty was still needed to blend them
in.
The tail fin and
rudder fit was pretty good. No problems whatsoever.
Contrary to the
fuselage, the wings were molded beautifully with very consistent engraved panel
lines. The trailing edges of the droppable flaps needed some sanding to
get the correct scaled thickness. The only problem I encountered on the
wings was the bad fit on the inboard flaps - they cannot be dropped once the
main wing section was glued to the fuselage. Hence I had mine in the
neutral position. Oh well.
Another thing that
puzzled me was the wing-top navigation light - it was molded as a solid
piece of grey styrene instead of clear plastic. I decided to replace it
with a chunk of clear sprue sanded and polished to shape (see picture).
The wing-tip nav
lights were molded as clear plastic. I used super glue to blend them into
the wing pieces.
Landing Gears
Trumpeter provided
both plastic and white metal versions for all the landing gears. The
plastic main gears were too weak so you really have no choice but to use the
metal ones. Unfortunately, this is another weak link (har har) of the kit.
The metal parts were riddled with flash and mold seam and needed a lot of
cleaning up. The Hasegawa 1/48 Hornet also has metal lets, yet there were
beautifully cast and needed minimal cleaning up - and the Trumpeter kit is
supposed to be least 10 years ahead in manufacturing technologies.
I used the plastic
part for the nose gear and found no problems.
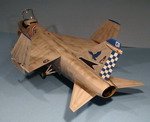
Painting and
Decaling
Painting a USN
low-vis scheme with heavy weathering is a long and involved process. Here
are the steps I took:
-
I primed all the parts with
white Mr. Surfacer 1000
-
Panel lines were pre-shaded
with flat black
-
Everything was airbrushed flat
white. The pre-shade will still show through.
-
I sprayed a mixture of 1 part
base colour, 2 part flat clear, 2 part gloss clear, 2 part thinner all
over the airframe. This gives a very subtle sun-faded look, yet it
preserves most of the black pre-shade.
-
Spraying small spots of grey
on random spots on the airframe. Spray white within panel lines to
make the sun-bleaching heavier.
-
Using the same mixture in step
4, spray across the airframe again to tone down the "damage"
done in step 5. This will bring a fairly realistic sun-faded USN
style mottling look to the model.
-
Use Future to seal the paint
job.
Decaling is probably
my least favourite part because I tend to make a lot of mistakes. The
checker piece doesn't fit the rudder very well, and I botched the 3-colour
stripe multiple times, so I had to purchase another sheet to make up
for it. In the end I still don't think the decaling job is very good, but
I just had to move on with life.
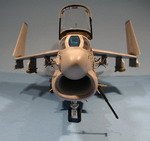
After coat of
Future was sprayed to seal the decals in. A wash was applied to the panel
lines. Finally, a flat coat was applied. Pastel chalk (mix of black,
white and raw umber) was liberally applied to make this Desert Storm warrior
come to life.
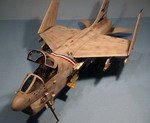
Since these markings
were applied to "401" after the hostilities ended, technically it
should not carry any weapons. But a SLUF without any bombs just doesn't
look right. Hence I put on a couple of GP bombs and AIM-9L's (leftovers
from my Academy Hornet) and called it finished.
Final Words
Can I recommend this
kit? Yes, but ONLY if you absolutely must have a 1/32 model of this
aircraft. I've built the Hasegawa 1/48 version and it is a much better
built in terms of quality and fit. In my opinion, this Trumpeter model is
only worthwhile if you put in the extra resin detail sets. Sure it'd cost
a lot of money, but the extras really bring this model to life.
Terry
Click on
images below to see larger images
|