|
I've always
liked the look of the RAF's biplanes from the Inter-War "Silver
Wings" period but rarely feel brave enough to tackle one.
Recently however I decided to take the bull by the horns & finish the
Aeroclub Gamecock which had been lurking part-built in a drawer under the
bed for more years than I care to remember. It's a typical Aeroclub
product which, for those not familiar means short run injection main
airframe parts in a butterscotch-coloured plastic with massive sprue
attachments which really MUST be sawn off rather than cut, a collection of
white metal detail parts, some Contrail rod & strut & a nice decal
sheet. The injected parts take a fair amount of work to get them
free of the sprues but once this is done they're actually really nicely moulded & remarkably free of
flash & mould joins. Being short run, of course means that
they're also totally free of that bane of the modeller's life the ejection
pin mark since the moulds don't have ejection pins. The white metal
parts need rather more clean-up, but are nice enough once done.
Once
everything was cleaned up much of the assembly was quite painless the
fuselage interior lower wing & tail slotting together with little in
the way of rubbing down & a couple of small smears of filler.
The first problem arose however with the one-piece white metal combined
fuselage nose & engine which was a very poor fit & significantly
larger that the fuselage resulting in much work with Milliput worked down
whilst wet to conceal the step. The kit supplies white metal
interplane struts but the modeller is required to cut the cabane struts
from a length of Contrail rod. This maybe doesn't sound too bad, but
the Gamecock actually has 10 of the accursed things giving much scope for
sense of humour failure!!
It took a considerable amount of time looking at the various photos
& scale plans in Lumsden & Thetford's fine book "On
Silver Wings" before I actually worked out exactly how many struts
there actually were & exactly where they went but I figured it out in
the end. The majority of the strut locations in the wings &
fuselage are shown as slight dimples in the mouldings which I deepened
with a drill then drilled out any missing locations using the plans.
Having got everything ready I decided the best way was to fit the
interplane struts first & tape the top wing in place then cut the
cabane struts to length & fix them to the fuselage which then allowed
me to remove the top wing again once the struts had set. After a
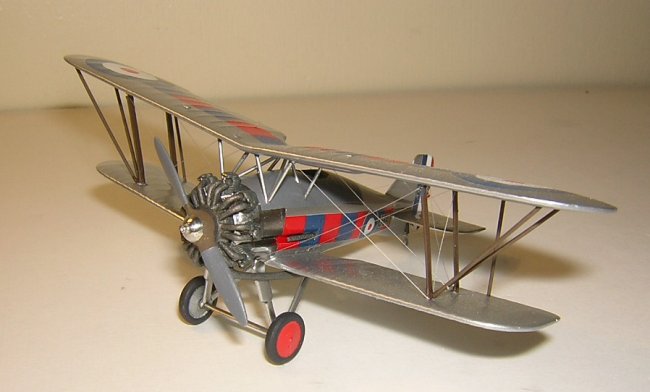
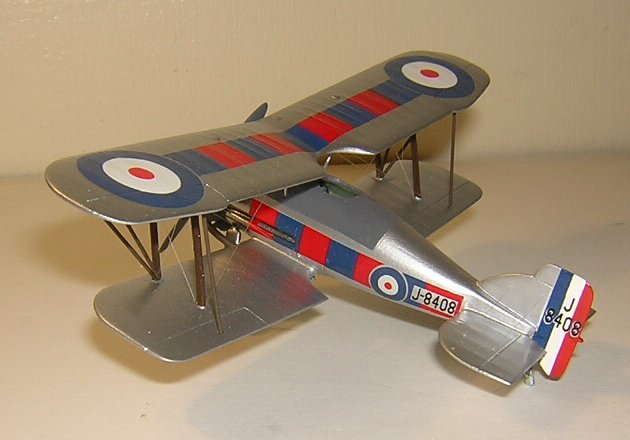
final coat of primer everything was ready for paint. As is usual for
RAF fighters of that era the Gamecock is finished in silver dope on the
fabric areas with any metal panelling left unpainted & usually highly
polished. The upper fuselage was normally painted in a dark colour
presumably to serve as an anti-glare panel which was a dark grey in the
case of the Gamecock. Having pondered the best way to paint it all
eventually I did the nose area in automotive gloss black followed by
Alclad Polished Aluminium, masked that & sprayed the rest in Alclad
White Aluminium . Next, I masked out the dark grey fuselage decking
& brush painted that so I could retain the silver finish on the struts
& finally brush painted the interplane struts.
Once the painting
was completed, I then applied the decals. The sheet was subtly out of
register & when I applied the underwing serials they had a white drop-shadow,
which looked distinctly odd. A phone call to Aeroclub brought a replacement sheet in the mail within a couple of days
& the serials on that turned out to be fine. The main problems with
the decals were the squadron markings on the fuselage & the rudder stripes.
The fuselage markings go over the gun troughs & are supposed to follow their
contours, but if you lay the decals down into the troughs it distorts their
shape & the whole appearance is totally wrong, so I laid the decals flat
across the ports &, once they'd dried, slit them with a scalpel &
persuaded the cut edges down into the troughs, then attempted to fill in the gap
between the cut edges with scraps of spare decal from the sheet.
This was distinctly unsuccessful & so after much fiddling I eventually
gave up & touched the decals up with paint, Humbrol 104 Oxford Blue & 19
Post Office Red turning out to be near-perfect matches. The rudder
stripes are supplied as plain straight lengths & really didn't want to fit
the rudder.
Eventually, after much messing about & vast quantities of assorted
decal softeners, I gave up & removed the sorry mess from the rudder. Having
found with the gun troughs that Humbrol 19 was a decent match for the red, I
then used it to brush paint the rear half of the rudder, cut the blue sections
from a spare set of stripes & applied them to the front of the rudder,
trimming once they were dry & finally used Xtradecal white stripe decal to
add the white portion. This may sound long-winded but trust me, it was a lot
easier & MUCH more successful than trying to use the kit stripes. As a
final point for anyone who's confused by my painting the rear of the rudder red,
RAF aircraft had rudder stripes with blue leading, rather than red, until 1931
when the order was reversed. Once everything was dry, I washed off
the surplus decal glue & solvents & brushed on a coat of Future top seal
everything in. Now came the bit I'd really been dreading, the accursed
rigging. I looked at the plans & photos again to determine what went
where & decided that I could do the bulk of the rigging before I put the top
wing in place, but before I started I fitted the main landing gear so that the
model would sit securely while I was working on it. I then found some
silver sprue from an old Esci car kit, stretched it & made a start.
Some days & much failure & swearing later, I'd finally got the wing
rigging in place & then fitted the top wing, breaking some of the rigging in
the process. Another round of bad language & sense of humour failure
later I finally got the wing rigging finished together with that on the tail.
This just left the additional vee struts from the bottom of the front interplane
struts to the front & rear spars & the aileron link rods, all of which I
cut to length from some Contrail rod, superglued in place & then brush
painted once they'd set.
Finally I fitted the pre-painted propeller & exhausts.
Building this kit was sometimes a distinctly frustrating experience,
largely due to my lack of experience with biplanes , but art the end of the day,
I was very happy with the result. Was it worth the effort? - too right it was !! Would I do it again? - certainly not for a while
!!!
John
|
|