|
As a member of
the IPMS(UK) Aerobatic Display Teams SIG, I seem to have had my horizons
broadened somewhat over the last couple of years & seem to end up
building things for the SIG display at the UK Nationals (no, I
can't get used to calling it Scale Modelworld either) which I'd either
never even thought of building, or in totally different markings to what
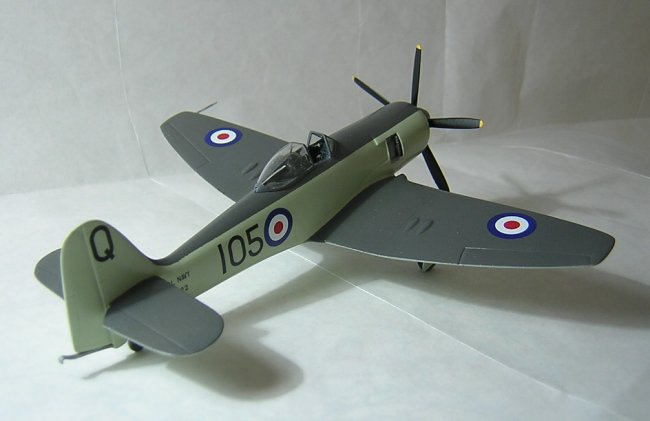
I'd originally planned. This Sea Fury was one of the latter - I'd
intended to build it as Peter Carmichael's MiG-killer (I know, 0 out of
10 for imagination!!), but eventually built it as an aircraft of the 801
Sqn aerobatic team at the time of the Festival of Britain in 1951 for the
2005 display theme of Naval teams.
I'd had the PM kit in my stash for many years , so decided I'd build
that. Obviously, any sane person would have built the Special Hobby
kit, but I already had the PM version, so natural meanness took over.
When I opened the kit, I found that I'd also got in stock the Airwaves
etched brass set & white metal undercarriage & an Aeroclub vacform
canopy. I noticed whilst perusing Aeroclub's website, that as well
as selling the canopy on its own, they also do it in a set with a white
metal casting for the rear cockpit decking, headrest & canopy guide
rail, so I invested in one of them too.
I remember when I first bought the kit, some time in the early 1990s,
that I thought it was quite reasonable, which I suppose it was back then
compared to the old Frog kit which was its only competition, but looking at it again the best part of 15 years later my opinion was rather
different. It was fairly cleanly moulded with recessed panel lines,
but the engraving was rather heavy & the entire surface had a rather
rough texture as if the mould hadn't been polished. The detail
parts are also sadly lacking - the cockpit detail consisted of a floor,
bulkhead & a totally useless seat, the one-piece canopy was ghastly,
the gear doors were the thickness of armour plate & totally undetailed, the undercarriage itself fit only for the bin & the
wheelwells,
though at least boxed in, were distinctly shallow with limited detail.
Fortunately, most of this was unlikely to be a problem - my normal build
technique involves much spraying of aerosol primer & rubbing down of
defects, which would fix the rough surface & heavy panel lines &
the various aftermarket goodies would deal with most of the rest.
The wheelwells I decided to leave as they were, since they weren't THAT
noticeable.
I built up the cockpit using the kit floor & bulkhead, the latter cut
down to clear the new rear decking, the Airwaves brass & an Aeroclub
white metal bucket seat & stick. Once painted, it all looked
great but, being all black & with a very small cockpit opening, I'm
sure you can guess how much of it was actually visible - ah well, I know
it's all there!! Once the fuselage was assembled, I realised
that the kit had no exhaust detail, so I trimmed away the solid wall at
the front of the exhaust channels on both sides of the fuselage &
thinned down the rear edge of the cowling to give room to fit a set of
exhausts after painting, these being made from 9 pieces of plastic rod
glued side by side & then cut into lengths once set.
The next
"challenge" concerned the wings - they looked ok on the
sprue but, once joined, the massive thickness of the trailing edges &
wingtips became glaringly apparent. This required considerable use
of files & sanding sticks & rescribing of the control surfaces.
The final task prior to painting was to fit the windscreen, which
was a far from smooth operation. I managed to ruin both the
Aeroclub vacforms, which is a common enough problem for me, being
hopeless with anything vacformed, which left me casting round for an
alternative. Eventually I found an Academy Typhoon in the stash
& stole the screen & canopy from that - the screen wasn't a
perfect fit, but a little fiddling with it got it in place & a skim
of filler faired it in neatly. As an aside at this point, Toyway, the UK Academy importer, sold me a replacement Typhoon clear
sprue at very reasonable cost.
Unlike the build so far, painting & decaling went smoothly.
First I sprayed the stainless steel area aft of the exhausts with Alclad,
masked it up & sprayed the main colours in Humbrol, glossed it up ,
applied the decals, which were from an assortment of Xtradecal & Modeldecal
generic sheets, washed the airframe once it was dry & then brushed on
a coat of clear gloss to seal the decals.
The final problems to be overcome concerned the undercarriage.
First off, the Airwaves undercarriage legs were fine, but I was less than
impressed with the wheels & so had to cast around for an alternative,
which turned out to be an Aeromaster Tempest (the Heller kit reboxed by
Aeromaster with some resin & photoetch & a new decal sheet.
I thought I'd be able to "borrow" the kit wheels & then get
a set of resin one for the Tempest, but when I opened the box I realised
that the kit came with both plastic & resin wheels, which solved the
problem nicely & at no expense. The other problem was the
undercarriage doors - all the kit doors were, as mentioned above,
grossly over-thick & under-detailed & the etched set came with a set of main doors which were nicely detailed on their inner faces,
but much too thin. Consequently, I superglued the etched doors to
a piece of 10 thou plasticard & then trimmed the card to size. The
inner doors & the tailwheel doors , which the Airwaves set didn't
supply, were vigorously rubbed down to reduce their thickness. Once the various detail parts were
painted, they were all fitted in place, a final coat of satin varnish
applied & the canopy demasked. In spite of the shortcomings of
the base kit, this was a generally enjoyable project which produced a
model with which I am happy. Next time I want a Sea Fury though, I'll be steering well clear of the PM kit in favour of
the vastly superior Special Hobby version, or possibly waiting for the
promised Trumpeter offering.
John
|
|