|
There was a demon that lived in
the air. They said whoever challenged him would die. Their
controls would freeze up, their planes would buffet wildly, and they would
disintegrate. The demon lived at Mach One on the meter, seven
hundred and fifty miles an hour, where the air could no longer move out of
the way. He lived behind the barrier through which they said no man
could ever pass. They called it.........the sound barrier.
I was 12 years old when my grandparents took me to see "The Right
Stuff" in the theater in 1983. This monologue by Levon Helm
gave me goose bumps back then, and it still does today. I love
speed. My favorite X-planes are the air-launched rocket planes that
were built to go fast- X-1 series, X-2, X-15, & D-558-2.
I was inspired to build these models while watching "The Right
Stuff" for the umpteenth time. I don't remember what exactly
year it was, but I do know it was sometime between the release of the
Eduard X-1 and the re-release of the Monogram B-29.
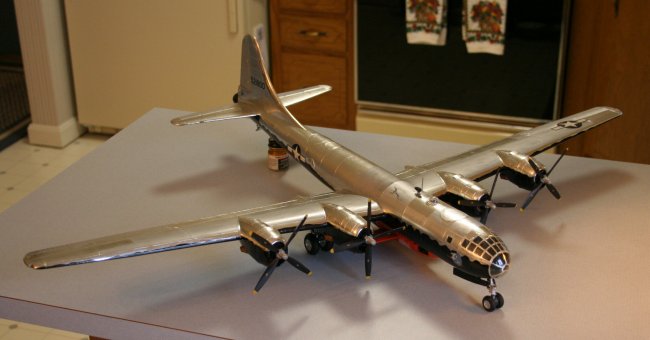
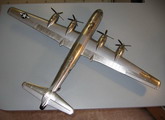
The B-29 Build
The actual building of this project was about 3 years worth of starts and
stops. The first thing I wanted to tackle was the cut-outs in the
B-29s fuselage. Nothing fancy here, I looked at my references,
guesstimated where to make my cuts on the fuselage halves, took a deep
breath, and went to work with my X-acto saw. I first cut away the
section between the fore and aft bomb bays. Next I cut away an X-1
nose-shaped section that went from the forward edge of the bomb bay and
extended almost to the rear of the nose wheel well. Also in this
area I had to cut off the lower part of the forward bulkhead. As it
turns out I made this cut-out too large. Oh well.
Finally, I removed parts of the fuselage that would make room for the X-1s
tail section. After smoothing out the edges with my Squadron sanding
sticks I taped together the X-1 and checked the fit. It looked
pretty good, I did not have to remove anymore parts of the fuselage.
Before the build was over Monogram re-issued their magnificent B-29.
Thankfully the reissue contained new Hamilton-Standard props. I no
longer had to look for the OOP H-S props from Kendall. I took
the H-S props from the reissue and exchanged it with the original kits'
Curtiss props. No problem, the reissue will someday become Enola
Gay.
The interior went together pretty much according to the instructions,
except for the bombardier's area. General Cardenas (we exchanged a
few E-mails) had told me most of the equipment in this area had been
removed. So that is the way I built mine. With the interior
complete, the fuselage halves were glued together. Another difficult
area had now been reached. How do I build the structure that
attaches the X-1 to the B-29? I had three pictures taken from inside
the bomb bay that showed some of the details of how the
X-1 was mated to the B-29. When I started this project I intended to
build an as-close-to-scale structure as possible, but then I asked myself
why go through all the time to build something that nobody is going to
see? I build for me, not for shows. I took a piece of square
stock and placed it across the bomb bay just forward of the wing carry
through. Using a piece of an F-16 main wheel well and another piece
of square stock, I built another structure and placed it on the spine of
the X-1. Viola! I had a nice non-scale attach point.
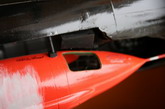
Another part that was modified was the pressurized tunnel over the bomb
bay. This tunnel connects the flight deck with the rear gunners' area.
On the real aircraft the vertical fin of the X-1 would not clear this
tunnel. One of the pictures showed that this tunnel had simply been
cut-off and a blank piece of metal placed over the hole! I cut-off
my tunnel even with the rear of the wing carry-through and covered the end
with styrene.
Next I moved on to make more exterior modifications that were particular
to 45-21800. First I smoothed out the canvas boot for the tail guns.
I also removed and sanded all turret fairings according to the
instructions. At this time in the build the Silverplate Turretless
conversion from Cutting Edge did not exist. The turret covers
provided by Monogram were far too big to use, so I cut my own covers from
the thinnest sheet styrene I had in my stock. I glued them into
place and tried my best to fair them into the fuselage. It looks
okay, but this part of the model still bugs me. The last change to
the exterior was to skip the installation of the main gear doors. On
the real aircraft they were removed because they would not clear
the wings of the X-1.
For natural metal finishes I like to use Bare Metal Foil. For the
finish on 45-21800 I used the original Foil, with a couple pieces of Matte
Aluminum thrown in for good measure. The top center section of the
wing was painted Testors aluminum. For realism I applied the foil
panel by panel. It took a while, but I like the finished look.
The foil was only applied halfway down the side of the fuselage. The
rest of the fuselage along with the entire underside of the aircraft
(except ailerons and elevators) was painted gloss black. The only
weathering I did was accomplished by alternating the "grain" of
the foil on some of the panels. For the nose glass, I applied foil
to the entire nose and cut out each window panel separately.
The real aircraft was virtually devoid of stencils. The national
insignia came from the reissued kit. The tail numbers and the nose
art decals were done by Mike Grant. I wanted to depict both aircraft
as they might have appeared on 14 October 1947. At that time the
USAF was barely one month old, so I was unsure of which insignia the B-29
carried. I eventually found pictures of the B-29 with the WWII-style
insignia and the X-1 with the new style insignia. Problem solved.
Future was applied before and after the decals.
The X-1 Build
The Eduard X-1 kit is awesome! This baby went together with no
problems. I bought the Profi-Pack Edition that included resin and PE
parts. I literally built it OOB. Since it was going to be
installed in the B-29 bomb bay, I built it with the gear up. It took
a little bit of fiddling to get the gear doors to fit correctly. The
entire model was sprayed with Testors "rattle can orange".
Future was put down before the decals. I used kit decals except for the
"Glamorous Glennis" decal. A hobby shop acquaintance had
made a set that looked better than the kit decal. I honestly cannot
remember if I sealed the decals with Future or Testors Dullcoat.
The only part of the X-1 that was weathered was the insignia on the left
wing. By 14 October 1947 46-062 had been carried aloft 30 times.
By this time the exhaust from the B-29s #2 engine had stained a portion of
the insignia. This can be clearly seen in the famous picture taken
by Bob Hoover as Yeager sped past Hoover's RF-80 chase plane.
Lastly, Testors Flat White was brushed onto the bottom and sides of the
fuselage to simulate LOX tank condensation.
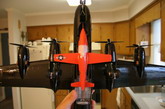
At the end of the X-1 build I decided to add one tiny and thoroughly
inaccurate detail. I placed Yeager's broomstick on the seat of the
X-1! For those who may not be familiar with Yeager's broomstick
story, I'll tell
you. The night before Yeager's historic flight, he was thrown by a
horse at Pancho's Happy Bottom Riding Club. He was treated by an
off-base doctor for several broken ribs. His injuries would have
prevented him from leaning over to lock the door on the X-1. So he
turned to his trusted friend Capt Jack Ridley. Ridley cut-off a
broomstick about 14" long, this handle could be used to, as Ridley
(played by Levon Helm) said in the movie, "..stick this in the handle
and wang it down!" Broomsticks in the late 1940s brooms were
either light blue or red and the length of Yeager's handle was
approximately 12-14". To make the broom handle I used the
handle from a Hasegawa F-16 boarding ladder and cut it to a length that
looked right. I painted it red, and painted one end light tan to
represent exposed bare wood. I placed it on the X-1s seat.
Yeager and Ridley certainly would not have left the handle lying on the
X-1s seat during the climb to launch altitude, but I could not resist
displaying this way.
Click on
images below to see larger images
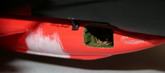
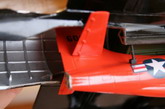
Mating
Both models were complete. It was now time to mate the two together.
If I was really insane I would have built a scale mating pit to display
the pair. This is not out of the question on a future project.
With both aircraft finished, I applied Zap to the square stock on the back
of the X-1 and placed it into the bomb bay of the B-29. While
secured to the B-29 the real X-1 was stabilized by four sway braces.
There were four small black squares on the fuselage of the X-1; this is
where the sway braces would touch the sides of the X-1. I built my
sway braces using round stock and square stock, painted them black and
glued in place. It was at this point that I realized I had forgotten
to build the pilot elevator! This elevator would carry the pilot
from the top of the bomb bay down to the entry hatch of the X-1.
This elevator is quite visible in several in-flight pictures. I
built the elevator out of sheet stock, painted it black and glued it to
the B-29 just above the X-1s door.
Conclusion
Finally after years of planning, researching, and building, my first
mothership/X-plane project was finally finished. This model is not a
perfect museum piece, it has some flaws like wrinkled foil, obvious seams,
and some surgical spots that were not completely sanded smooth, but
overall I'm pleased with the way this project turned out. I also
like the fact that I built something that, to my knowledge, no one else
had built in 1/48th scale.
What's next? About halfway through this project I decided I wanted
to do more 1/48th scale mothership/X-plane combinations. My plan now is to
have at least five more:
Boeing B-29 45-21800 & Bell X-1 46-062 (first to break Mach 1)-
DONE!!!
Boeing P2B-1S 'NACA 137' & Douglas D-558-2 Skyrocket 'NACA 144' (first
to break Mach 2)- 10% complete as of June 2007
Boeing EB-50D 46-096 & Bell X-2 46-064 (first to break Mach 3)- 55%
complete as of June 2007
Boeing EB-50A 46-006 & Bell X-1D 46-1386
Boeing NB-52A 52-003 "Balls 3" & North American X-15-1
56-6670 (first glide flight- 8 June 1959)
Boeing NB-52B 52-008 "Balls 8" & North American X-15A-2
56-6671 (first to break Mach 4, 5, 6, & set unofficial absolute world
speed record)
Each of these above projects will be displayed with their associated chase
planes. Construction of Bob Hoover's RF-80 will begin once the
EB-50D/X-2 project is finished. The RF-80 will be built from an old
Monogram F-80 and C&H Aero conversion kit.
I hope you enjoyed reading about this build. I certainly enjoyed
working on this project and writing this article. Happy modeling.
Stephen
Click on
images below to see larger images
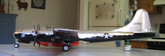
Below is a
teaser picture of my next project......it's the EB-50D/X-2 mothership/X-plane.
|
|