This
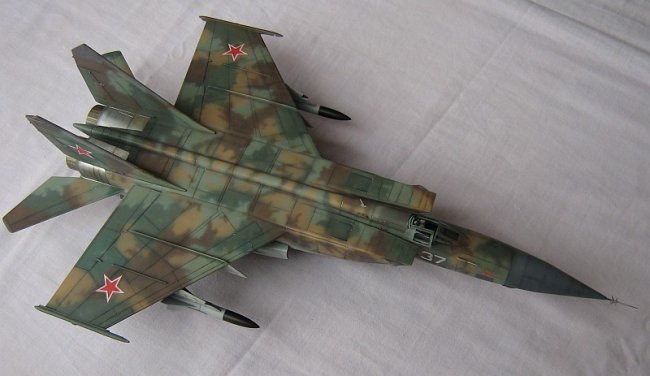
is the Revell 48th scale MiG-25PD converted to a BM version. The BM was a
limited development of the MiG-25 to provide a Soviet SEAD (Suppression of
Enemy Air Defences) aircraft. Protracted in development, it entered
service in 1988. Apparently less than 100 were produced. The BM’s main
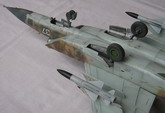
weapon was the Kh-58 (AS-11 Kilter) anti-radiation missile. References
indicate that launch weight is 640kg, each missile has a 150 kg blast
fragmentation warhead and uses inertial mid course guidance and the
passive radar homing with a range between 70 and 150km depending on launch
altitude. The BM airframe was different to the standard P/PD as follows :
-
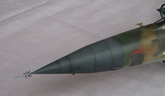
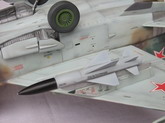
Extended
nose more conical in shape than the P/PD versions to house EW and
emitter detector systems. These noses were painted with a false grey
radome in an attempt to resemble to P/PD interceptor.
-
Distinctive
antennae on the intake cheeks and forward fuselage sides
-
Revised
inboard pylons (I assume to take the Kh-58 missile launch rail).
Click on
images below to see larger images
The
Revell kit is a dog. I had to rescribe as many panel lines as possible as the
limited panel lines on the kit are raised. I bought the NeoMega cockpit set
which is an absolute must considering the lack of kit cockpit detail. I also
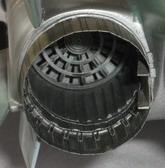
bought the Eduard exhaust, interior (landing gear wells and intake detail) and
exterior photo etch sets. These are also definite musts, especially the exhaust
set as the kit parts are anemic and too shallow. The fit of the kit is bad and
lots of filler was required all over. The kit does not provide the prominent
engine bleed air ducts on the top of the intakes. I scratch built these with
plastic card before realizing that the Eduard interior set provides the ducts in
neat photo etch sections. The kit inboard pylons were modified. The intake cheek
antennae were scratch built from plastic card. The entire nose was made from a
block of laminated Evergreen plastic bar and then rough shaped on a lathe.
Final
sanding to provide the conical shape took ages. Panel lines were scribed.
Luckily this solid nose provided sufficient ballast to keep the aircraft from
becoming a tail sitter. The missiles were also scratch built using laminated bar
and a lathe (thanks Jonathan). I initially thought of using the kit missiles as
the basis but realized that they were too small in diameter. The nose pitot was
also scratch built with plastic card vanes.
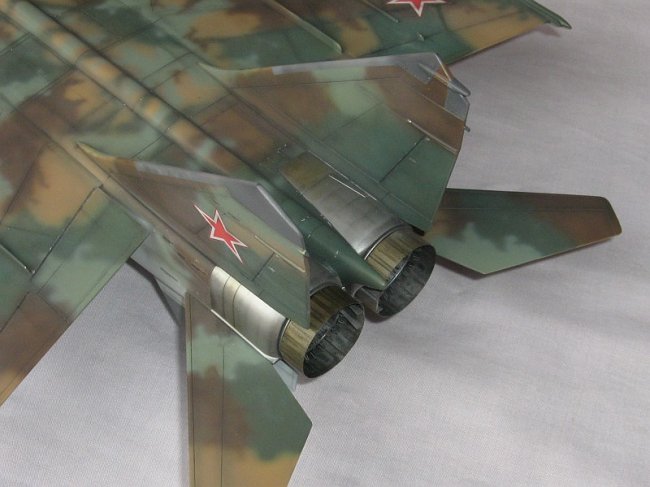
The
exhaust nozzles and afterburner cans were a real challenge. Rolling the Eduard
exhaust cans to provide a nice symmetrical cylinder was a lot more difficult
than I anticipated. The Eduard afterburner cans have no detail – they are flat
pieces of sheet which must be rolled. I used a technique I learnt from a fellow
modeler in Greece
– I took a similar size section of thin plastic card, glued sections of
stretched sprue lengthwise and covered this with tin foil which was then rubbed
down over the sprue to provide a suitably corrugated effect (thanks Yiannis !).
The end result is 1,000 times better than the kit parts. Painting the exhausts
and the bare metal areas on the rear fuselage was a challenge. I painted the
bare metal areas as follows – Tamiya X-18 black, overspray with X-11 silver,
heat discoloration using black and orange pastel and dry brushing with Humbrol
H52 metallic blue. The exhaust nozzles were treated in a similar fashion, but had
an added wash of white spirit / black oil paint mix, over sprayed with thinned
Tamiya X-26 clear orange. This is a new technique for me and I’m reasonably
happy with the result.
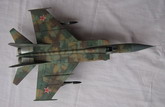
I
used Bort 37 as my subject matter. There are several photos of this aircraft in
a very tatty looking tactical camouflage scheme based in
Eastern Europe. I don’t find the plain grey versions too interesting, so I decided to try to
replicate this aircraft. I could not find photos of the top surfaces or port
side so had to use a bit of artistic licence based on the starboard image.
Preshading of panel lines was done using Tamiya X-18 black. I used XtraColour
gloss paints – X626 light blue for the undersides. Upper camouflage was a
combination of X-617 tan, X-620 light green, X-619 red/brown + spot X-617 and
X-616 dark green over sprayed with thinned X-618 dark green. The upper
camouflage was applied freehand in a random fashion using a Badger 200 airbrush.
The radome on the subject aircraft looks to be a faded grey/blue colour – I
replicated this with a mix of Testors RLM75 + 30% Tamiya XF-18.
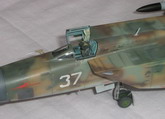
Revell
decals are notoriously nasty in terms of conforming to a model’s surface.
However, the decals were printed beautifully (especially all the intricate
stencils) so I decided to use them. I applied the decals using Future as a decal
setting agent – only problem – when dry, Future yellows – this is
particularly visible on the light blue underside. I had to make my own Bort 37
markings – this was achieved using adhesive clear laminate cut to shape with a
sharp knife, applied to the aircraft and sprayed white. This worked out very
well. After a long evening of decaling, it was time for weathering. As per
routine, I weathered using raw umber pastel for the undersides and dark grey
pastel for the upper camouflaged surfaces. The raw umber pastelling on the
underside helped to detract from the nasty yellow decal patches. Some subdued
chipping was done using Tamiya X-11 silver.
That’s
it then – another model for the cupboard.
Malcolm
Click on
images below to see larger images
|