|
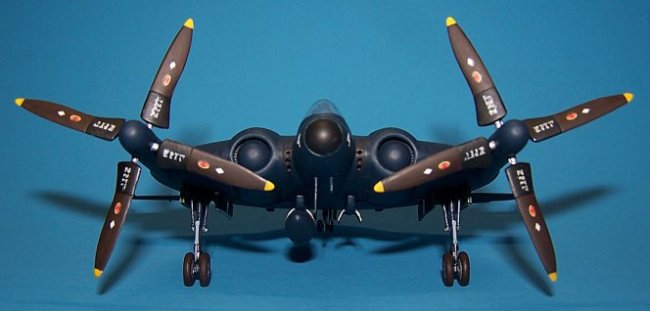
The Vought XF5U-1 "Flying
Pancake" was an experimental U.S. Navy fighter aircraft designed during
World War II by Charles H. Zimmerman. The unusual configuration was
designed to maximize lift for easily controlled carrier landings, yet allow for
high maximum speeds. Zimmerman estimated that the aircraft would have a
top speed of 425 mph and a landing speed as slow as 40 mph. Seeing more promise
in jet aircraft, the U.S. Navy cancelled the XF5U-1 in 1947. Tragically,
the prototypes were all ordered destroyed. After removing the engines,
instruments and other salvageable equipment, the aircraft were demolished with a
steel wrecking ball. Interestingly, the first few hits of the ball bounced
off the aircraft, hardly denting it. After the weak structural points were
located, the wrecking ball was employed once again, reducing the aircraft to a
pile of scrap.
In my early years as an engineer with Vought Aircraft, I had the pleasure of
working with a few people who had been involved with the XF-5U program.
Although it never was used for its intended purpose, they had fond memories of
the aircraft and were quite proud to have been associated with it.
Click on
images below to see larger images
Construction:
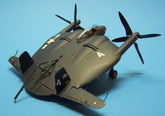
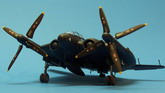
I began with the Hasegawa 1/72 XF-5U kit. Although the kit is of the
XF-5U prototype aircraft, I decided to build my model as an operational F-5U
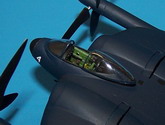
version. Dissatisfied with the thickness of the kit supplied canopy, I
carved a wooden form and stretch formed a new one. I wanted to position
the canopy open but the shape of the fairing aft of the cockpit doesn't provide
much of a mounting surface. To solve this problem, I used a U-shaped piece
of wire epoxied to the canopy as the lower canopy frame. I left about
1/2" of wire protruding from the lower forward edges of the canopy to
attach to the cockpit sill area. This not only provided for a strong
attachment but also ended up looking like canopy railings. As I love to
add details, I scratch built an arresting hook from brass wire and tubing with
some sheet styrene doors attached. Adding the arresting hook in an extended
position required cutting out the hook door panels on the upper surface. I
thinned the fuselage (or is it wing?) in this area and carefully cut out the
panels along the scribed lines. Since this opening would allow the
interior to be seen, I boxed in the hook cavity with some sheet styrene and
added a few lightening holes to represent the internal wing structure.
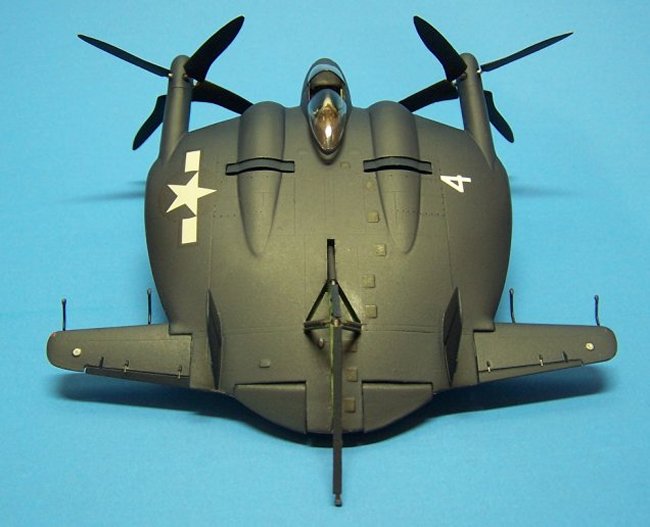
In the cockpit, I added grab handles to the ejection seat with thin wire as
well as some seat belts made from masking tape. The oversized kit joystick was
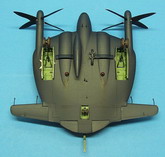
replaced with one from my spare parts box. I drilled ports in each wing
root to represent the six 50 caliber machine guns. To add a more realistic
look, I separated and repositioned the control surfaces slightly. If you
do this on an aircraft that used cables to move control surfaces, don't forget
to position the joystick to match the control surface deflection. The
engine cooling vents looked a bit chunky, so I cut them out and replaced them
with thin aluminum versions cut from a soft drink can.
On the underside, I drilled out ports and used brass tubing for the exhausts.
The external stores pylons were scratch built from scrap styrene and soft wire
for the sway braces. My trusty spare parts box yielded a suitable drop
tank to hang on one of the pylons.
Finishing:
The model was painted with a custom mix of Testors Model Master Blue Angel
Blue and Flat Black. The exterior was sprayed with Testors Gloss Cote
prior to applying decals, then sprayed with Testors Dull Cote. Interior surfaces
were painted with Model Master Zinc Chromate. Muzzle blast staining was
drybrushed with a mix of Rust and Flat Black. Exhaust staining was drybrushed
using Flat Black, Rust and Light Ghost Grey. I opted to paint the
otherwise clear nose radome Flat Black. Kit decals were used except for
the "Bugs Bunny" nose art of the prototype aircraft. Since this
was to be an operational F-5U, I removed the X from the XF-5U tail marking
decal. Aircraft side numbers were added with dry transfer markings.
Since the location of the underside star and bar insignia coincides with the
landing gear door, careful cutting and placing of the decal was required.
Overall:
The kit is quite good in terms of detail but poor fit of the engine intakes
and the propeller spinners required a lot of filling and sanding. I really
enjoyed working on this unusual naval aircraft model and plan on adding a
1/72 scale carrier deck section on which to display it.
Keenan
|
|