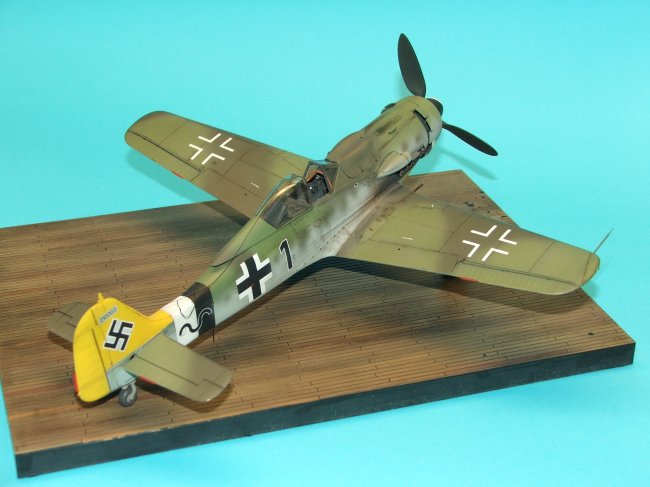
|
Without
knowing it at the time, a visit to “Kaiser Ralph’s” home in Brisbane
led to the building of Tamiya’s 1/48 Focke-Wulf Fw.190D-9 in the scheme and
markings of Oblt. Hans Dortenmann – “Black 1”.
American
author and historian, Jerry Crandall had recently published his wonderful
350-page reference book on the Focke-Wulf 190 “Dora” – the long-nose
version. The book is literally full of photographs and aircraft profiles and it
wasn’t until I received my own copy a month ago that I came across the version
I knew I would like to represent.
With
that, I cleared my workbench down and ripped into the kit. This article
describes the build from “go to whoa”.
I
chose Tamiya’s 1/48 Fw.190D-9 kit, as it would be the most straightforward
build as an out-of-the-box model.
Construction
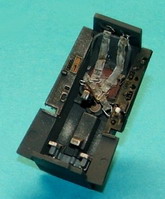
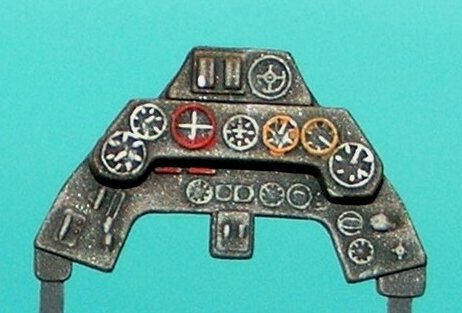
I
commenced by gluing in the main wheel-well and sandwiching it between the lower
and upper wing sections, putting these aside to set. I then cleaned and painted
the cockpit components. I used Tamiya German Grey as RLM66 Black-Grey.
Instrument details were picked out using Vallejo Acrylics of different colours
and a black watercolour wash added.
To
beef up the cockpit interior, I fashioned seatbelts using lead-foil and wire.
These were primed and painted Vallejo Buff and a watercolour wash added. In the
rear fuselage I drilled out the aircraft jack/trestle points and inserted a
piece of brass tube. I then mated the fuselage halves inserting the cockpit tub
up through the bottom opening.
Moving
back to the wing, I cleaned up the leading and trailing edges and glued this
sub-section to the fuselage. The tailplanes were then glued and the model
prepped for painting.
Click on
images below to see larger images
Preparation
At
this stage, I cut off the undercarriage indicator posts from the top wing and
drilled holes which would later take a more appropriate replacement. In the
upper and lower rear fuselage I drilled holes for later aerials and antenna. The
aerial post on top of the fin was also removed to avoid damage. This was later
glued back in place.
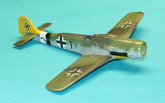
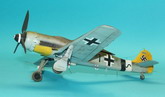
Painting
This
kit was the second serious attempt at pre-shading and thanks again to assistance
from “Kaiser Ralph”, I managed to successfully apply this stage which
involved spraying Tamiya Acrylic Nato Black along major panel lines and
recesses.
After
a visual inspection and a little bit of light sanding, I was ready to lay down
the first of the four major RLM colours – Gunze Acrylic RLM76 Light Blue. This
was sprayed on all lower wing and fuselage surfaces before allowing a short
drying time and putting down a coat of “Passt” Clear Gloss Acrylic medium.
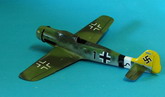
I
prefer to intersperse some of my colour coats with “Passt” to enhance the
drying time and to allow me to handle and mask the model in preparation for the
next colour – in this case, I elected to spray the tailplane its distinctive
RLM04 Yellow; this was also applied to the lower cowl section. I then took some
Tamiya Acrylic White, then Black and applied the dual-coloured tail band. These
areas were then sprayed with “Passt” and masked off.
Gunze
RLM75 Grey-Violet and RLM83 Dark Green were applied to the upper wings and
fuselage – once this was down I oversprayed the Grey with RLM82 Bright Green,
being how the original scheme was applied. Finally, I sprayed a mottle of RLM83
along the fuselage sides.
Decal
Preparation and Application
Decals
and stencilling data were sourced from various sheets which included Sky Models,
Aeromaster and Cutting Edge.
The
Sky Models sheet provided the Werke Nummer and major stencils whilst National
Markings are from Aeromaster. Sundry markings courtesy of the third source
In
preparation for decalling, I applied a few coats of “Passt” gloss and
experienced no silvering - the modeller’s curse!
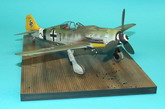
Weathering
The
decals “cured” overnight and I began applying the watercolour wash which
consisted of a variety of shades including Black and Burnt Umber from Maries.
Panel lines and decals received the same application of the wash which was then
carefully streaked using damp brushes in a rearward motion, to replicate the
airflow effect of the elements. The entire model then received a coat of Polly S
Acrylic Matt Clear to provide an overall even sheen and to seal both the decals
and the watercolours.
Finals
The
last stages of construction now involved attaching the undercarriage, cockpit
windscreen and canopy and all the “fiddly bits”. I used 19g hypodermic
needles for the two inboard wing cannon and a piece of brass tubing with brass
wire for the pitot tube.
The
antenna wire was fashioned from a combination of nylon thread and stretch
elastic. The FuG 16 antenna (lower fuselage) is a piece of brass rod.
The
centre-line drop tank attachment points seemed incorrect and so I shaved these
off and repositioned them to suit the ETC rack sway braces
Display
Base
This
simple black plastic base from Eduard provides a suitable stand for the
‘190’ and I transformed it simply by spraying an overall coat of Gunze RLM83
Dark Green (because that what was in the gun at the time) applying a few chosen,
masked sections and brush painting on a few different shades of Vallejo browns
and then a random spray of different browns and yellows along the length of the
base.
Oil
spills were provided using Citadel Black Ink.
David
Click on
images below to see larger images
|