|
Hello all,
Here is my latest
submission, the Tamiya "Bunker Buster" edition of their 1/32nd scale
F-15E Strike Eagle. Some of you may have seen my previous Mudhen in the gallery
already, but with this model I wanted to try something a little different.
I had
seen this particular airframe at the 2005 RIAT and was inspired by her
"hard worked" appearance. There were a number of techniques that I
wanted to attempt on this build which I hadn't tried before.
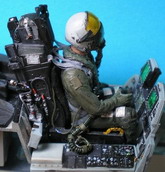
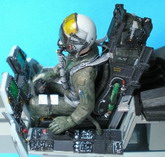
Firstly, I wanted to
add a crew this time around. This posed some challenges in itself but luckily
the kit parts are a good place to start. I have seen many models with aircrew on
board but I wanted to try to re-create the transparency of the visors, in
particular, the high contrast yellow visor often worn. In order to do this I
carved out the visor of the kit pilot and WSO to give a crude representation of
a face and then heat formed a replacement visor from clear plastic sheet. Once
this was tinted with acrylic floor polish tinted with the appropriate ink the
end result was quite pleasing.
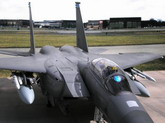
I used the kit
cockpit but added some scratch built detail, plus I also spent some
time adding bits to the seats then sat the crew in and added the belts from
foil. In my opinion, the Tamiya cockpit is perfectly adequate with a little TLC,
particularly if the canopy is to be closed.
Click on
images below to see larger images
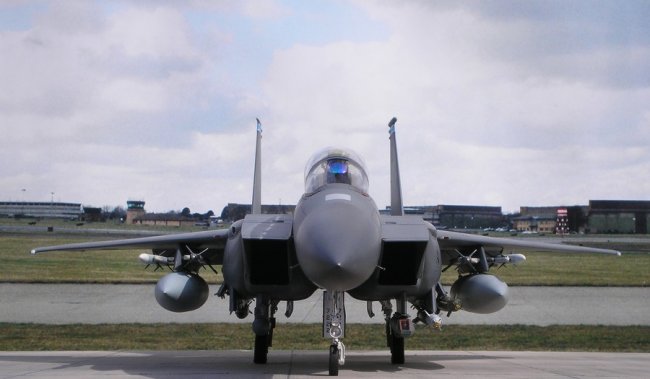
Something that is very
eye-catching on the full sized F-15E is the wide angle HUD. If you get the
chance to walk around one of these at an airshow you will clearly see that
the coated glass changes colour in different lighting. After seeing an
article by Dave Roof I was struck by a bolt of inspiration. Dave had used
irridescent confetti to add visual interest to the MFDs in his Hornet
cockpit which has the same colour changing properties as the F-15E HUD. I
scoured the internet looking for a suitable material and after some trial
and error (and one replacement HUD,......thanks Harv) settled on a
thin irridescent plastic film. I pressed a small, hot metal sphere into
the film to deform it and then cut out a circle which I stuck to the
plastic HUD with acrylic floor polish. I was absolutely thrilled by the
result and even now I think the HUD is my favourite part of the
model!
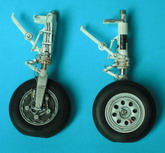
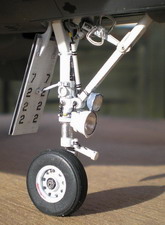
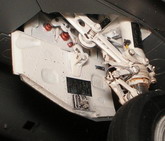
With the cockpit and
canopy as I wanted it my attention turned to other areas of the build. For me,
there are three main areas of interest on a modern jet fighter, the cockpit, the
gear/wheel bays and the tail pipes. I opted to tackle the landing gear next and
save the tail pipes until last. Once again, scratch built detail was added to
give the gear legs and wheels a more realistic appearance including some
weathering. I know these aircraft are well kept but there is always something a
modeller can find to dirty up if you look hard enough!
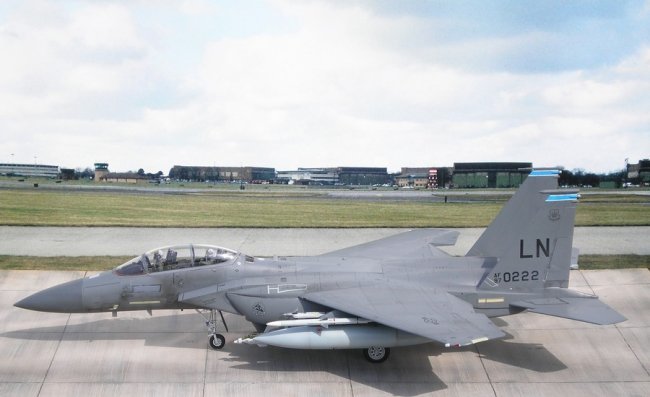
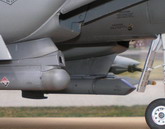
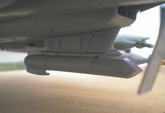
I turned my
attention to the payload next. I chose a load-out sourced from the F-15E Strike
Eagle website of 2xAIM-120, 2xAIM-9, 2xGBU-12, 2xGBU-38 JDAM and 2x WRM fuel
tanks. Keith Money kindly provided the bombs (thanks Keith) which I detailed. I
used Cutting Edge adaptors and AIM-120s then borrowed the AIM-9s from the
Tamiya Black Knights F-14 as they looked better than the ones supplied with this
kit. The WRM tanks were converted from the kit editions and the AN/AAQ-13
LANTIRN pod was treated to a little TLC before being slung under the intake.
For the targetting
pod I was persuaded to build a SNIPER pod which might now be available
through DrPepper resins.
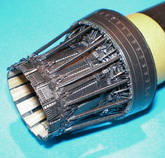
The last and most
herculean task involved adapting the Flightpath etched burner cans to use some
of the kit parts. I'd used the etched parts before so I knew what was in store
but this time I hoped to model the petals in the closed position as though the
engines were running.
This turned out to
be a mammoth undertaking with no less than 371 parts per side! I'm pleased with
the finished article though. Adding the plastic parts to the etch managed to get
rid of the 2D appearance that can be apparent from certain angles.
I was very lucky to
have an inordinate amount of help from the guys here on the ARC forums so I'd
like to take this opportunity to thank everyone for their support and
encouragement, I appreciate it.
For anyone foolhardy
enough to want to know more, a long and detailed build thread can be found here:
http://www.arcforums.com/forums/air/index.php?showtopic=73471&hl=Don't%20get%20excited
I hope you enjoy
reading this short article as much as I enjoyed building the model. Until next
time, keep well and happy modelling.
Guy (geedubelyer)
Click on
images below to see larger images
|