|
The diorama of the Iraqi aircraft is in 1/48
scale. A good scale to work with, as it is small enough to hide your mistakes
and large enough to play with the amount of detail you want to add to it. The
idea for this diorama came into my modelling world as soon as I read an article,
with plenty of photos to support it, in a very known magazine, the Combat
Aircraft Illustrated. Well as the story goes, some smart Iraqi officers
had the bright idea of hiding their aircraft by burying them into the desert,
under tones of fine innocent sand. Yes, these airplanes were also fueled up,
armed and ready to go. Yeap...the rest is history.
Back to our subject, the internet
came to my rescue once again. I found -not a lot - but enough photos to give me
an idea and a general picture of what actually happened. The actual
aircraft must have been partially buried in the sand and covered with a
camouflage net to hide it from conspicuous eyes (although in a similar picture
of a Mig-25, seems that the whole aircraft was buried in the sand). So, how do
we start this project. First things first.
The kit used in this diorama is the
Korpo Su-25K. Personally I think it is a much better kit than the Monogram
alternative. The engraved lines are very fine, the cockpit is more than
adequate, having (almost) full detailed side consoles and a not bad at all,
ejection seat. I couldn't resist, instead I used a True Details K-36 from my
sparesbox and what a difference it made.
The construction of the actual
kit was effortless. Some filler was used, just for the sake of making things
look even better. Part of the project was to open some panels in order to make
the scene look even more dramatic and also raise my stress levels to new
heights. The secret for doing that? Be patient, organized and try to plan ahead
(note: these rules don't apply to myself.). If you are planning in opening a
panel you have to be certain you have something to stick behind it. In our case,
the openings at the engine intakes are parts (guess what) from a rotor head of
an AH-64. The electronics boxes and the rangefinder at the nose is a complete
mystery to me, but as it goes, if it looks right, it is right! Now, time for
cheating. The open panel at the spine of the fuselage was intended to be left
open...but I couldn't think of anything to fit in there -this is called "modelling
blackout"- so I left it half open, the more I sat starring at it the less I
could find faults with it. The same thing applies for the half open panel at the
left side infront under the cockpit of the aircraft.
The cockpit was painted using the
usual Russian colours, and the camouflage pattern in the actual aircraft was
airbrushed freehand, using as a guide the instructions given in the actual
kit. Don't bother to be accurate, as in every picture I checked, the pattern was
a bit different. Also the actual colours used, were a result of experience (!!!)
and speculation rather than the actual Fs numbers given in the instructions.
Anyway who can accuse you of being wrong, is only a Russian aircraft. I had to
lighten them up a bit, so I add a few drops of white to add some realism to
fade the colours due to the harsh conditions of the environment.
When the actual model of the
aircraft was finished, it was time to plan the construction of it's
habbitat. As a dedicated aircraft model builder, I didn't have a clue how to
begin. A helping hand came from a good friend and fellow modeller Nikos
Kamitsis, who as an armour modeller (I forgive him for that), helped me
built a scaled down desert landscape.
First of all, we cut a square piece
of polystyrene foam, (you know the white stuff used to protect electrical
appliances and the small pieces that come off, go everywhere and drive the wife
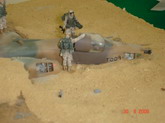
mad) to the size that was appropriate for the diorama. I dug a hole in it,
dryfitting and testing all the time the model of the aircraft I had already
built, so that it lays buried, but the same time most of it is on the surface
above the groundwork. (Yes I did that in our kitchen and I drove my wife nuts.
Are you happy now???). When I was happy with the position of the aircraft, it
was time to go to the next stage. A disgusting creamy substance was made out of
water, pieces of newspaper and white glue. This substance was applied on the
surface of the polystyrene foam, and was smoothed and shaped in order to look
more realistic. The aircraft model was placed in it's trench and glued safely
using adequate amounts of white glue. The weathering had to be applied now, as
later the things get more complicated and is difficult to work with. It was
done, using various shades of pasteIs, with colours resembling the colours of a
desert, using light browns, dark and light yellows and of course some light
greens for the camouflage.
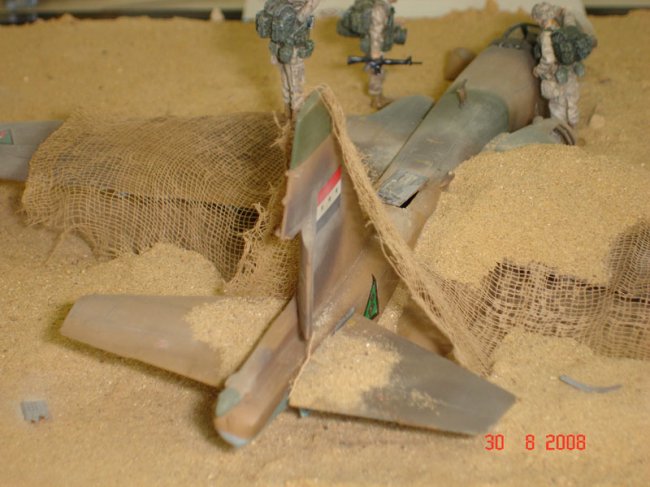
I have to mention at this point how
easy is to make a camouflage net, that we will need to use at this stage. For
this we need a common bandage. First of all we stretch it out to make it
look like a net, we then paint it in a colour that please us and "vouala",
our camoflage net is ready. I placed the net over the aircraft as it looked in
the pictures, secured it in the ground using ...toothpicks...and glue, and
before I knew it, this stage was over. Now before the paste dries up, we
sprinkle sand - yes natural sand found somewhere in a construction site in our
town (oops...) and we kept adding more till the base was covered with a
thick layer of sand. I also diluted some white glue with water and using a soft
thin brush I touched the top surface of the model crevices and places where
sand could accumulate. This way the actual model of the aircraft could be
"bond" in a way, with the surrounding landscape. I kept adding diluted white glue over the already settled sand, sprinkling some more sand on
top, till I was happy with the overall result. Dry pastels were again used as
before, this time in order to "connect" the model to the sandy
groundwork and to look even dustier with all this sand on top of it.
Click on
images below to see larger images
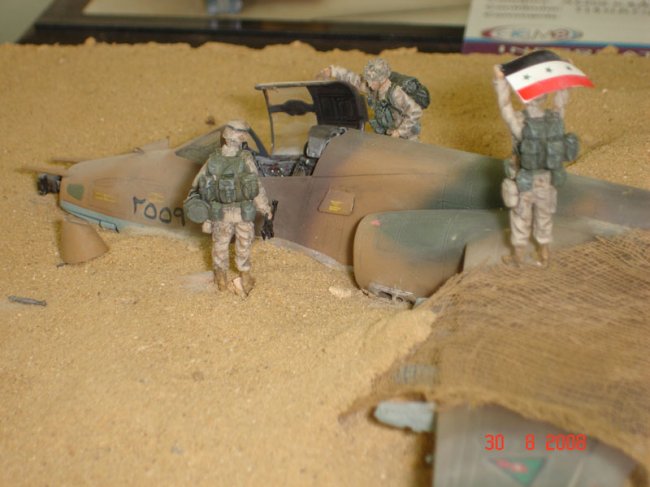
And now for something completely different. Figures.
I hate them. I love to look at them in aircraft dioramas but I really do
hate painting them. The figures I use in my dioramas don't look dead or
funny, they look like zombies. So an extra helping hand and advice
on the subject came again from the usual origin, an experienced armour
builder, Niko. The actual figures came from the US airborne Desert Storm
I & II sets, from Czech Master Kits. I was really surprised from the
quality and finesse of these figures. Detail in every single aspect. It
would be very disappointed if I couldn't get the best out of them. To cut
a long story short, following his tips and advice I managed to paint three
respectable figures of modern US soldiers in the 48th scale. A bit
of advice. Don't be embarrassed to ask other modellers for their help and
advice. There are hundreds of books and thousands of reference material
on the internet on how to do things in modelling, but nothing can be
compared to having a real person sitting next to you and teaching you, the
right way to get better results. To give an interesting note in the diorama
I placed these figures around (and on top) of the aircraft, in order
to give a bit more character. The only thing I am disappointed with, is
the actual Iraqi flag I used with the soldier on top of the aircraft. My
original idea was to look wavy. I used paper - it looked "heavy"
and "thick" for this scale. The painted alluminum
foil looked like the flag which was used in the moon landings.
Finally in a moment of utter desperation I found a pair of Iraqi flags in
my spare decals. Problem solved. It was thin enough for the scale and
exactly the size I was looking for, and it fitted perfectly in between the
raised arms of the trooper.
Yes now I think after a couple of months, (I am a
slow builder), the desert diorama project came to an end. I am happy with the
end result. It could be worst, and that is what I always say about my models.
I want to thank "Hel.Mo." for
supporting such an interesting hobby in our country, Greece, and especially Thanos
Mentzelopoulos for giving me the pleasure of expressing my views and
thoughts when I build my favourite models.
Panagiotis
Click on
images below to see larger images
|
|