|
I bought this kit from a fellow
member and it was quite a steal for roughly $6 (based on our local currency
about 300 Pesos). Although the box was missing, the parts were intact.
It's
rather sparse in detail. The exhaust nozzles for the engines are molded in the
fuselage and the landing gear well barely had any detail. The cockpit detail was
rather plain. It could benefit more from modification whether using aftermarket
parts or scratchbuilding. The instrument panel dials are raised detail and no
gunsight is provided. The kit has the option of using either wheels or skis (for
the winter version) and the decals are for two versions, for summer or winter
variants but it does not state what particular unit. I initially figured I
would build
it out of the box just for kicks and to practice a few skills and tricks I've
learned which I could apply in my other ongoing builds. But the moment I got
started, I began to take it rather seriously and sought to make it look better
to the best of my ability.
Click on
images below to see larger images
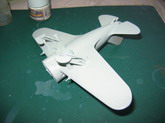
I
first painted it white (light gray will also do) then applied black. After it
dried, I lightly sanded it with fine sandpaper to make the details stand out.
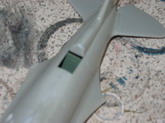
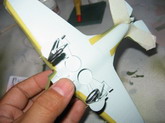
I
painted the cockpit interior gray green (Tamiya XF-71). The fuselage had some
issues. To start off, the front part which had a gap (unsure if it was caused by
warping) but I rectified it with putty. The other is this gap between the
cockpit seat and the backrest. I corrected this by putting a thin styrene rod on
the gap and melting down with liquid cement to make it conform. I filed it down
to shape and sealed the seams with Gunze Mr. Surfacer 500. On the lighter side,
I played Russian music during my build sessions, especially Polyushka Polye
(My Plains) and Balalaika on my MP3 player to set the mood (and it
helped a lot!)
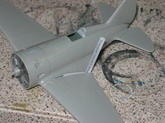
The
engine part was pretty simple with just a 2 parts (B1 and B9). I painted it with
metallic gray (Tamiya XF-56) and gave it a wash then applied it directly to the
assembled fuselage.
The
wing assembly came along fine but the issue showed when it was joined to the
fuselage. There seemed to be an uneven spacing leaving one side with a gap which
I had to fix by using plastic strip from a used prepaid telephone card. I fixed
it in place with superglue and trimmed of the excess after it had set. I sanded
it down flush and finished it off with another treatment of Mr. Surfacer 500.
For
the landing gear, I elected to use the wheels and the components came on rather
nicely (I would reiterate that this would benefit more from aftermarket detail
parts). I held off on attaching the wheels and canopy until I completed
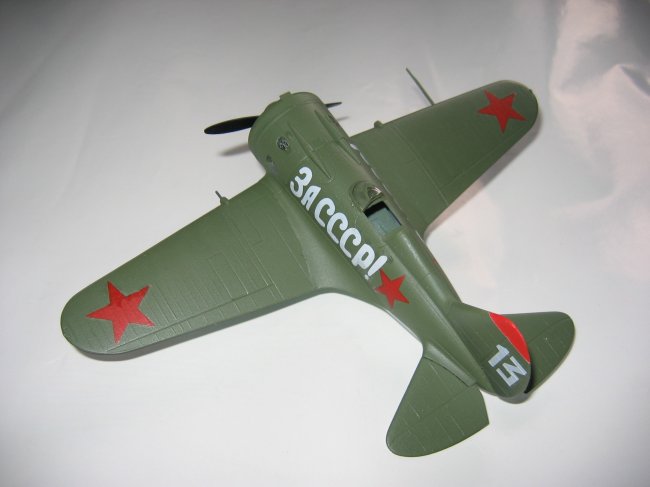
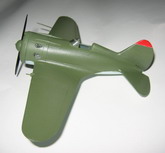
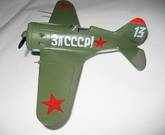
painting. Since I used the wheels, I'll be painting the model in its summer
scheme.
Before
doing the actual painting, I gave the whole model a coat of Mr. Surfacer 1000 to
prime it and to check for any flaws that I might have overlooked. After being
satisfied that I covered all possible flaws, I started my painting with the
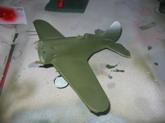
underside using light blue (Gunze #314). After it had set, I masked off the
edges of the underside as I prepared to paint the topside using what
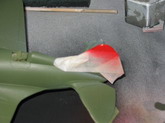
approximates Russian green (Gunze #303). The instructions for the summer scheme
calls for a bright red rudder tip. To make the brightness stand out, I first
gave the rudder tip a white undercoat (Gunze #316) then applying the red (Gunze
#3) later on. I repeated the process for the propeller spinner.
A word
of warning when attaching the propeller to the engine: The instruction (Step 2,
page 3) is wrong. The propeller (part B3) is illustrated backward.
Somewhere
along the way, one of the wing machine gun barrels broke off. To rectify it, I
used plastic rod as replacement. The pitot tube (part B25) vanished into parts
unknown and I replaced it with a round toothpick filed and sanded to shape. I
attached the canopy last.
Before
putting on the decals, I brushed the entire model with Future. The stuff leveled
off nicely and it ensured a shiny finish. The decals came along fine with no
problem at all though I was careful in applying the longer decal (Go USSR!) and
I didn't want to find out the hard way if it will tear. After applying all the
decals, I gave it another coat of Future to protect the decals and after it had
set, put on Testor's Dullcote to tone down the finish. Since speed was my goal,
I decided to forego the weathering and leave it looking in pristine condition.
For a dramatic touch, I used a Soviet flag as the backdrop on my laptop and
posed my model in the foreground.
It took me about 35
hours to complete the kit (my progress was hampered in part to work) and for a
kit which I once dubbed unattractive, I grew to like it and I felt like wanting
to make another one. I got my wish when I was given an Eduard kit (this time a
Type 10) to build for one of our major patrons. I just could not wait to get
started on this other one and the lessons I learned from this build shall be
carried forward in this next build.
IPMS
Philippines Bert Anido
Aaron Ronquillo
Click on
images below to see larger images
|