|
Spanish text is at
the bottom of this article.
Hello, fellow
modelers!
I like the F-16
Fighting Falcon very much. It was the pride of Venezuela's Air Force (FAV,
Fuerza Aérea Venezolana) for more than two decades, until the recent
acquisition of Sukhoi Su-30. I also like Tigermeet jets, so why not
combine both tastes? In fact, I am finishing a Dutch Tigermeet F-16B. I will
build a FAV F-16A later, as its SEA camouflage scheme is harder to airbrush.
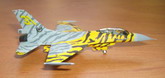
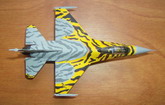
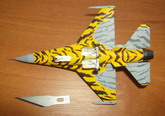
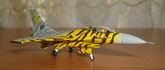
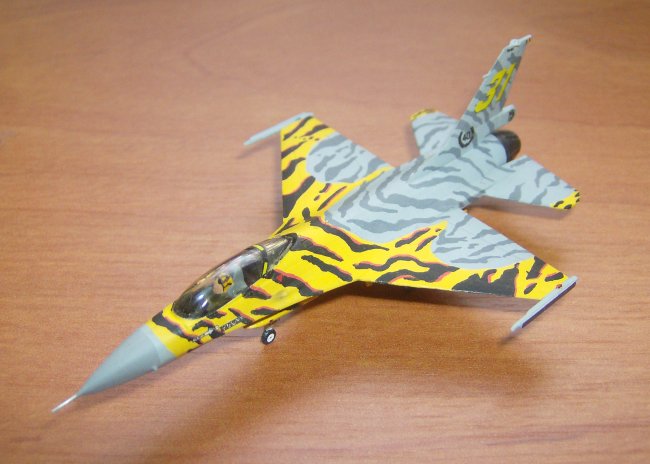
Here are some photos
of my
recently finished 1/144 Dragon F-16A
from the 31 squadron of the Belgian Air Force, in Tigermeet markings. This
is my smallest model to date (and will likely be the smallest forever) and my
second submission to ARC. The
kit has finely recessed panel lines, and the overall level of detail is very
good for the scale, but its radome and canopy are too bulbous. The undercarriage legs and the pitot tube are very fragile, as one
would expect from a kit this little. The pilot and the
ejection seat are molded as one piece, the pilot certainly looks like a seated
robot (this is the standard of all modern 1/144 Dragon airplane kits.) The
afterburner is molded together with part of the rear fuselage, as in other F-16
kits I've seen (I wonder why, it just makes painting the afterburner more
difficult.)
I built the kit OOB except for the scratchbuilt pitot tube. I painted the pilot's helmet
in yellow with black strips, just to match
the airplane, and tinted
the canopy with Humbrol Clear Smoke. I then assembled the model following the kit's instructions, but I left the afterburner
and
the whole undercarriage for the end stage. The fuselage is split in upper and lower
halves, and a lot of putty and sand work was needed in the LERX area. The canopy
didn't fit over the top fuselage, so I had to remove some plastic from
the fuselage before gluing the canopy. I masked the canopy
with very thin strips of masking tape and Humbrol Maskol and then smoothed
the joint with putty and sandpaper. I also filled and sanded all the points
where the pylons are normally placed, because I decided to build the model without
external stores, as shown in the box photo and also in others that I found at the
internet (the kit includes Sidewinders and also drop tanks and their pylons,)
and masked the afterburner.
Click on
images below to see larger images
I've read several times
that it's good to paint a white primer under a bright color as yellow, so I painted all the model flat white,
after painting the canopy frames
interior black. Three coats of white were needed to cover the
slightly dark gray of the plastic, so the recessed lines almost disappeared
under the paint. Now I think that a better solution is to paint a very light gray (like
FS36622 Camouflage gray) under bright colors. I did so under the yellow nose of
a Bf-109E that is still under construction: just one coat of light gray and one
of yellow were needed.
I matched the yellow with that of the
photos instead of matching it with the pale yellow of the
big "31" numerals of the decals sheet, I didn't want my plane look as a
scared Tiger! Before airbushing Humbrol 69 yellow, I masked the areas that would be later painted
gray with
Maskol, together with the wheel wells. I didn't paint the undercarriage doors at
this stage, now I think it would have been better to attach them in the closed
position with silly putty or white glue in order to paint them together with the
rest of the model, including the tiger strips.
When the yellow was
dry, I masked its edge carefully with Maskol, then I airbrushed MM Light Ghost
Gray FS36375, as it seems to match the color of the photos
better than the kit recommended FS36320 Dark Ghost Gray. I then brush-painted the dark
gray tiger strips with a 1:1 mix of MM Gunship
Gray FS36118 and white, and later the black tiger strips with flat black. When the black was dry, I
applied the pink trim next to the black (at the first moment I didn't
believe the kit's instructions, so I checked the photos again and found that this trim really
existed.)
Then the
model received two coats of Tamiya clear gloss in preparation for decals. Many decals are very small, but I managed to apply them all.
There are even two decals for what I assume is the signature of the artist who
designed the Tigermeet scheme, these go next to a corner over each of the
ventral fins!
After decaling, a
coat of Humbrol Matt Cote was airbrushed over the model. It's the last time I
use this product, because it remains tacky forever! Then I painted and attached the
undercarriage legs, wheels and doors, and finally the afterburner, which was
painted MM Metalizer Exhaust. The fit of the afterburner piece to the fuselage wasn't good
at all, so I had to sand my already painted model at this area and then retouch all
the painting, including some lost tiger strips. When I observed my photos again
I realized that the radome gray is darker than that of the rest of the airplane,
so I masked and painted it with FS36270 Neutral Gray (the kit's instructions
don't show a darker radome.) I finally brush-painted
all the navigation lights.
I kept weathering to
a minimum because this is an exhibition plane. I just tried to simulate gun
stains and to highlight some of
the surviving panel lines with a graphite pencil, but the effect is hard to see.
Well, after all the work I'm glad with the
results. I think that painting tiger strips on such a little model was both
challenging and rewarding. I've seen a model of this airplane in Hyper Scale,
but it's 1/48 scale and the tiger strips are decals that don't have the pink
trim. Moreover, the dark gray tiger strips are too dark, compared with that of
the photos of the real airplane.
Thanks for watching
and reading. Greetings from Caracas, Venezuela.
Here is the article
in Spanish
¡Hola, compañeros
modelistas!
Me gusta mucho el
F-16
Fighting Falcon. Fue el orgullo de la Fuerza Aérea Venezolana (FAV) por más de
dos décadas, hasta la reciente adquisición de Sukhoi Su-30. También me gustan
los reactores con decoración Tigermeet, ¿por qué no combinar ambos gustos?.
De hecho, estoy terminando un F-16B holandés con dicha decoración. Construiré
después un F-16A de la FAV, ya que su camuflaje es más difícil de aplicar con
aerógrafo.
Aquí les muestro
algunas fotos de mi F-16A de Dragón en escala 1/144, perteneciente al
escuadrón 31 de la fuerza aérea belga, con decoración Tigermeet de 1991. Este
es mi modelo más pequeño hasta la fecha (y probablemente para siempre), y mi
segundo artículo en ARC. El kit tiene finas líneas en bajo relieve, y el nivel
de detalle es muy bueno para esta escala, pero el radomo y la carlinga son muy
bulbosos. El tren de aterrizaje y el tubo pitot son muy frágiles, como se puede
esperar de un kit tan pequeño. El piloto y el asiento expulsor forman una sola
pieza, con un piloto que parece un robot sentado (esta pieza es estándar en
todos los kits de aviones Dragon en 1/144). El posquemador forma una pieza con
parte del fuselaje trasero, como en otros kits de F-16 que he visto (me pregunto
por qué, sólo sirve para que el pintado del posquemador sea más difícil).
Armé el kit tal
como viene en caja, excepto el tubo pitot. Pinté el casco del piloto de
amarillo con rayas negras para armonizar con el avión, y teñí la carlinga con
Clear Smoke de Humbrol, que tiene un tono más marrón que el de Gunze. Luego
armé el modelo siguiendo las instrucciones, pero dejé el posquemador y el tren
de aterrizaje para el final. El fuselaje está formado por mitades superior e
inferior, y fue necesario masillar y lijar bastante la unión en el área del
LERX. La carlinga no calzaba sobre el fuselaje, así que fue necesario quitar un
poco de plástico del fuselaje antes de pegar la carlinga. Enmascaré la
carlinga con tiras delgadas de cinta y con Humbrol Maskol, luego suavicé la
unión con masilla y lija. También masillé y lijé los puntos de anclaje de
los soportes, ya que iba a hacer mi modelo sin equipo externo, como aparece en
la foto de la caja y en otras que conseguí en Airliners.net (el kit incluye
Sidewinders y también depósitos lanzables con sus soportes), luego enmascaré
el posquemador.
He leído varias
veces que es aconsejable imprimar con blanco antes de pintar colores brillantes
como el amarillo, así que pinté el modelo con blanco mate después de pintar
el bastidor de la carlinga con negro interior. Se necesitaron tres capas de
blanco para cubrir el gris un poco oscuro del plástico, lo cual hizo casi
desaparecer el bajo relieve. Ahora creo que sería mejor imprimar con un gris
muy claro, como el Gris camuflaje FS36622. Así lo hice para el morro amarillo
de un Bf-109E que estoy construyendo, y necesité sólo una capa de gris claro y
una de amarillo.
Elegí el amarillo
según el de las fotos, en vez de hacerlo según el amarillo pálido de los
números "31" de la hoja de calcomanías, ¡no quería que mi avión
pareciera un tigre asustado!. Antes de aplicar el amarillo 69 de Humbrol con el
aerógrafo, enmascaré con Maskol las áreas que luego pintaría de gris, junto
con los pozos de las ruedas. En esta etapa no pinté las puertas del tren de
aterrizaje, creo que hubiera sido mejor colocarlas con cola blanca o plastilina
para pintarlas junto con el resto del modelo, incluyendo las rayas de tigre.
Cuando el amarillo
estuvo seco, enmascaré cuidadosamente su borde con Maskol, luego apliqué el
Gris Fantasma claro FS36375, que parece cuadrar mejor con el de las fotos que el
Gris Fantasma oscuro FS36320 recomendado por el kit. Después pinté a pincel
las rayas de tigre grises con una mezcla 1:1 de Gris naval FS36118 y blanco, y
más tarde las rayas de tigre negras con negro mate. Después pinté los
resaltes rosados junto al negro (al principio no creí en las instrucciones,
así que revisé de nuevo las fotos y comprobé que dichos resaltes de verdad
existían).
Después apliqué al
modelo dos capas de barniz brillante Tamiya para prepararlo para las
calcomanías. Muchas de las calcomanías son muy pequeñas, pero me las arreglé
para aplicarlas todas. ¡Hay inclusive dos calcomanías para lo que yo supongo
es la firma del artista que diseñó la decoración tigermeet, y que van junto a
una esquina sobre cada una de las aletas ventrales!
Después de aplicar
las calcomanías, apliqué una capa de barniz mate Humbrol. ¡Es la última vez
que uso este producto, ya que queda pegajoso por siempre!. Después pinté y
pegué las patas, ruedas y puertas del tren de aterrizaje, y finalmente el
posquemador, que pinté con Metalizer Exhaust de Model Master. El calce del
posquemador con el fuselaje no era para nada bueno, así que me tocó lijar mi
ya pintado modelo en esta zona y luego retocar toda la pintura, incluyendo
algunas rayas de tigre. Cuando observé mis fotos de nuevo me dí cuenta de que
el gris del radomo era más oscuro que el del resto del avión, así que
enmascaré y lo pinté con Gris neutro FS36270 (las instrucciones del kit no
muestran el radomo más oscuro). Para finalizar pinté todas las luces de
navegación con pincel.
Decidí mantener en
lo mínimo el envejecido, ya que este es un avión de exhibición. Sólo traté
de simular los residuos del cañón y de resaltar algunas de las líneas
sobrevivientes de paneles con un lápiz de grafito, pero el efecto es difícil
de apreciar.
Bueno, después de
todo el trabajo estoy contento con los resultados. Creo que pintar las rayas de
tigre en un modelo tan pequeño resultó ser tanto retador como gratificante. He
visto un modelo de este avión en Hyper Scale, pero está en escala 1/48 y sus
rayas de tigre son calcomanías que no tienen el resalte rosado. Más aún, las
rayas de tigre gris oscuro son muy oscuras, comparadas con las de las fotos del
avión real.
Gracias por observar
y leer. Saludos desde Caracas, Venezuela.
Orlando Sucre Rosales
|