|
I've
built model aircraft on and off since the late 1950s (yes, I am that old) but
this is my first WWII French aircraft. I had Tamiya's D.520 in my stash
for ages and knew nothing about the aircraft on the box art until I did some
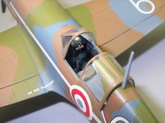
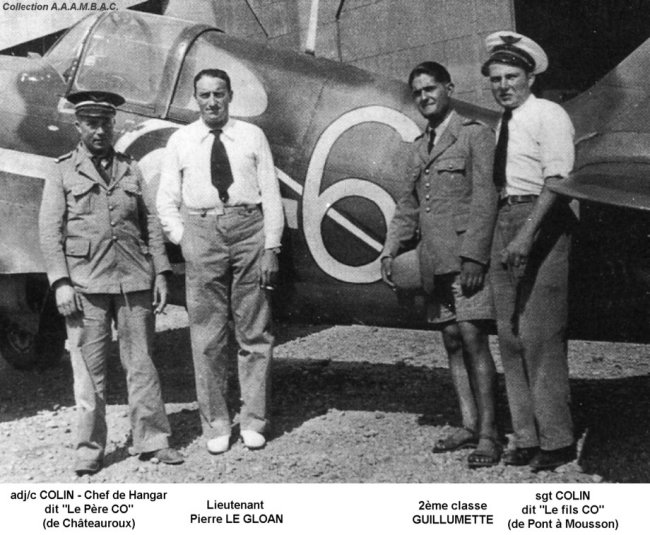
research. When I learned about the pilot, Pierre Le Gloan (second from
left in big picture further below) I was hooked on building this kit.
Le
Gloan was the fourth highest scoring French ace of WWII (18 victories) and
his story is fascinating. He won fame during the Battle of France by downing
five aircraft in one sortie--four Italian CR.42 biplane fighters and a Breda
BR.20 bomber on June 15, 1940--but his later history is problematic. He
also shot down six RAF Hurricanes and one Gloster Gladiator over Syria during
heavy air combat in May-July 1941 between the Vichy French and
the Allies. He switched sides again when his unit,
GCIII/6 joined the Free French Air Force and became GC 3/6 Roussillon in May
1943, at which time they converted to Bell P-39 Airacobras, His life
ended spectacularly on September 11, 1943 when Le Gloan attempted to belly land
a P-39 with a dead engine on the North African Coast near
Algiers. Forgetting that his Airacobra had a belly tank, he touched down
with it still attached. The fuel in the tank exploded and the entire
aircraft blew up, killing him instantly. Le Gloan was 30 years old when he
died.
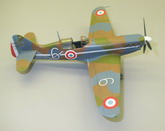
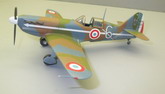
The
D.520 on the Tamiya box art is "No. 277," the aircraft most
closely associated with Le Gloan. It was his personal mount for most of
his career, and carried a "6" as his lucky number. (The
MS.406 in which he scored his first victory did as well). The kit decals
give you the option of showing No. 277 in Battle of France livery without the
long white arrow and the white border to the French roundel on the fuselage, and
sans the French tricolor "ace" markings on the after fuselage that
bisect the number 6. However, I opted for these early Vichy markings
because they are more colorful and bring to mind Le Gloan's later combat
history. The model as completed shows No. 277 in June 1940, after the
Armistice with Nazi Germany, and before Vichy aircraft carried still more
colorful markings on nose and tail.
Click on
images below to see larger images
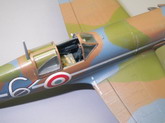
I started with the cockpit,
of course. The first question was the cockpit color. The Tamiya
instructions specify a dark grey, but online research suggested something called
French night black. There's an Aeromaster paint of this color available,
but I settled on Tamiya's non-specular USN dark sea blue after reading a source
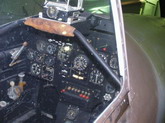
that said this color was close. Plus, the D.520 on display at Le
Bourget in Le Gloan's No. 277 markings showed a dark black cockpit (see the
picture above on the left) and that was good enough for me. Note, however, that photos
of the real aircraft show a light color aft of the pilot's seat armor plate,
where the rear windows are, These I painted a medium grey.
The kit was not built OOB.
I added the plain brass Eduard D.520 Zoom set for the cockpit, or at least
most of it. It's a definite enhancement but it's hard to see all the
detail, especially on the sidewalls. There are other aftermarket products
for this kit, but they are hard to find. There's an OOP
"Hi-Tech" resin cockpit set from France that features a deeper, wider
belly radiator, which is supposedly more accurate. I couldn't find one
anywhere. By happenstance I ran across a Pend-Orielle resin set of D.520
flight control surfaces, but frankly they were more trouble than they were
worth, at least at my skill level. After fiddling with them for a while I
opted for the kit parts.
The basic kit construction was straightforward, but Tamiya's
extended flap parts are annoying if you want them raised like I did. You
have to cut the hinges off and position them carefully, then firmly hold them in
place till the crazy glue sets. Even then they aren't a snug fit where the
edges join the fuselage. On one of them I had to add some sheet styrene on
the edge to eliminate a noticable gap. Other than that, nuts-and-bolts
construction presented no major problems, and was completed with some coats of
Gunge "Mr. Surfacer 1000" sprayed from a can. That is a product
I'm coming to like very much.
Painting the final
exterior colors was a challenge, both in terms of research and application. This
is an area where even 60+ years after WWII the sources on French camouflage
colors disagree about hues, and where most everybody agrees that camouflage
patterns on upper surfaces followed no set pattern. So, one is left with
educated guesswork from indistinct photos about the camouflage scheme for a
particular subject, and a number of paint choices. As for the colors. I
still have usable Humbrol enamel tins that have a dark French chocolate
brown and a dark, somewhat jarring green, but ultimately I settled on Testor's
"PolyScale" brand water-based paints. The lower
surface French light blue-grey is well represented by the Polyscale paint IMO,
as is the French dark blue-grey for the upper surfaces. Their French
"Khaki" (medium green, not tan) looked attractive to me, as did
their earth color, so these were the colors I used.
I've had trouble
spraying PolyScale before, but these paints went on well after thinning with a
few drops of distilled water. Unfortunately, they also came OFF in a few
places when I masked the upper fuselage using drafter's tape, even though
it was old and not very tacky. This resulted in a lot of light sanding,
polishing (and cursing) as I corrected discontinunities in the surface finish.
Maybe for my next French WWII kit I'll try the old Humbrol paints for the greens
and browns.
The actual
camouflage pattern for Le Gloan's No. 277 is elusive. Different photos
show different patterns of the topside colors at different times, so I imagine
the aircraft was periodically touched up to repair damage and wear.
For ease of painting I went ahead and masked the airframe using
the pattern shown on the 1/48th drawings that Tamiya helpfully provides in the
kit. These DO NOT replicate the pattern shown on the box art (taken from a
good in-flight photo of the airplane) but using the drawings makes masking
the complex camo scheme much easier. What I did was make photocopies of
the drawings. Then I placed the top and side drawings over glass and
put drafter's tape over the camo demarcation edges. I carefully
used a No. 11 blade to cut the tape strips to match the edges on the drawings
visible through the tape. I then pulled the cut strips of tape off
of the drawings and placed them over the corresponding areas on the kit.
This method yields great templates for the camouflage edges. The cut
tape strips work perfectly on the wings and tail, and let you get close on the
fuselage, where additional trimming and fitting is necessary for the curved
surfaces.
After the
basic paint job was done I used Tamiya clear gloss in a spray can to get a
high gloss sheen for the decal application. I used the kit decals for
everything except the national markings, because the red in the kit roundels and
rudder stripes is far too dark. Berna has a new D.520 sheet (BN4823) available
from Flightdecs in Canada http://flightdecs.ca/A_berna_48.htm and
I used these for the roundels. One caution, however: if you plan to use
the Vichy scheme DO NOT try to use the Berna fuselage roundels with Tamiya
white border decals. The Berna fuselage roundels are smaller than the
kit ones, and you'll get a gap between the outer red roundel edge and the inner
white border. Fortunately, there are two solid white circles on the
Berna sheet that you can use instead, after trimming the edges of a solid
white bar that goes through them.
The nastiest surprise in building
this kit was the tricolor rudder stripes. Even though the Berna
decals are the right colors, they don't come close to fitting. They are
too short in the vertical plane and aren't flexible enough for the
curved surfaces of the rudder, even if they were the right size. So, with
the model all painted and with most of the decals applied I had to try painting
the rudder stripes. What was I thinking?! I carefully masked
the vertical and horizontal stabilizers, and first applied the white middle
stripe using Tamiya white acrylic.
I then masked that off for painting of the blue and red stripes.
There is no Tamiya paint for the French national insignia blue, so I
searched through various paint bottles and found a near perfect match in
the PolyScale paint that replicates the
sun bleached blue-grey topsides on early WWII USN aircraft. The red
was standard Tamiya red acrylic, and that went on well. For once, there
was no disaster at the end of my build and the rest of the decaling went
smoothly.
Only after all this was done did I
add Moskit D.520 engine exhausts. I had to sand the edges that
press into the fuselage slots in order for them to fit. The set I got
had bright brass showing in spots, so I gave them a light coat of Testor's
"Burnt Iron" metalizer. The paint instructions say spray only,
but I've used all these metalizer paints with a small brush to pick out details
and had no problems at all.
The last part on the kit that's not
OOB is the pitot tube. The kit part is hopelessly delicate, and broke
at the first inadvertent touch after it was glued on and painted, I cut the
plastic "bare metal" end of the plastic part from the broken shaft, and
glued it to a hard wire I cut to size and crazy-glued in. It's inelegant
but sturdy.
I decided to give the kit a super
light coat of Promodeler brown wash, but did not thin the clay solution down
with a drop of soap to break the surface tension as the manufacturer recommends
for glossy surfaces. So, some of the wash dried in little brown circles, but
it looks close enough to spots of mud for me not to go all AMS over
the effect. I finished the model by
spraying Polyscale's flat finish overall. It's another product I always
use.
All
in all, I like the way the kit came out, and would definitely recommend it.
It's an unusual subject and looks quite exotic on the model shelf with my
collection. I'm inspired enough by the "French connection" that
I've now started a Hobbycraft Curtiss Hawk H-75 in the markings of another
famous French ace who didn't survive the war.
Brian
D. O'Neill
Click on
images below to see larger images
|
|