|
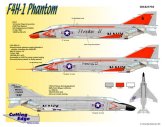
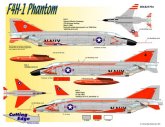
OK, what bits (OK, BIG
bits) do we give you to convert your Tamiya (1/32) and Hasegawa (1/48) F-4
kits back to the earliest Phantom II? Hold on to your hat, because these
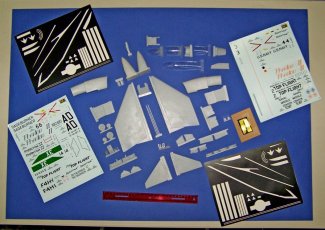
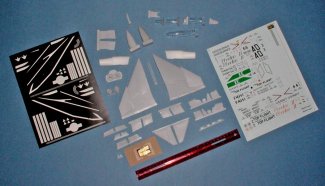
sets are gargantuan (check out the one foot (12") ruler shown in each
photo to get a feel for the size of each set)
If the ruler doesn't do it for you, let me tell you how I had to take
the photos below. The dark blue paper behind the parts is 30" x
40", and it's laying on top of a white-topped banquet table that's
36" wide and six feet long. I had to stand on a ladder to shoot
straight down on the parts, and still there's a little "fisheye"
in the photo. These sets are BIG.
Click on
images below to see larger images
As you can see, these sets are MAJOR airframe conversions for the 1/32
Tamiya F-4C/D (or F-4J; see below), and the 1/48 Hasegawa F-4J "new
tool" kit with engraved panel lines.
Notes on the Airframe Conversion
Parts
(1/32 parts are described, but the
1/48 parts are similar, only they fit the Hasegawa kit)
Click on
image below to see larger image
We're especially proud of the clear canopies we've included in these
sets. I had samples of the cast canopies with me during my very short
visit to the IPMS-USA national convention last year, and a handful of
people were able to see the parts. I apologize for not recalling everyone
who was in the gaggle when I was showing them off, but I specifically
recall Dr. Frank Mitchell and Ed Kinney as being two of them. I'm certain
Frank and Ed will verify the quality of the castings--folks remarked that
they were better than most injection molded kit canopies!
You're probably already aware of our very popular 1/32 F-4B/N Airframe
Conversion sets that we released a couple of months ago. You might be
asking, "What's the difference between those sets and this F4H-1
set?" Well, plenty!
I'll discuss this in more detail below, but in a nutshell, the nose is
completely different, the canopy is completely different, the
"flat" wing tops do NOT include the bulged stiffener over the
main landing gear attachment points (neither did the early F-4Bs, but
that's a different story), the intakes were quite different on the first
few aircraft, and the spoilers were perforated on the first few aircraft.
Let's step through some of these characteristics.
Order the 1/32 scale F4H-1 Conversion
here.
Order the 1/48 scale F4H-1 Conversion here.
The
"Flat" Wing
As you already know, the wings of the F4H-1, like the F-4B/N, were
"flat" because of the thin main landing gear tires. From the
F-4C--on (as modeled in all versions of the 1/32 Tamiya F-4 kits), the
wider MLG tires required a substantial bulge in both the top and bottom
surfaces of the wings to accommodate the larger tires. The underside
bulges extend across the lower wing surface and continue onto the main
landing gear doors and the speed brakes.
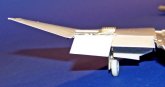
Your Cutting Edge F4H-1 Airframe Conversion Set includes completely new
cast resin inboard top wings. These are not merely Tamiya parts with the
bulge removed, but completely new wing tops that we created to precisely
fit the Tamiya lower wing part.
This is both good news and not good news (see below). To prevent
shrinkage on such large parts, we have had to implement special (and
time-consuming, and expensive) processes and procedures to ensure you
receive a resin wing part that fits right every time. We've worked very
hard to make this work right for you, and frankly, we're pretty proud of
the results.
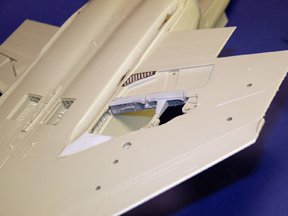
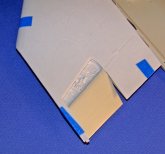
Our conversion set also provides you with detailed, "flat"
doors for the MLG and speed brakes, and "flat" resin insert
parts for the most difficult bulged areas of the bottom wing itself. You
can see from the photo below that these are straightforward to install, as
you cut along existing Tamiya panel lines.
Note, however, there is only a small bulged area of the lower wing just
aft and inboard of the speed brake well on each side that we do NOT
provide a replacement part for (see the hatched area in the photo above).
Why? It's not very "humped" to begin with and I decided it was
actually less work for you to sand this area flat than cut it out and
replace it with a resin insert. Again, this is the "hatched"
area in the photo.
I have confidence in your ability to handle this small area on your
own. We've taken care of the major problem areas; you are well able to fix
this one small area yourself.
The
Thin Wheels
We all know the F4H-1, again like the F-4B/N, had much thinner main
wheel tires than all subsequent Phantoms. Yes, we've given you these wheel
units, and also included separate resin nose wheels (in the 1/32
conversion only) since many of you do not like to use vinyl model tires.
I am very lucky to have a McDonnell Douglas technical document (thanks
to Dave Rider) giving exact tire sizes for the various Phantom versions.
Do you think we used it to get our F4H-1 tires the correct size? Duh!
Fuselage
- "Pointy" nose (with separate IR fairing)
- Fuselage/wing attachment fillers
- "Flat" canopy (open AND closed)
- "S" shaped intakes and fixed splitter plates
- Long nose pitot tube
- "Navy" style nose landing gear door
- Plain fin cap
Click on
image below to see larger image
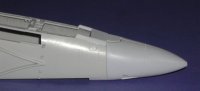
"Pointy"
Nose With Separate IR Fairing
The surefire method of
identifying a F4H-1 in photos is by the short, "pointy" nose.
This was very similar in shape to the F3H Demon, and wasn't changed
until partway through F4H-1 production (the various designations given
to the early F4H-1s can be very confusing and are outside the scope of
this letter; for an excellent discussion click here
and here).
This early nose housed the
24" APQ-50 (or APQ-72) radar dish. This smaller nose was fitted to
the Block 1 and Block 2 F4H-1s. The larger nose (typical from the F-4B
and on) containing the larger APQ-72 radar, with its 32" dish, was
fitted to Block 3 jets starting with BuNo 146817, which also had the
higher canopy. In fact, without seeing the BuNo data block, it can be
difficult to distinguish between Block 2 F4H-1s and the later F-4B.
We give you this short
nose, along with a very long nose pitot, the IR fairing later fitted to
some aircraft, and some small adapters that fit the new nose to the
Tamiya fuselage/wing. Note the cast nose has the original NACA style air
conditioning intakes as on the first two aircraft (142259 and 142260);
on subsequent jets an external intake was fitted. This external intake
was somewhat similar to the one fitted to the F-4B and later and is also
provided in your conversion set.
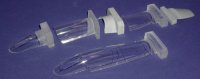
"Flat"
Canopy (Open AND Closed)
As I mentioned above,
we're extraordinarily proud of the clear canopies we're giving you in
these sets. Yes, I said "canopies," as in more than one
canopy!
The second most obvious
identification point for the F4H-1 is the "flat" canopy, which
was much lower than the one fitted to the F-4B and on. Now, I know you
probably build you models "canopy open," as do I.
However...when the F4H-1 canopy is open, it's not so obvious that the
canopy itself is considerably different from the later Phantom canopy.
So, you might prefer to
model this particular jet with the canopy closed to draw attention its
unusual shape. Do you know how hard it is, even with injection molded
kit canopies, to make a clean "closed" canopy from separate
canopy parts? Do you know how much a pain in the (you know) it is to cut
apart a "closed" canopy so you can display it open? I do!
That's why I'm giving you BOTH versions!
Click on
image below to see larger image
"S"
Shaped Intakes And Splitter Plates
The first seven F4H-1s
(all Block 1 aircraft) were produced with a beautiful "S"
shaped lip to the engine air intakes. In fact, this intake is a surefire
identification point for these first seven jets. Actually, all of these
aircraft were later fitted with the "standard" Phantom intakes
as seen on every other version of the jet, but for a while, they sported
truly elegant intakes.
We've provided you with
these intakes--and of course they are SEAMLESS! It's almost a shame to
build one of the later jets, or one of the retrofitted early planes,
because these intakes are so distinctive. But, there were some really
pretty later schemes, and I suspect you'll have difficulty deciding
exactly which one to do!
If you decided to build a
variant with the "standard" Phantom intakes, Cutting Edge has
produced a wonderful set of seamless intakes cast in white resin. They
are available separately in set CEC32183.
Click here
to see and order them.
Click on
images below to see larger images
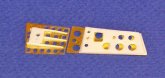
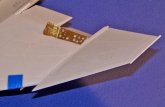
Early
Perforated Spoilers & Bays
One of the coolest
features of our new sets is the etched metal perforated spoilers as
fitted to the first seven Phantoms built (Block 1). It's pretty easy to
miss the fact that all Phantoms had spoilers near the outboard edge of
the wing just forward of the flaps. On aircraft #8 through the end of
Phantom production these spoilers were solid, they were perforated on
the first seven.
I'd seen these perforated
spoilers in photos for years, but I'd always assumed they were
"scab on" additions similar to the spoilers on the F3H Demon.
Not so.
I'm lucky enough to live
about 15 minutes from the US Marine Corps Air-Ground Museum (now called
the National Museum of the Marine Corps) located in Quantico, Virginia.
They have the number three F4H-1 (BuNo 143388) in their collection,
although after decades of outside storage the aircraft is in truly
terrible condition.
Anyway, I was able to
photograph and measure the perforated spoilers on that bird a couple of
years ago. This spoiler assembly is essentially exactly as on later
Phantoms, but with a perforated aerodynamic plate. I was able to
precisely measure each of the holes and their exact locations, so our
etched metal parts are true scale!
The three pieces that
make up each spoiler and bay give multiple levels of bas-relief
regardless of whether you model them stowed (down) or raised. Frankly, I
think you'll find them too cool to glue on in the down position!
Order the 1/32 scale
F4H-1 Conversion here.
Order the 1/48 scale F4H-1 Conversion here.
Special
FREE bonus
included with the Cutting Edge F4H-1 Airframe
Basic Conversion Set!
(1/32 only; not required for the 1/48
Hasegawa F-4 kit!)
- Rear fuselage vents above nozzles
Another part I'm throwing in as a Special
FREE BONUS with this basic conversion set, since they
are NOT purely and specifically part of the F4H-1 conversion, corrects
the small vent on each side just above the exhaust nozzles. Please note
that these vents need to be
corrected on ALL Tamiya F-4 kits, regardless of the version.
We've known from the first day the Tamiya
kit hit the street that these vents were the wrong size, shape, angle,
and location. Interestingly, Revell got the size, angle, and shape right
on in their 1/32 F-4 series, and was off the correct location by only
about three scale inches, which is no big deal (if you're building a
Revell kit, of course, which has other problems).
Click on
images below to see larger images
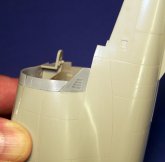
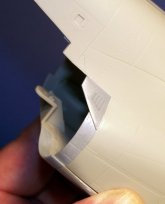
We've corrected
these vent panels for the Tamiya kit and are providing you as a Special
FREE BONUS with new, triangular
resin inserts that fit along existing panel lines in the Tamiya kit.
Here's a photo that shows one of the panels in place (along with the
rear fuselage extension parts needed only when you start from the F-4J
and included in set CEC32187).
At this point, we do NOT
plan to release these small but important parts as a separate set.
Wings
- Catapult hooks and
bays (for the Tamiya F-4C/D basis kit)
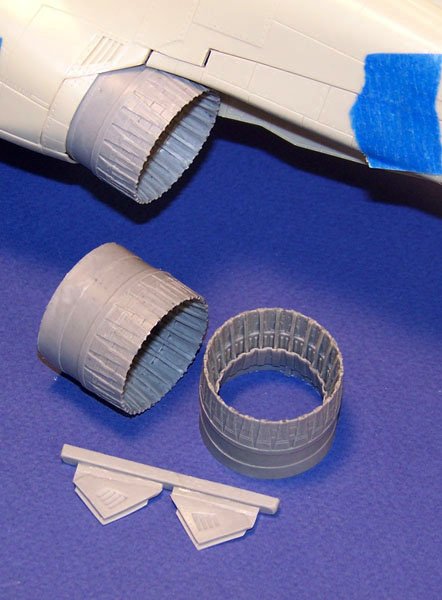
- Rear lower
wing/fuselage extensions for the J79-GE-8 nozzles
The Tamiya F-4J lower
wing and rear fuselage is designed to accept the later, larger-diameter
J79-GE-10 engine nozzles, so to properly fit the earlier J79-GE-2
nozzles you'll need to extend the lower wing and fuselage sides in this
area.
No big deal. Our resin
parts easily and quickly solve this problem. You don't even have to make
any cuts on the fuselage, although you've got four simple cuts along
existing panel lines on the lower wing part.
Luckily, all the wing
conversion parts we give you in this set are extremely easy to build,
and in fact are direct replacements for existing kit parts.
Fuselage
- Unslotted
stabilators without reinforcing plates
- Drag chute door
- Nose gear main door
& clear resin lights
Most of these fuselage
conversion parts are extremely easy to build, and as with the wing
conversion parts, are direct replacements for existing kit parts.
The only difficult
conversion parts, and they're only moderately difficult, are the Slotted
Stabilators. As originally built, up through Block 25, the F-4B had
Unslotted Stabilators, and these are included in the Tamiya F-4C/D kit
and may be used as-is (except for removing the stiffener and battle
damage repair plates). Note that Block 26 and higher F-4Bs left the
factory with Slotted Stabilators.
However, late in its
service life nearly all Block 25 and earlier F-4Bs received Slotted
Stabilators to significantly reduce landing approach speeds-a very
important issue during carrier landings. All F-4Ns had the Slotted
Stabilators (as did, of course, all F-4Js).
If you're starting from
the Tamiya F-4J kit with the slotted stabilators, you'll need to remove
the existing Tamiya kit stabilators from their mounting/rotation
structure and glue the Unslotted Stabilators in their place. (BTW, I
recommend you use 5-Minute Epoxy for this procedure rather than
superglue).
"The Issue
Of The
F4H-1/F-4B/C/D/N Engine Nozzles"
We've recently released a
separate set of superdetailed J79-GE-8 (similar to J79-GE-2) engine
nozzles for the F4H-1, F-4B, F-4C, F-4D, and F-4N. As noted, we have not
included these nozzles in our F4H-1 conversion set because nearly all of
you who responded to our F-4 survey told us you didn't want to buy any
more parts than you actually need to build your model from whichever
Tamiya F-4 kit you choose to use as the basis of your conversion.
|