|
Ok…
back to the landing gear.
See
photos 03 and 04
Next
I glued on the pieces required to complete the landing gear. Here you want to
test fit the gear against the doors before you leave it to dry. I drop a little
Tamiya Thin on the parts then position them on the doors. When I’m satisfied
they’re fairly close to the correct position, I let them dry overnight.
See
photos 05,
06 and 07
Paint
them; add the doors and you’re pretty much done. Run a sanding stick on the
sides of the nubs just enough to clean them up a little. This cuts down on the
amount of forcing you sometimes have to do to insert the landing gear, but also
gives you a little wiggle room so they are positioned straight and even.
See
photos 08, 09 and 10
Click on
images below to see larger images
|

|
|

|
|

|
|

|
|
Photo
03 |
|
Photo
04 |
|
Photo
05 |
|
Photo
06 |
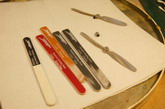
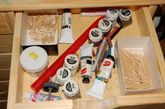
Ok,
because I need a break, I’m going to take some time to highlight some of the
crap on my bench used during builds. I really don’t know where to start with
this ‘cause man… there is a lot of stuff. I think I will refrain from
commenting on anything in any detail. However, if you have any questions
regarding some of it send me a PM and I’ll try to get back to you with an
explanation. Let’s look at some of the stuff on the bench…
See
photos 11 thru 39
Alright,
let’s paint a little…
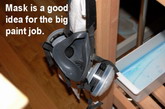
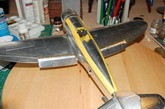
Pull
out the Tamiya tape (just use Tamiya don’t fight it), we’re going to mask
off the top of the fuselage to receive the paint that cut’s the glare of the
metal for the pilot. I have applied the tape by eye, yes eye, getting as even
side-to-side as I can. See picture.
See
photos 40,
41 and 42
Then
with the help of Blu-tac, I start covering up the cockpit area so it doesn’t
get any overspray in it. Add some tape to cover up the rest and that step is
done. As you may have noticed, I tend to re-use tape I’ve saved from other
masking needs during the build. This is due to the fact Tamiya tape is just darn
expensive.
See
photos 43,
44, 45 and 46
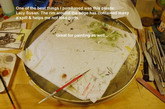
Now
use paper towel (buy the paper towel that comes in half sheets), and tape it
along the first Tamiya tape line to cover the rest of the kit for overspray
protection. If you want to prevent bleed through (meaning sometimes when you
paint along a taped edge, the paint will seep underneath it so when you remove
it, there won’t be the nice straight line you were going for), then take some
flat clear coat and brush it down the edge of the tape. This will prevent the
paint from seeping under it. Then get out that trusty airbrush and spray away. I
remove masking as soon as possible, the faster the better. This means less
chance of lifting the off the paint at the edge of the tape, particularly on
foil.
See
photos 47 thru 53
Larry Shred
Click on
images below to see larger images
|

|
|

|
|

|
|

|
|
Photo 07 |
|
Photo 08
|
|
Photo 09 |
|
Photo 10 |
|
. |
|
.
|
|
. |
|
. |
|
Photo 11 |
|
Photo 12
|
|
Photo 13 |
|
Photo 14 |
|
. |
|
.
|
|
. |
|
. |
|

|
|

|
|

|
|

|
|
Photo 15 |
|
Photo 16
|
|
Photo 17 |
|
Photo 18 |
|
. |
|
.
|
|
. |
|
. |
|

|
|

|
|

|
|

|
|
Photo 19 |
|
Photo 20
|
|
Photo 21 |
|
Photo 22 |
|
. |
|
.
|
|
. |
|
. |
|

|
|

|
|
|
|

|
|
Photo 23 |
|
Photo 24
|
|
Photo 25 |
|
Photo 26 |
|
. |
|
.
|
|
. |
|
. |
|

|
|

|
|

|
|

|
|
Photo 27 |
|
Photo 28
|
|
Photo 29 |
|
Photo 30 |
|
. |
|
.
|
|
. |
|
. |
|

|
|

|
|

|
|

|
|
Photo 31 |
|
Photo 32
|
|
Photo 33 |
|
Photo 34 |
|
. |
|
.
|
|
. |
|
. |
|

|
|
|
|

|
|

|
|
Photo 35 |
|
Photo 36
|
|
Photo 37 |
|
Photo 38 |
|
. |
|
.
|
|
. |
|
. |
|
|
|

|
|
|
|

|
|
Photo 39 |
|
Photo 40
|
|
Photo 41 |
|
Photo 42 |
|
. |
|
.
|
|
. |
|
. |
|

|
|

|
|

|
|

|
|
Photo 43 |
|
Photo 44
|
|
Photo 45 |
|
Photo 46 |
|
. |
|
.
|
|
. |
|
. |
|

|
|

|
|

|
|

|
|
Photo 47 |
|
Photo 48
|
|
Photo 49 |
|
Photo 50 |
|
. |
|
.
|
|
. |
|
. |
|

|
|

|
|

|
|
Photo 51 |
|
Photo 52 |
|
Photo 53 |
|